Pioneer 310-S Owner's Manual - Page 18
Connecting up, Connecting other AV sources, Plugging - dv dvd
 |
UPC - 012562656816
View all Pioneer 310-S manuals
Add to My Manuals
Save this manual to your list of manuals |
Page 18 highlights
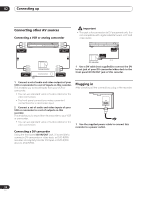
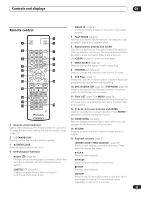
02 Connecting up Connecting other AV sources Connecting a VCR or analog camcorder Important • This jack is for connection to DV equipment only. It is not compatible with digital satellite tuners or D-VHS video decks. AUDIO/VIDEO OUTPUT 2 ì VIDEO/R/RW AUDIO/VIDEO INPUT 1 Analog camcorder AUDIO/VIDEO INPUT VCR AUDIO/VIDEO OUTPUT 1 Connect a set of audio and video outputs of your VCR or camcorder to a set of inputs on this recorder. This enables you to record tapes from your VCR or camcorder. • You can use standard video or S-video cables for the video connection. • The front panel connections make convenient connections for a camcorder input. 2 Connect a set of audio and video inputs of your VCR or camcorder to a set of outputs on this recorder. This enables you to record from this recorder to your VCR or camcorder. • You can use standard video or S-video cables for the video connection. Connecting a DV camcorder Using the front panel DV IN/OUT jack, it is possible to connect a DV camcorder or video deck, or DVD-R/RW recorder and digitally transfer DV tapes or DVD-R/RW discs to DVD-R/RW. VIDEO/R/RW DV IN/OUT ì DV IN/OUT DV camcorder 1 Use a DV cable (not supplied) to connect the DV in/out jack of your DV camcorder/video deck to the front panel DV IN/OUT jack of this recorder. Plugging in After checking all the connections, plug in the recorder. AC IN 1 Use the supplied power cable to connect this recorder to a power outlet. 18 En
-
 1
1 -
2
-
3
-
4
-
5
-
6
-
7
-
8
-
9
-
10
-
11
-
12
-
 13
13 -
 14
14 -
 15
15 -
 16
16 -
 17
17 -
 18
18 -
 19
19 -
 20
20 -
 21
21 -
 22
22 -
 23
23 -
24
-
25
-
26
-
27
-
28
-
29
-
30
-
31
-
32
-
33
-
34
-
35
-
36
-
37
-
38
-
39
-
40
-
41
-
42
-
43
-
44
-
45
-
46
-
47
-
48
-
49
-
50
-
51
-
52
-
53
-
54
-
55
-
56
-
57
-
58
-
59
-
60
-
61
-
62
-
63
-
64
-
65
-
66
-
67
-
68
-
69
-
70
-
71
-
72
-
73
-
74
-
75
-
76
-
77
-
78
-
79
-
80
-
81
-
82
-
83
-
84
-
85
-
86
-
87
-
88
-
89
-
90
-
91
-
92
-
93
-
94
-
95
-
96
-
97
-
98
-
99
-
100
 |
 |
