Pioneer AVX-7000 Manual
Pioneer AVX-7000 Manual
 |
View all Pioneer AVX-7000 manuals
Add to My Manuals
Save this manual to your list of manuals |
Pioneer AVX-7000 manual content summary:
- Pioneer AVX-7000 | Manual - Page 1
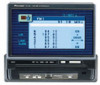
7 INCH WIDE AV SYSTEM DISPLAY Manual AVX-7000 - Pioneer AVX-7000 | Manual - Page 2
-mount 4 Connecting the Units 5 About the V.SEL cable 5 Connection Diagram 6 Connecting the Power Cord 6 Connecting the System (A 7 Connecting the System (B 8 Important Information 9 About This Product 9 Precaution 9 In Case of Trouble 9 Important Safeguard 10 Key Finder 11 This product - Pioneer AVX-7000 | Manual - Page 3
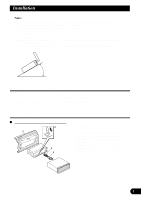
this product, connect the wiring temporarily, making sure it is all connected up properly, and this product and the system work properly. • Use only the parts included with this product to ensure proper installation. The use of unauthorized parts can cause malfunctions. • Consult with your - Pioneer AVX-7000 | Manual - Page 4
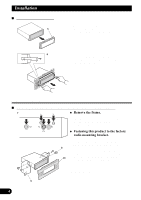
in the figure, until they click into place. Keeping the keys pressed against the sides of the unit, pull the unit out. DIN Rear-mount Installation using the screw holes on the side of this product. 7 * * 5. Frame Pull out to remove the frame. (When reattaching the frame, point the side - Pioneer AVX-7000 | Manual - Page 5
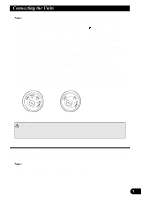
beginning installation. • Refer to the owner's manual for details on connecting the power amp and other products, then make connections correctly. • Secure the wiring with cable clamps or adhesive tape. To protect the wiring, wrap adhesive tape around them where they lie against metal parts. • Route - Pioneer AVX-7000 | Manual - Page 6
• This product conforms to new cord colors. This Product Yellow To terminal always supplied with power regardless of ignition switch position. Fuse holder Red To electric terminal controlled by ignition switch (12 V DC) ON/OFF. Fuse resistor Orange To lighting switch terminal. Fuse resistor - Pioneer AVX-7000 | Manual - Page 7
Connecting the System (A) Speaker Unit (supplied) Navigation System (sold separately) This Product 3 m Not Used. 15 cm Gray 3m RGB cable (supplied) 50 cm Green Gray - Pioneer AVX-7000 | Manual - Page 8
Connecting the System (B) Navigation System (sold separately) Green Gray Green Audio Visual Master Unit (sold separately) RGB cable (supplied with the Audio Visual V.SEL cable Master Unit) (supplied) 6m Gray This Product t 3m Speaker Unit (supplied) 15 cm Blue Multi-CD player (sold - Pioneer AVX-7000 | Manual - Page 9
manual handy as a reference for operating procedures and precautions. • Always keep the volume low enough for outside sounds to be audible. • Protect this product from moisture. In Case of Trouble Should this product fail to operate properly, contact your dealer or nearest authorized PIONEER Service - Pioneer AVX-7000 | Manual - Page 10
please park safely before making adjustments. 7. Do not attempt to install or service your display by yourself. Installation or servicing of the display by persons without training and experience in electronic equipment and automotive accessories may be dangerous and could expose you to the risk of - Pioneer AVX-7000 | Manual - Page 11
This Product The following diagram shows the display when it is deployed. Display Wide mode indicators DIM button BRIGHTNESS button Release Section RESET button WIDE button ANGLE button Signal Receptor OPEN/CLOSE button • Use the remote control products for the AUDIO VISUAL MASTER UNIT by - Pioneer AVX-7000 | Manual - Page 12
to Adjust Picture Brightness Although the angle at which the LCD can be positioned and viewed clearly is limited because of under the following conditions: - When using this product for the first time after installation. - When the machine fails to operate properly. - When strange (incorrect) messages - Pioneer AVX-7000 | Manual - Page 13
ON again (or turned to ACC), the display will be deployed automatically. * When using an AUDIO VISUAL MASTER UNIT, turning the power of either of these on will deploy the display automatically. * Installing the front panel will automatically deploy the display. (Refer to page 16.) • The automatic - Pioneer AVX-7000 | Manual - Page 14
Screen Angle Adjustment The angle of this product's screen continues changing as long as you keep pressing the ANGLE button. • If you can hear the display knocking against your vehicle's console or dashboard, press the ANGLE button on the (-) side to move the screen a little forward. • When - Pioneer AVX-7000 | Manual - Page 15
Closing the Display The display will be automatically closed by the automatic close/open mode. If the display does not close automatically, press the OPEN/CLOSE button. • When closing the display, check to make sure that it has closed completely. If the display has stopped halfway, leaving it like - Pioneer AVX-7000 | Manual - Page 16
the screen's brightness. Switching the Auto-Dimmer Mode This function is used to automatically adjust LCD brightness according to the ambient brightness in order to always maintain proper LCD visibility. Hold for 2 seconds Selected wide mode Repeat the preceding operation to switch the Auto - Pioneer AVX-7000 | Manual - Page 17
since its proportions are the same as that of the normal picture. • Different settings can be memorized for each picture. • Some displays (e.g. the AUDIO VISUAL MASTER UNIT source display) are always indicated as FULL irrespective of the setting of this mode. In this case, pressing the WIDE button - Pioneer AVX-7000 | Manual - Page 18
Canceling the Automatic Close/Open Mode To prevent the display from hitting the shift lever of an automatic vehicle when it is in the "P" (park) position, or when you do not wish opening/closing of the display to be carried out automatically, please cancel the automatic close/open mode. The - Pioneer AVX-7000 | Manual - Page 19
Switching the Illumination Color This product is equipped with two illumination colors, green and red.You can select the desired illumination color. Hold for 2 seconds Repeat the preceding operation to switch to the previous color. - Pioneer AVX-7000 | Manual - Page 20
is being detached. • Take care not to grip it too tightly or drop it. Replacing the Front Panel Align the groove on the bottom of the front panel with the guide on the main body, and clip in. • When replacing the front panel, avoid pressing any of the buttons. • Avoid subjecting the front - Pioneer AVX-7000 | Manual - Page 21
signs from the display, turn OFF the power immediately and consult your dealer or the nearest authorized PIONEER Service Station. Using the product in this condition to the LCD screen. When not using this product, close the display and avoid exposing it to direct sunlight as much as possible. - Pioneer AVX-7000 | Manual - Page 22
white dots (bright dots) may appear on the LCD screen. These are due to the characteristics of the LCD screen and do not indicate a problem with the display. • At low temperatures, the LCD screen may be dark for a while after the power is turned ON. • The LCD screen will be difficult to see if it is - Pioneer AVX-7000 | Manual - Page 23
General Power source 14.4 V DC (10.8 - 15.1 V allowable) Grounding system Negative type Max. current consumption 2.0 A Dimensions (DIN) (mounting size) ......... 178 (W) × 50 (H) × 160 (D) mm (front face 188 (W) × 58 (H) × - Pioneer AVX-7000 | Manual - Page 24
DE MEXICO, S.A. de C.V. San Lorenzo Num 1009 3er piso Desp. 302 Col. Del Valle, Mexico D.F. C.P. 03100 TEL: 5-688-52-90 Published by Pioneer Electronic Corporation. Copyright © 1999 by Pioneer Electronic Corporation. All rights reserved. Printed in Belgium MAN-AVX-7000-GB/B
-
 1
1 -
 2
2 -
 3
3 -
 4
4 -
 5
5 -
 6
6 -
 7
7 -
8
-
9
-
10
-
11
-
12
-
13
-
14
-
15
-
16
-
17
-
18
-
19
-
20
-
21
-
22
-
23
-
24
 |
 |

7 INCH WIDE AV SYSTEM DISPLAY
Manual
AVX-7000