Pioneer BDP-121 Owner's Manual - Page 42
Communication Setup
 |
View all Pioneer BDP-121 manuals
Add to My Manuals
Save this manual to your list of manuals |
Page 42 highlights
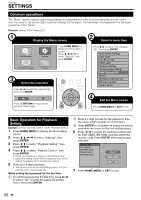
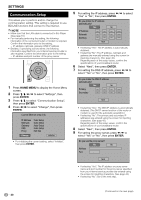
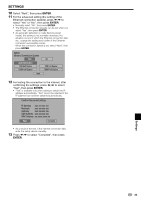
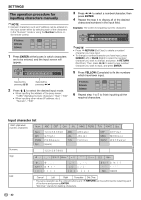
SETTINGS Communication Setup This allows you to perform and/or change the communication setting. This setting is required to use BD-LIVE functions that connect to the internet. NOTE • Make sure that the LAN cable is connected to this Player. (See page 18.) • For manually performing the setting, the following information of the connected router or modem is required. Confirm the information prior to the setting. − IP address, netmask, gateway, DNS IP address • Besides, if specifying a proxy server, the following information specified from your internet service provider is also required. Confirm the information prior to the setting. − IP address and port number of the proxy server 1 Press HOME MENU to display the Home Menu screen. 2 Press to select "Settings", then press ENTER. 3 Press to select "Communication Setup", then press ENTER. 4 Press to select "Change", then press ENTER. Current Ethernet setup info. IP Address : Auto Setup Netmask : Auto Setup Gateway : Auto Setup DNS : Auto Setup Proxy : Not Use Change Initialize • For initializing the current setting, select "Initialize", then press ENTER. 5 For setting the IP address, press to select "Yes" or "No", then press ENTER. Do you obtain the IP address automatically? Yes No IP Address Netmask Gateway Next • If selecting "Yes": The IP address is automatically obtained. • If selecting "No": The IP address, netmask and gateway are manually entered using the screen for inputting characters. (See page 42.) Regarding each of the setup values, confirm the specifications of your broadband router. 6 Select "Next", then press ENTER. 7 For setting the DNS IP address, press to select "Yes" or "No", then press ENTER. Do you obtain the DNS IP address automatically? Yes No Primary Secondary Next • If selecting "Yes": The DNS IP address is automatically obtained. (The DHCP server function of the router or modem is used for the automatic acquisition.) • If selecting "No": The primary and secondary IP addresses are entered using the screen for inputting characters. (See page 42.) Regarding each of the setup values, confirm the specifications of your broadband router. 8 Select "Next", then press ENTER. 9 For setting the proxy server, press to select "Yes" or "No", then press ENTER. Do you use the proxy server? Yes No Address Port Next • If selecting "Yes": The IP address or proxy server name and port number for the proxy server specified from your internet service provider are entered using the screen for inputting characters. (See page 42.) • If selecting "No": Go to the next step. (Continued on the next page) 40
-
 1
1 -
2
-
3
-
4
-
5
-
6
-
7
-
8
-
9
-
10
-
11
-
12
-
13
-
14
-
15
-
16
-
17
-
18
-
19
-
20
-
21
-
22
-
23
-
24
-
25
-
26
-
27
-
28
-
29
-
30
-
31
-
32
-
33
-
34
-
35
-
36
-
 37
37 -
 38
38 -
 39
39 -
 40
40 -
 41
41 -
 42
42 -
 43
43 -
 44
44 -
 45
45 -
 46
46 -
 47
47 -
48
-
49
-
50
-
51
-
52
-
53
-
54
-
55
-
56
-
57
-
58
-
59
-
60
-
61
-
62
-
63
-
64
-
65
-
66
-
67
-
68
-
69
-
70
-
71
-
72
-
73
-
74
-
75
-
76
-
77
-
78
-
79
-
80
-
81
-
82
-
83
-
84
-
85
-
86
-
87
-
88
-
89
-
90
-
91
-
92
-
93
-
94
-
95
-
96
-
97
-
98
-
99
-
100
-
101
-
102
-
103
-
104
-
105
-
106
-
107
 |
 |
