Pioneer BDP-41FD Owner's Manual - Page 23
The operation procedure for, inputting characters manually
 |
UPC - 884938127899
View all Pioneer BDP-41FD manuals
Add to My Manuals
Save this manual to your list of manuals |
Page 23 highlights
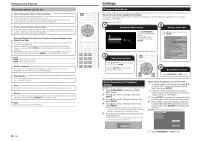
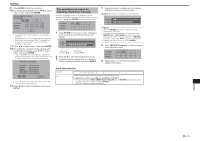
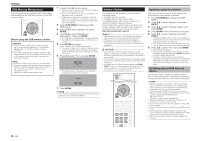
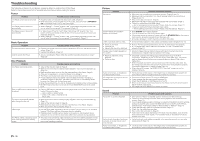
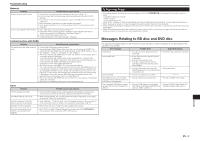
Settings 9 Press ENTER to test the connection. 10 For setting the IP address, press to select "Yes" or "No", then press ENTER. Do you obtain the IP address automatically? Yes No IP Address Netmask Gateway Next • If selecting "Yes": The IP address is automatically obtained. • If selecting "No": The IP address, netmask, gateway and primary and secondary DNS IP addresses are manually entered using the screen for inputting characters. (See right.) 11 Press to select "Next", then press ENTER. 12 For testing the connection to the internet, after confirming the settings, press to select "Test", then press ENTER. • "Test" is available only when setting to obtain the IP address automatically. "Test" cannot be selected if the IP address has not been obtained automatically. Confirm the current setting. IP Address : xxx xxx xxx xxx Netmask : xxx xxx xxx xxx Gateway : xxx xxx xxx xxx DNS Address : xxx xxx xxx xxx MAC Address : xx:xx:xx:xx:xx:xx Test Complete • As a result of the test, if the internet connection fails, enter the setup values manually. 13 Press to select "Complete", then press ENTER. The operation procedure for inputting characters manually Numeric characters such as IP address can be entered on the input screen using the number buttons (0 to 9) or and ENTER on the remote control. IP Address 123 Netmask Gateway 1 Press ENTER at the boxes in which characters are to be entered, and the input screen will appear. Numeric Edit 1234567890 Selected by pressing Selected by pressing 2 Press to select the desired input mode. 3 Press the number buttons (0 to 9) or to select a number/character, then press ENTER. 4 Repeat the step 3 to display all of the desired characters/numbers in the input field. Example: The screen for inputting numeric characters Numeric 123 Edit 1234567890 NOTE • Press RETURN (Del.Char.) to delete a number/ character you have input. • To change a number/character you have input, press GREEN (Left) or BLUE (Right) to select the number/ character you want to change, and press RETURN (Del.Char.). Then, press to select a new number/ character you want to input, and press ENTER. 5 Press YELLOW (Complete) to fix the numbers which have been input. IP Address 123 Netmask Gateway 6 Repeat step 1 to 5 to finish inputting all the required characters. Input character list Numeric 1 2 3 4 5 6 7 8 9 0 Edit Cancel Left Right Complete Del.Char. * The same operation as RED, GREEN, BLUE, YELLOW and selecting each of the items and pressing ENTER. "Del.Char." stands for deleting characters. RETURN can be performed by Settings 23
-
 1
1 -
2
-
3
-
4
-
5
-
6
-
7
-
8
-
9
-
10
-
11
-
12
-
13
-
14
-
15
-
16
-
17
-
 18
18 -
 19
19 -
 20
20 -
 21
21 -
 22
22 -
 23
23 -
 24
24 -
 25
25 -
 26
26 -
 27
27 -
 28
28 -
29
-
30
-
31
-
32
-
33
-
34
-
35
-
36
-
37
-
38
-
39
-
40
-
41
-
42
-
43
-
44
-
45
-
46
-
47
-
48
-
49
-
50
-
51
-
52
-
53
-
54
-
55
-
56
-
57
-
58
-
59
-
60
-
61
-
62
-
63
-
64
-
65
-
66
-
67
-
68
 |
 |
