Pioneer CDX-P686 Owner's Manual
Pioneer CDX-P686 - Premier CD Changer Manual
 |
UPC - 012562620497
View all Pioneer CDX-P686 manuals
Add to My Manuals
Save this manual to your list of manuals |
Pioneer CDX-P686 manual content summary:
- Pioneer CDX-P686 | Owner's Manual - Page 1
DISC PLAYER COMPACT DISC POUR MULTI-LECTURE CDX-P686 Owner's Manual Mode d'emploi UC This product conforms to CEMA cord colors. Le code de couleur des câbles utilisé pour ce produit est conforme à CEMA. Precautions/Précautions English Français Information - Pioneer CDX-P686 | Owner's Manual - Page 2
Information vis avant d'installer le lecteur. Conservez problem. If the error is displayed even after corrective action is taken, contact your dealer or the nearest authorized PIONEER Service Station. E: Error number C: Cause T: Treatment E: 11, 12, 14, 17, 30 C: The disc is dirty. T: Clean the disc - Pioneer CDX-P686 | Owner's Manual - Page 3
another product, refer to the supplied Installation manuals of both products and connect cords battery (-) cable before beginning installation. • Check whether installation and wiring have been disc player does not operate when the button on the multi-CD controller is pressed, or if the multi-CD - Pioneer CDX-P686 | Owner's Manual - Page 4
the vehicle. • Before finally installing the unit, connect the wiring temporarily and make sure it is all connected up properly and the unit and the system work properly. • Use only the parts included with the unit to ensure proper installation. The use of unauthorized parts can cause malfunctions
-
 1
1 -
 2
2 -
 3
3 -
 4
4
 |
 |

Precautions when handling magazines
•
Do not put the magazine in a place where it will be exposed to
high temperatures or direct sunlight.
•
Do not disassemble the magazine.
•
Take care not to drop the magazine or knock it against anything.
•
Do not use cracked or warped trays.
•
Never insert anything other than discs. Do not attach a label or
tape to a disc.
•
The use of benzine, thinner, insecticide, or other volatile chemi-
cals may damage the magazine surface.
Extra magazines
If you need more magazines, please ask your nearest dealer for
magazine JD-612V.
Attaching the label
Attach the supplied label in the specified position. Attaching the
label in an incorrect place or attaching more than one label will
cause malfunction.
Inserting discs
•
Be sure to remove the disc before changing a disc tray.
•
If the tray is not aligned with the right and left grooves, it cannot
be pushed to the end. Do not bend or force the tray.
•
Always load 6 trays in a magazine to prevent loss or warping of
trays.
•
If you load a disc with the label generally printed in black facing
down, not only will the player not be able to recognize whether
the disc is set or not, but also, if you have a multi-CD controller,
the controller will not display an error message to let you know
about it. So make sure all the discs in each magazine have their
label sides facing up.
Loading and removing the magazine
•
Do not put your fingers in the magazine tray as this may lead to
incorrect operation and damage to the player.
•
If the label on the magazine is coming off or wrinkled up, it may
damage the eject mechanism, and in some cases, the magazine
may not be ejected. Therefore, remove a damaged label com-
pletely before use.
•
Never leave the door open while playing discs. The entry of dirt,
dust, or any other foreign matter into the player may cause it to
fail.
Précautions relatives au maniement des chargeurs
•
Ne conservez pas les chargeurs dans un endroit o
ù
ils seront expos
é
s
à
la lumi
è
re directe du soleil, ou
à
une temp
é
rature excessive.
•
Ne tentez pas de d
é
monter les chargeurs.
•
Evitez de laisser tomber les chargeurs ou de les exposer
à
des chocs.
•
Ne pas utiliser des cartouches f
ê
l
é
es ou d
é
form
é
es.
•
N
’
introduisez dans les chargeurs que des disques compacts. Ne
posez aucune
é
tiquette ni aucun ruban adh
é
sif sur les disques.
•
L
’
essence, le diluant pour peinture, les insecticides et les produits
chimiques en g
é
n
é
ral, peuvent endommager la finition des
chargeurs.
Chargeurs suppl
é
mentaires
En cas de besoin, adressez-vous au distributeur Pioneer qui sera en
mesure de vous fournir des chargeurs convenables (r
é
f
é
rence
JD-612V).
Fixation de I
’é
tiquette
Fixer I
’é
tiquette fournie
à
I
’
endroit. Le fait de fixer I
’é
tiquette
à
endroit incorrect ou de fixer plus d
’
une
é
tiquette provoquera un
mauvais fonctionnement.
Mise en place des disques
•
N
’
oubliez pas de retirer le disque avant de changer un plateau.
•
Si le plateau n
’
est pas correctement engag
é
dans les rainures
droite et gauche, vous ne pouvez pas l
’
introduire
à
fond dans le
chargeur. En ce cas, ne forcez pas sur le plateau.
•
Veillez
à
ce que le chargeur contienne toujours 6 plateaux; de cette
mani
è
re, vous
é
viterez la perte ou l
’
endommagement des
plateaux.
•
Si vous mettez en place un disque de telle mani
è
re que son
é
ti-
quette soit tourn
é
e vers le bas, non seulement le lecteur sera dans
l
’
incapacit
é
de lire le disque mais encore le contr
ô
leur pour lecteur
de CD
à
chargeur (dans la mesure o
ù
votre voiture en est pourvue)
ne sera pas en mesure d
’
afficher un message d
’
erreur pour vous
signaler ce fait. Veillez donc
à
ce que tous les disques soient plac
é
s
en sorte que les
é
tiquettes soient tourn
é
es vers le hant.
Mise en place et retrait d
’
un chargeur
•
Ne pas mettre les doigts dans le tiroir du chargeur car cela peut
entra
î
ner une anomalie de fonctionnement et un endommagement
du lecteur.
•
Si l
’é
tiquette que porte le chargeur se d
é
colle ou est pliss
é
e, le
m
é
canisme d
’é
jection peut
ê
tre endommag
é
, ou
ê
tre dans
l
’
incapacit
é
d
’é
jecter le chargeur. En cons
é
quence, retirez toute
é
tiquette endommag
é
e avant d
’
introduire le chargeur.
•
Ne conservez pas la trappe ouverte car le lecteur pourrait mal
fonctionner si des poussi
è
res ou des corps
é
trangers venaient
à
y
p
é
n
é
trer.
•
When driving on an uneven road, the player may not reproduce every
sound properly.
•
During winter the inside of the vehicle may be very cold. If the heater
is turned on and the player is used soon after, the disc or optical parts
(prism, lens, etc.) may become misted up, and the player will not oper-
ate correctly. If the disc is misted up, wipe it with a soft cloth. If the
optical parts are misted up, wait for about an hour for them to warm
up. They will return to their normal condition.
CAUTION:
•
With this player, you can use the ITS functions to store up to 99
tracks per disc.
Even if the Head unit
’
s manual indicates ITS memory is up to 24
tracks per disc, this player can store up to 99 tracks per disc.
•
When playing a CD TEXT disc on this product, display of Title
indications in the head unit
’
s display is possible. For details con-
cerning CD TEXT discs, refer to the head unit
’
s owner
’
s manual.
•
This product conforms to the track skip function of the CD-R disc.
The tracks containing the track skip information are skipped over
automatically.
Important
The serial number of this device is located on the rear of the unit.
For your own security and convenience, be sure to record this num-
ber on the enclosed warranty card.
•
La conduite du v
é
hicule sur une route cahoteuse peut entra
î
ner des
erreurs de lecture.
•
L
’
hiver, la temp
é
rature int
é
rieure du v
é
hicule peut
ê
tre tr
è
s basse. Si
vous mettez en service le lecteur dans les instants qui suivent la mise
en service du chauffage, de la condensation peut se former sur les dis-
ques ou le capteur (prisme, objectif, etc.) rendant ainsi impossible
toute lecture. Si la condensation s
’
est form
é
e sur le disque, vous pou-
vez l
’
essuyer avec un chiffon doux. Si la condensation s
’
est form
é
e sur
le capteur, vous devez attendre qu
’
elle disparaisse, ce qui peut exiger
une heure.
ATTENTION:
•
Avec ce lecteur, vous pouvez m
é
moriser jusqu
’à
99 plages par
disque en utilisant les fonctions ITS.
M
ê
me si le mode d
’
emploi de l
’
appareil principal indique que la
m
é
moire ITS est limit
é
e
à
24 plages par disque, ce lecteur peut
m
é
moriser jusqu
’à
99 plages par disque.
•
Lors de la lecture d
’
un disque CD TEXT, l
’
affichage du titre du disque
peut avoir lieu sur l
’é
l
é
ment central. Pour de plus amples d
é
tails
concernant les disques CD TEXT, reportez-vous au mode d
’
emploi
de l
’é
l
é
ment central.
•
Ce produit est conforme avec la fonction de saut de plage des
disques CD-R. Les plages contenant des informations de saut de
plage sont saut
é
es automatiquement.
Service apr
è
s-vente des produits PIONEER
Veuillez contacter votre revendeur ou distributeur en ce qui con-
ceme le service apr
è
s-vente (et les conditions de garantie) ou tout
autre information. En cas de n
é
cessit
é
ou lorsque I
’
information
recherch
é
e n
’
est pas disponible, veuillez contacter Pioneer aux
adresses suivantes;
N
’
envoyez pas le produit
à
r
é
parer sans avoir, au pr
é
alable, contac-
t
é
nos bureaux.
Pour de plus amples informations relatives
à
la garantie, r
é
f
é
rez-
vous au feuillet Garantie Limit
é
e livr
é
e avec l
’
appareil.
PRECAUTION:
L
’
USAGE OU LE REGLAGE, OU ENCORE LA PERFORMANCE
DES PROCEDURES AUTRES QUE CELLES SPECIFIEES PEU-
VENT RESULTER EN UNE EXPOSITION DANGEREUSE AUX
RADIATIONS.
PRECAUTION:
L
’
USAGE D
’
INSTRUMENTS OPTIQUES AVEC CE PRODUIT
AUGMENTERA DES RISQUES NUISIBLES AVEC LES YEUX.
After-sales service for Pioneer products
Please contact the dealer or distributor from where you purchased
the product for its aftersales service (including warranty conditions)
or any other information. In case the necessary information is not
available, please contact the companies listed below:
Please do not ship your product to the companies at the addresses
listed below for repair without advance contact.
For warranty information please see the Limited Warranty sheet
included with your product.
CAUTION:
USE OF CONTROL OR ADJUSTMENT OR PERFORMANCE OF
PROCEDURES OTHER THAN THOSE SPECIFIED HEREIN MAY
RESULT IN HAZARDOUS RADIATION EXPOSURE.
CAUTION:
THE USE OF OPTICAL INSTRUMENTS WITH THIS PRODUCT
WILL INCREASE EYE HAZARD.
Information to User
Alteration or modifications carried out without appropriate
authorization may invalidate the user
’
s right to operate the
equipment.
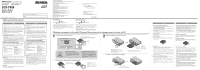
1
Inserting discs/Mise en place des disques
Changing disc trays/Remplacement des plateaux pour disque
2
Loading the magazine/Mise en place d
’
un chargeur
To remove the magazine/Pour retirer le chargeur
1
2
3
4
5
6
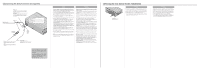
Hold down the maga-
zine lock button and
pull the tray out.
Appuyez sur le bou-
ton de verrouillage et
tirez
à
vous un
plateau.
Disc tray
Plateau
Insert the maga-
zine with the
arrow upward.
Introduisez le
chargeur de
mani
è
re que la
face portant la
fl
è
che soit tourn
é
e
vers le haut.
Press the eject button.
Appuyez sur le bouton d
’é
jection.
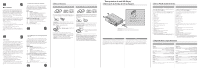
Loading a magazine in the multi CD player/Mise en place d’un chargeur dans le lecteur de CD
Slide out the disc tray
Extrayez le plateau
à
disque
Disc tray
Plateau
1st to 6th
discs
Ordre des
6 disques
Insert discs with the label side up.
Introduisez les disques de fa
ç
on que I
’é
tiquette soit
tourn
é
e vers le haut.
Gently pull the disc tray out.
Tirez doucement le plateau
à
vous.
Remarque sur les disques de 8 cm
•
N
’
utilisez pas d
’
adaptateur pour disque de 8
cm, faute de quoi le lecteur pourrait ne pas
fonctionner. Pour mettre en place un disque
de 8 cm, vous devez utiliser un plateau sp
é
-
cial (num
é
ro de pi
è
ce CXB5931). Le service
d
’
entretien Pioneer vous renseignera utile-
ment
à
ce sujet.
Notes on 8-cm (3-inch) CDs
•
Do not use an 8-cm CD adapter. If it is
used, the player may fail. To load an 8-cm
CD, you need a special 8-cm CD tray (Part
No. CXB5931). Ask your Pioneer service
station about it.
8cm
Precautions/Pr
é
cautions
USA
Pioneer Electronics (USA), Inc.
CUSTOMER SUPPORT DIVI-
SION
P.O. Box 1760,
Long Beach, CA 90801-1760,
(800) 421-1404
CANADA
Pioneer Electronics of
Canada, Inc.
CUSTOMER SATISFACTION
DEPARTMENT
300 Allstate Parkway
Markham, Ontario L3R OP2
(905) 479-4411
1-877-283-5901
USA
Pioneer Electronics (USA), Inc.
CUSTOMER SUPPORT DIVI-
SION
P.O. Box 1760
Long Beach, CA 90801-1760,
(800) 421-1404
CANADA
Pioneer
é
lectroniques du
Canada, Inc.
D
é
partement de service aux
consommateurs
300 Allstate Parkway
Markham, Ontario L3R OP2
(905) 479-4411
1-877-283-5901
Label
Etiguette
English
Fran
ç
ais
English
Fran
ç
ais
Align the disc tray the left and
right grooves,
and push it in until you hear it
click.
Engagez
à
fond le plateau pour
disque dans les rainures droite et
gauche.
<KFJFF/00H00000>
<CRD3730-A/N> UC
MULTI-COMPACT
COMPACT DISC POUR
DISC PLAYER
MULTI-LECTURE
CDX-P686
Owner’s Manual
Mode d’emploi
Published by Pioneer Corporation.
Copyright © 2002 by Pioneer Corporation.
All rights reserved.
Publication de Pioneer Corporation.
Copyright © 2002 Pioneer Corporation.
Tous droits de reproduction et de traduction réservés.
Printed in Thailand
Imprimé en Thaïlande
This product conforms to CEMA cord colors.
Le code de couleur des câbles utilisé pour ce produit est conforme à
CEMA.
Load the magazine and close the door.
Introduisez le chargeur et refermez la trappe.
Slide and open the door.
Open it fully until it locks with a click.
Faites glisser le volet.
Ouvrez-le compl
è
tement; il se verrouille
et vous entendez un d
é
clic.
PIONEER CORPORATION
4-1, MEGURO 1-CHOME, MEGURO-KU, TOKYO 153-8654, JAPAN
PIONEER ELECTRONICS (USA) INC.
P.O. Box 1540, Long Beach, California 90801-1540, U.S.A.
TEL: (800) 421-1404
PIONEER EUROPE NV
Haven 1087, Keetberglaan 1, B-9120 Melsele, Belgium
TEL: (0) 3/570.05.11
PIONEER ELECTRONICS ASIACENTRE PTE. LTD.
253 Alexandra Road, #04-01, Singapore 159936
TEL: 65-6472-1111
PIONEER ELECTRONICS AUSTRALIA PTY. LTD.
178-184 Boundary Road, Braeside, Victoria 3195, Australia
TEL: (03) 9586-6300
PIONEER ELECTRONICS OF CANADA, INC.
300 Allstate Parkway, Markham, Ontario L3R OP2, Canada
TEL: (905) 479-4411
PIONEER ELECTRONICS DE MEXICO, S.A. de C.V.
San Lorenzo 1009 3er. Piso Desp. 302
Col. Del Valle Mexico, D.F. C.P. 03100
TEL: 55-5688-52-90
Product registration
Visit us at the following site:
1
Register your product. We will keep the details of your purchase
on file to help you refer to this information in the event of an
insurance claim such as loss or theft.
2
Receive updates on the latest products and technologies.
3
Download owner
’
s manuals, order product catalogues, research
new products, and much more.
Enregistrement du produit
Rendez-nous visite sur le site suivant:
1
Enregistrez votre produit. Nous conserverons sur fichier les d
é
tails
de votre achat pour vous permettre de vous reporter
à
ces infor-
mations en cas de d
é
claration de sinistre
à
votre assurance pour
perte ou vol.
2
Recevez les mises
à
jour sur les derniers produits et les plus
r
é
centes technologies.
3T
é
l
é
chargez les manuels de l
’
utilisateur, commandez les cata-
logues des produits, recherchez de nouveaux produits, et bien
plus.