Pioneer CNDV-60MP Other Manual - Page 2
Renewed Points for AV Source - discs
 |
UPC - 012562809281
View all Pioneer CNDV-60MP manuals
Add to My Manuals
Save this manual to your list of manuals |
Page 2 highlights
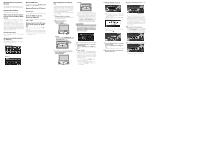
Renewed Points through this Upgrade If you upgrade your navigation system by this disc, the system will have the following change; Renewal Map database The Map database will be changed. Wide variety of facility information for Points of Interest (POI) search You can search your destination from all areas. - Approximately 11 million POIs are included in this database as of January 2005. - Some POI information may not be accurate or may become inaccurate through the passage of time. Please directly contact the POI to verify the accuracy of the information about the POI which appears in this database. POI information is subject to change without notice. Change zone name NF ➞ NL (NEWFOUNDLAND AND LABRADOR of CANADA) Renewed POI icon Some facilities icons used in POI Search, Vicinity Search, and Overlay POI will be changed. Renewed Points for AV Source Source icon The icon design for each source will be changed. Some of "ESC" touch key (except for AVIC-D1) The name of the touch key will be changed from "ESC" to "HIDE". Renewed point in the MP3 operation screen (except for AVICD1) The folder icon has will be added to the "UP" touch key. The file extension (.mp3) will be displayed after a track in the track list display and detail Information display. (The extension may not be displayed if the file name is long.) Appearance changing (except for AVIC-D1) The appearance of the navigation menu and AV menu will change as follows: Navigation menu AV menu How to Upgrade Your Navigation AVIC-D1: The program is installed to the navigation system using the application disc. When installing the program, you carry out the following operations. When all the setup procedures are completed, you can use the navigation system. The screen images used in this section are AVICN2 as an example. 1 Park your vehicle in a safe place. Leave the engine on, and make sure that the parking brake is applied. 2 Remove the current disc. AVIC-N1, AVIC-N2: Press the EJECT button. When the upgraded program has been found, installation of the program starts immediately. ❒ If you cannot insert a disc completely or if an inserted disc is not recognized, check that the label side of the disc is up. Press the EJECT (or DVD-ROM EJECT) button to eject the disc, and check the disc for damage before inserting the disc again. • Once the installation of the program starts, do not stop the engine of your vehicle nor switch off the navigation system until the installation is completed and the following Audio screen appears. AVIC-D1: Press and hold the OPEN/CLOSE button to open the LCD panel and then press the DVD-ROM EJECT button. 3 Insert the new Pioneer DVD Map Disc into the appropriate slot. AVIC-N1, AVIC-N2: 4 Press the NAVI/AV button to change the navigation screen. (If you use AVIC-D1, press the MAP button.) 5 Touch "Yes/Oui". When you start the navigation system for the first time, you will see a confirmation message asking if you wish to select another language. English is the default language of the navigation system. If desired, you can select another language as shown. ❒ To keep English, touch "No/Non". After this, proceed to Step 8. ❒ When you want to select another lan- guage, touch "Yes/Oui", and proceed to the next step. 6 Select the language from the list. Touch the language you want to use. 9 To set the time difference, touch "+" or "-". ❒ The language selected here is reflected for the navigation functions (e.g., Destination search, etc.) only. Installation of the program, in the language you chose, begins. When the installation is complete, the opening display appears. Time difference The time difference between the time originally set in the navigation system (Pacific Standard Time) and the current location of your vehicle is shown. If necessary, adjust the time difference. Touching "+" or "-" changes the time difference display in one-hour increments. The time difference can be set from +3 to -3 hours. 10If necessary, set to summer time. Daylight Saving Time (DST) is off by default. Touch "Summer Time" to change the time if you are in the daylight saving period. This turns the display below summer time "On". 7 Press the NAVI/AV button to change the navigation screen. (If you use AVIC-D1, press the MAP button.) Some time is needed until navigation is ready. 8 Check the details of the cautionary mes- sage and touch "OK". 11To complete the setting, touch "Back". The map of your surroundings appears.
-
 1
1 -
 2
2
 |
 |
