Pioneer DJM 3000 Owner's Manual
Pioneer DJM 3000 - Professional DJ Mixer Manual
 |
UPC - 012562585734
View all Pioneer DJM 3000 manuals
Add to My Manuals
Save this manual to your list of manuals |
Pioneer DJM 3000 manual content summary:
- Pioneer DJM 3000 | Owner's Manual - Page 1
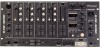
DJ MIXER DJM-3000 Operating Instructions 1 - Pioneer DJM 3000 | Owner's Manual - Page 2
Thank you for buying this Pioneer product. Please read through these operating instructions so you will know how to operate your model properly. After you have finished reading the instructions, put them away in a safe place for future reference. In some countries or regions, the shape of the - Pioneer DJM 3000 | Owner's Manual - Page 3
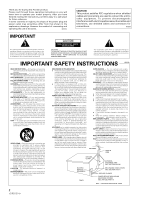
IMPORTANT NOTICE The serial number for this equipment is located on the rear panel. Please write this serial number on your enclosed warranty card and keep it in a secure area. This is for your security. 3 - Pioneer DJM 3000 | Owner's Manual - Page 4
BPM 19 USING THE FADER START FUNCTION 20 Starting with the Channel Fader 21 Starting with the Cross Fader 21 USING THE EFFECT MIX FUNCTION 22 Effect Mix Features 22 Selecting the Effect Mix Function 23 Effect Mix Fader Mode 24 Effect Mix Auto Mode 25 TROUBLESHOOTING 26 SPECIFICATIONS 27 - Pioneer DJM 3000 | Owner's Manual - Page 5
.) ÷ When the unit is used inside a carrying case or DJ booth, separate it from the walls or other equipment to improve heat radiation. Installing the DJM-3000 in an EIA rack The screw holes on the front panel of the DJM-3000 are designed for use in attaching the unit to a 19-inch EIA rack. ÷ Attach - Pioneer DJM 3000 | Owner's Manual - Page 6
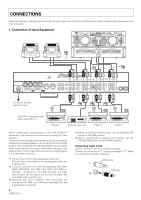
LEVEL ATT. PHONO 4 LINE 7 CONTROL CH - 4 R PHONO 3 LINE 5 / LINE 6 CH - 3 SIGNAL GND CONTROL R PHONO 2 LINE 3 / LINE 4 CH - 2 CONTROL R PHONO 1 LINE 1 CONTROL / LINE 2 CH - 1 CH-4 MIC 3 MIC 2 DJM-3000 RL RL RL RL Connect to a wall's electrical outlet (PHONO 4 cannot be used replace - Pioneer DJM 3000 | Owner's Manual - Page 7
effector (Supports XLR input) (Supports RCA input) (For booth monitor) Microphone 2 DJM-3000 SEND OUT RETURN R L MASTER OUT 2 R MASTER R MASTER OUT 1 BOOTH MONITOR LEVEL ATT. PHONO 4 LINE 7 CONTROL CH - 4 R PHONO 3 LINE 5 / using a monaural input effector, connect it to the L channel - Pioneer DJM 3000 | Owner's Manual - Page 8
Enables microphone 1 and 2 while attenuating other sound levels. The amount of attenuation can be controlled by setting the rear-panel TALK OVER LEVEL, within the range -4 dB to -20 dB. ) ¢ \ ø CH-1 to CH-4 (Channel Input Controls) 7 Input selector switches Use to select an input source from among - Pioneer DJM 3000 | Owner's Manual - Page 9
the BPM display channel. ~ Peak level meter Peak levels are displayed as they occur and maintained for 2 seconds. The meter displays the channel fader output level. Displayable range is from -22 dB to +14 dB. ! Channel fader lever Use to adjust the sound level at each channel. π MASTER (Master - Pioneer DJM 3000 | Owner's Manual - Page 10
are out, it indicates manual mode. For more information about manual mode, see the item "BPM COUNTING" "on pages 18-19. If the Effect selector switch (⁄) is set with the Effect CH. SELECT switch (¤). ¶ If the Effect CH. SELECT switch is used to select "CF.A" or "CF.B", the channel that lights - Pioneer DJM 3000 | Owner's Manual - Page 11
the manual mode is enabled (see page 19). PART NAMES AND FUNCTIONS Å EFFECT MIX Controls fl FADER/OFF/AUTO (EFFECT MIX selector switch) Use to select the cross fader effect mode. FADER: Selects Effect Mix Fader mode. When this is selected, the Cross fader lever (™) can be used to control effects and - Pioneer DJM 3000 | Owner's Manual - Page 12
, simpler mixing of music with different tempos. Use of the TAP switch to input the beat manually makes it possible to set BPM for music for which it is difficult to measure (a capella, improvisation, etc.). Beat Effector (Effects linked to BPM) Links various effects to the BPM calculated with the - Pioneer DJM 3000 | Owner's Manual - Page 13
shifter to microphone sound produces voice changer effects. Mixing with original sound produces a choral effect. 9. Send/Return (SND/RTN: External effect input/output) Makes diverse effects possible through connection to available effectors, samplers, etc. USING THE EFFECT FUNCTIONS 13 - Pioneer DJM 3000 | Owner's Manual - Page 14
Feedback (Flanger feedback sound level) Example: Applying the delay effect to music on CH-2. BPM display Effect parameter/BPM display H.P CUE switch Effect selector switch Effect CH. SELECT switch Effect PARAMETER 1 control (TIME) Effect PARAMETER 2 control (LEVEL/DEPTH) Effect ON/OFF switch 14 - Pioneer DJM 3000 | Owner's Manual - Page 15
flash if BPM cannot be counted for more than 2 seconds. In this case, use manual mode to make settings (see page 19). 3 Set the parameter value. When the H.P CUE switch (in the BEAT EFFECTS controls) is pressed, the effect can be confirmed by listening to the headphones output. Setting the Delay - Pioneer DJM 3000 | Owner's Manual - Page 16
PARAMETER 1 control (TIME). Setting the Balance Between Original and PitchShifted Sound Levels ÷ The balance between original and pitch-shifted sound levels is set using the Effect PARAMETER 2 control (LEVEL/DEPTH). Turning this control to the left will decrease pitch-shifted sound and turning - Pioneer DJM 3000 | Owner's Manual - Page 17
on, all of the reverberation of the prior channel's effects will be output. ÷ Only operate the Effect selector switch when effects are off (when the Effect ON/OFF switch is lit orange). Operating it with effects on could generate noise. USING THE EFFECT FUNCTIONS ÷ Display when CH-3 has been pitch - Pioneer DJM 3000 | Owner's Manual - Page 18
mode. In this event, set to manual mode to count the BPM (see page 19). 4 Press CH-1 H.P CUE switch. ÷ The BPM display LED "1" will light. ÷ The BPM of the music input to CH-1 will appear on the AUTO BPM COUNTER. * To measure BPM accurately, select only one channel (CH-1 to CH-4 H.P CUE switch - Pioneer DJM 3000 | Owner's Manual - Page 19
effect operations, the BPM display's counter (upper side) will flash. In such a case, change the Effect selector switch to AUTO BPM and use the TAP switch for manual input without using the "TAP" input. ÷ Change the Effect selector switch the Effect PARAMETER 1 control (TIME) is turned, the Effect - Pioneer DJM 3000 | Owner's Manual - Page 20
Fader Start Play (To Use Fade-in Operation with a Connected CD Player) Fader start play will be possible when the unit has been connected with control cords to the CMX-3000, CMX5000, CDJ-1000, CDJ-100S, CDJ-700S, and CDJ-500 II CD players for DJs. In other words, when the DJ mixer's channel fader - Pioneer DJM 3000 | Owner's Manual - Page 21
START FUNCTION The following is an example of starting a CD player connected to CH-1. Example: FADER START switch Channel fader lever If cue points have been set in advance when using the CMX-3000, CMX-5000, CDJ-1000, CDJ-100S, CDJ-700S and CDJ-500 II, it is not necessary to leave the CD player - Pioneer DJM 3000 | Owner's Manual - Page 22
USING THE EFFECT MIX FUNCTION When this mixer is combined with separately purchased CD players (CMX-3000, CMX-5000, CDJ-1000, CDJ-100S, CDJ-700S or CDJ-500II), the Cross fader channel assigned to the other side is connected. Example: Cross fader lever position and effect volume setting when effect - Pioneer DJM 3000 | Owner's Manual - Page 23
to the same channel. (In this case, fader display A, fader display B, and the fader start display for the selected channel will all flash). FADER START switches EFFECT MIX selector switch Fader display A Fader display B CROSS FADER ASSIGN A switch Cross fader lever CROSS FADER ASSIGN B switch - Pioneer DJM 3000 | Owner's Manual - Page 24
switch FADER START switches EFFECT MIX selector switch Fader display A Fader display B CROSS FADER ASSIGN A switch Cross fader lever CROSS FADER ASSIGN B switch Effect select/ start switches Effect Mix Fader Mode 1 Using the CROSS FADER ASSIGN switches (A and B) choose the channel (CH1 - Pioneer DJM 3000 | Owner's Manual - Page 25
-CH4) connected to the CD player you wish to use with cross fader effects. ¶ Be sure to assign different channels to the CROSS FADER ASSIGN switches A and B. 2 Set the Cross fader lever to the Effect Mix Auto mode starting position. In the Effect Mix Auto mode, the way the sound is initially heard - Pioneer DJM 3000 | Owner's Manual - Page 26
. ÷ BPM can't be measured in some cases, depending on the music. ÷ Adjust the TRIM control so that the input level approaches 0 dB on the peak level meter. ÷ Adjust input levels of other channels to approach 0 dB. ÷ Press the TAP switch and set BPM manually. Measured BPM value differs from value - Pioneer DJM 3000 | Owner's Manual - Page 27
5˚C to +35˚C Operating humidity 5% to 85% External dimensions 482 (W) x 220 (D) x 107 (H) mm 12-19/32 (W) x 14-5/8 (D) x 4-7/32 (H) in Weight 7.1 kg 15 lbs 11 oz Accessories ÷ Short-circuit pin plug 2 ÷ Operating instructions 1 ÷ Warranty 1 For improvement purposes, specifications and design - Pioneer DJM 3000 | Owner's Manual - Page 28
, or if you wish to purchase replacement parts, operating instructions, service manuals, or accessories, please call the number shown below. 800 - 872 - 4159 Please do not ship your product to Pioneer without first calling the Customer Support Division at the above listed number for assistance
-
 1
1 -
 2
2 -
 3
3 -
 4
4 -
 5
5 -
 6
6 -
 7
7 -
8
-
9
-
10
-
11
-
12
-
13
-
14
-
15
-
16
-
17
-
18
-
19
-
20
-
21
-
22
-
23
-
24
-
25
-
26
-
27
-
28
 |
 |

Operating Instructions
DJ MIXER
DJM-3000