Pioneer DRM-7000 User Manual for the DVD-7361 drive - Page 9
English
 |
View all Pioneer DRM-7000 manuals
Add to My Manuals
Save this manual to your list of manuals |
Page 9 highlights
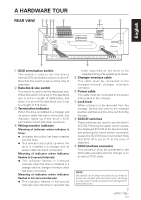
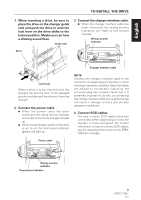
English TO INSTALL THE DRIVE 1. When inserting a drive, be sure to place the drive on the changer guide rails and push the drive in until the lock lever on the drive shifts to the locked position. Maybe you can hear a clicking sound then. Guide rails 3. Connect the changer interface cable. ¶ When the changer interface cable has been connected, the wiring monitor indicators will flash at two-second intervals. Wiring monitor indicator Drive Changer interface cable Lock lever When a drive is to be removed from the changer, flip the lock lever to the released position and then pull the drive out from the changer. 2. Connect the power cable. ¶ When the power cable has been connected, the wiring monitor indicator on the rear of the drives (orange) will light up. ¶ When the termination switch of the drive is set to on, the termination indicator (green) will light up. NOTE: Connect the changer interface cable to the connector corresponding to the bay in which the drives have been installed. (Note that labels are affixed to connectors indicating the corresponding bay number.) Note that it is extremely important to do this, as connecting the changer interface cable to a neighboring bay will result in damage to discs and the disc transport mechanism. 4. Connect SCSI cables. The way in which SCSI cables should be connected differs depending on how the changer is to be configured. For further information on how to connect SCSI cables, see the operating instructions for the DRM7000 disc changer. Power cable Wiring monitor indicator Termination indicator 9 En
-
 1
1 -
2
-
3
-
 4
4 -
 5
5 -
 6
6 -
 7
7 -
 8
8 -
 9
9 -
 10
10 -
 11
11
 |
 |
