Pioneer HTP-074 Refurbished Operating Instructions
Pioneer HTP-074 Refurbished Manual
 |
View all Pioneer HTP-074 Refurbished manuals
Add to My Manuals
Save this manual to your list of manuals |
Pioneer HTP-074 Refurbished manual content summary:
- Pioneer HTP-074 Refurbished | Operating Instructions - Page 1
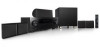
HTP-074 Home Theater Package / Home Cinema Package VSX-325 AV Receiver S-12A Speaker System Register your product on http://www.pioneerelectronics.com (US) http://www.pioneerelectronics.ca (Canada) http://www.pioneer.co.uk (or http://www.pioneer.eu). (Europe) Operating Instructions - Pioneer HTP-074 Refurbished | Operating Instructions - Page 2
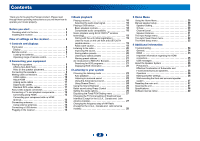
Pioneer product. Please read through these operating instructions system Home Menu 29 Manual speaker setup 29 Speaker Setting 29 X.Over 30 Channel Level 30 Speaker Distance 31 The Input Assign menu 31 The Auto Power Down menu 32 The HDMI Setup menu 32 6 Additional information Troubleshooting - Pioneer HTP-074 Refurbished | Operating Instructions - Page 3
IEC R03 dry cell batteries (to confirm system operation) x2 • AM loop antenna • Non-Skid Pads x20 • Quick start guide • Safety Brochure Installing the receiver • When TV to this receiver. Check the manual that came with the TV if you ) (When the connected TV supports the HDMI Audio Return Channel - Pioneer HTP-074 Refurbished | Operating Instructions - Page 4
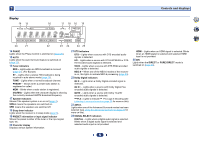
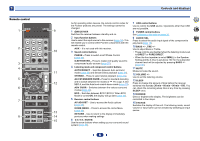
source (page 16). 2 Receiver control buttons SPEAKERS - Use to change the speaker system on or off. When the SP OFF is selected, no sound is output from Display on page 5. 4 Tuner control buttons BAND - Switches between AM, FM ST (stereo) and FM MONO radio bands (page 20). TUNER EDIT - Use with - Pioneer HTP-074 Refurbished | Operating Instructions - Page 5
RDS - Lights when an RDS broadcast is received (page 21). (For Europe) ST - Lights when a stereo FM broadcast is being received in auto stereo mode (page or the input signal type, etc. 20 Character display Displays various system information. 21 DTS indicators DTS - Lights when a source with DTS - Pioneer HTP-074 Refurbished | Operating Instructions - Page 6
receiver (page 16). This will enable you to control other Pioneer components with the remote control. AUX - It is not Home Menu (page 29). RETURN - Use to return to the display immediately previous when making settings 6 / // , ENTER Use the arrow buttons when setting up your surround sound system - Pioneer HTP-074 Refurbished | Operating Instructions - Page 7
1 Loading the batteries The batteries included with the unit are to check initial operations; they may not last over a long period. We recommend using alkaline batteries that have a longer life. WARNING • Do not use or store batteries in direct sunlight or other excessively hot place, such as - Pioneer HTP-074 Refurbished | Operating Instructions - Page 8
The following guidelines should help you to get the best sound from your system. • The subwoofer can be placed on the floor. Ideally, the other -Audio, the speakers should be more directly behind the listener than for home theater playback. • Try not to place the surround speakers farther away from - Pioneer HTP-074 Refurbished | Operating Instructions - Page 9
2 Connecting the speakers The receiver will work with just two stereo speakers (the front speakers in the diagram) but using at least three speakers is recommended, and a complete setup is best for surround sound. Make sure you connect the speaker on the right to the right (R) terminal and the - Pioneer HTP-074 Refurbished | Operating Instructions - Page 10
transfer - This may not operate properly, depending on the connected equipment. - 4K 24p, 4K 25p, 4K 30p, 4K 50p and 4K 60p signals are supported. • HDCP 2.2 compatible terminal Note • Use a High Speed HDMI®/™ Cable. If HDMI cable other than a High Speed HDMI®/™ Cable is used, it may not work - Pioneer HTP-074 Refurbished | Operating Instructions - Page 11
2 Connecting your equipment Analog audio cables Use stereo RCA phono cables to connect analog audio components. These cables are typically red and white, and you should connect the red plugs to R (right) terminals and white plugs to L (left) terminals. White (Left) L R AUDIO Red (Right) Digital - Pioneer HTP-074 Refurbished | Operating Instructions - Page 12
The HDMI Setup menu on page 32). - Please refer to the TV's operation manual for directions on connections and setup for the TV. Important • When the ARC console HDMI OUT HDMI OUT 2 4 34 If the TV does not support the HDMI Audio Return Channel function, this connection is required to listen to - Pioneer HTP-074 Refurbished | Operating Instructions - Page 13
2 Connecting your equipment Connecting your component with no HDMI terminal This diagram shows connections of a TV and Blu-ray Disc/DVD player (or other playback component) with no HDMI terminal to the receiver. Important • When the receiver and TV are connected by composite cable, the OSD - Pioneer HTP-074 Refurbished | Operating Instructions - Page 14
2 Connecting your equipment Connecting antennas Connect the AM loop antenna and the FM wire antenna as shown below. To improve reception and sound quality, connect external antennas (see Using external antennas below). fig. a fig. b 2 3 Place the AM antenna on a flat surface and in a direction - Pioneer HTP-074 Refurbished | Operating Instructions - Page 15
and play back music files. • This receiver does not support a USB hub. • For instructions on playing the USB device, see Playing a USB device once in a while. When you find it damaged, ask your nearest PIONEER authorized service center or your dealer for a replacement. • The receiver should be - Pioneer HTP-074 Refurbished | Operating Instructions - Page 16
a source Here are the basic instructions for playing a source (such as a DVD disc) with your home theater system. RECEIVER AUDIO SEL AV ADJUST MUTE VOLUME DVD BD GAME TUN AUX SAT STREAM BOX CBL S.BOX TRE CD TV BT AUDIO USB BT PHASE S.RETRIEVER BASS HOME MENU TOP MENU RETURN USB - Pioneer HTP-074 Refurbished | Operating Instructions - Page 17
11) and set the signal input to C1/O1 (digital). • Some DVD players don't output DTS signals. For more details, refer to the instruction manual supplied with your DVD player. Input function BD/DVD HDMI 9 Input Terminals COAXIAL OPTICAL 9 9 ANALOG 9 TV 8a 9 9 8b CBL/SAT 9 9 9 9 CD - Pioneer HTP-074 Refurbished | Operating Instructions - Page 18
on the front of this receiver. Important • Pioneer cannot guarantee compatibility (operation and/or bus power) CD TV BT AUDIO USB BT PHASE S.RETRIEVER BASS HOME MENU TOP MENU RETURN USB AV ADJUST MUTE VOLUME DISP page 35. If this doesn't remedy the problem, it is likely your USB device is - Pioneer HTP-074 Refurbished | Operating Instructions - Page 19
device must support A2DP profiles. This unit will be displayed as "Pioneer AV Receiver" on all BLUETOOTH capable Please refer to the user's manual for your BLUETOOTH capable device for system to prevent signal noise and interruptions. 2 4 34 Scope of operation Use of this unit is limited to home - Pioneer HTP-074 Refurbished | Operating Instructions - Page 20
neighbor's microwave is placed near your system, you may experience radio wave interference. cables for products supported by this unit, using the automatic (search) and manual (step) tuning functions. Once you . Improving FM sound If the TUNE or ST indicators don't light when tuning to an - Pioneer HTP-074 Refurbished | Operating Instructions - Page 21
the frequency. An introduction to RDS (For Europe) Radio Data System (RDS) is a system used by most FM radio stations to provide listeners with various DRAMA - Radio plays, etc. CULTURE - National or regional culture, theater, etc. SCIENCE - Science and technology VARIED - Usually talk-based - Pioneer HTP-074 Refurbished | Operating Instructions - Page 22
Master volume • Radio Text (RT) - Messages sent by the radio station. For example, a talk radio station may provide a phone number as RT. • Program Service Name (PS) - The name of the radio station. • Program Type (PTY) - This indicates the kind of program currently being broadcast. • Current tuner - Pioneer HTP-074 Refurbished | Operating Instructions - Page 23
4 Listening to your system Choosing the listening mode This receiver offers a variety of listening modes to accommodate playback of various audio formats. Choose one according to your speaker environment - Pioneer HTP-074 Refurbished | Operating Instructions - Page 24
4 Listening to your system Multichannel sources STEREO ALC Straight Decode STEREOc See above. No additional Auto playback on page 23. DIRECT Sources are heard according to the settings made in the Manual SP Setup (speaker setting, X.Over, channel level, speaker distance), as well as with dual - Pioneer HTP-074 Refurbished | Operating Instructions - Page 25
your system current source, settings and status of the receiver. AV ADJUST MUTE VOLUME HOME MENU RETURN 1 Press AV ADJUST button. 2 Use / to select the -PCM sources. Please select another input signal if this is a problem. OFF ON DRC (Dynamic Range Control) Adjusts the level of dynamic - Pioneer HTP-074 Refurbished | Operating Instructions - Page 26
other than Dolby TrueHD. f. You shouldn't have any problems using this with most SACD discs, but if the feature is only available when the connected display supports the automatic audio/video synchronizing capability ('lip-sync to OFF and adjust the delay time manually. For more details about the lip - Pioneer HTP-074 Refurbished | Operating Instructions - Page 27
(Except for the U.S.A., Canada and Latin America models) If the Graphical User Interface screen is not displayed correctly, it may be that the TV system is set incorrectly for your country or region. 1 Switch the receiver into standby. 2 While holding down TUNE on the front panel, hold ÍSTANDBY/ON - Pioneer HTP-074 Refurbished | Operating Instructions - Page 28
to OFF, you may not be able to set the switching of the Fixed PCM, NTSC/PAL or 9K STEP/10K STEP Listening to your system 2 4 34 28 - Pioneer HTP-074 Refurbished | Operating Instructions - Page 29
. Home Menu 1.Manual SP Setup 2.Input Assign 3.Auto Power Down 4.HDMI Setup Manual speaker setup This receiver allows you to make detailed settings to optimize the surround sound performance. You only need to make these settings once (unless you change the placement of your current speaker system - Pioneer HTP-074 Refurbished | Operating Instructions - Page 30
sounds best. If you're having problems, the easiest option is to route home theater system. CAUTION • The test tones used in the Channel Level settings are output at high volume. 1 Select 'Manual SP Setup' from the Home Menu. 2 Select 'Channel Level' from the Manual SP Setup menu. 2 4 34 1.Manual - Pioneer HTP-074 Refurbished | Operating Instructions - Page 31
the Channel Level menu. Speaker Distance For good sound depth from your system, you need to specify the distance of your speakers from the listening to TV input. 2 4 1 Select 'Input Assign' from the Home Menu. Home Menu 1.Manual SP Setup 2.Input Assign 3.Auto Power Down 4.HDMI Setup 34 Return - Pioneer HTP-074 Refurbished | Operating Instructions - Page 32
Menu. Home Menu 1.Manual SP Setup 2.Input Assign 3.Auto Power Down 4.HDMI Setup 4.HDMI Setup a.ARC OFF b.Standby Through [ OFF ] c.4k60p Setting Return Return 2 Choose the 'ARC' setting you want. When a TV supporting the HDMI Audio Return Channel function is connected to the receiver, the - Pioneer HTP-074 Refurbished | Operating Instructions - Page 33
unit may not operate properly if the HDMI CONTROL on the player is ON. Refer to the relevant device's instruction manual for details. If this does not work, turn OFF the ARC function. If this is the case, listen on the display will blink. Turn ON the unit after blinking stops. 33 Home Menu 2 4 34 - Pioneer HTP-074 Refurbished | Operating Instructions - Page 34
problem may lie there. If the trouble isn't sorted out even after going through the checks below, ask your nearest Pioneer authorized independent service The video input selected on the TV monitor is incorrect. Refer to the instruction manual supplied with the TV. ™ There is no bass. # When the - Pioneer HTP-074 Refurbished | Operating Instructions - Page 35
problem still persists when connecting your HDMI component directly to your monitor, please consult the component or monitor manual or contact the manufacturer for support ™ The OSD screen (Home Menu, etc.) isn't HDMI connections when setting up the system. ™ No sound, or sound instructions - Pioneer HTP-074 Refurbished | Operating Instructions - Page 36
Switch off and unplug your AV equipment and consult the instructions when connecting up components. Make sure you use the mount the speakers on is strong enough to support them. When attaching the speakers to brackets, than the one supplied with this system. Connection to any other amplifier may - Pioneer HTP-074 Refurbished | Operating Instructions - Page 37
the speaker system is heavy and that its weight could cause the wood screws to work loose, or the wall material to fail to support it, resulting Mounting screws are not supplied. Use screws suitable for the wall material and support the weight of the speaker. If you are unsure of the qualities and - Pioneer HTP-074 Refurbished | Operating Instructions - Page 38
33 ft.) Frequency range 2.4 GHz Supported BLUETOOTH profiles A2DP Supported Codec SBC (Subband Codec), AAC Enclosure Front speakers Closed-box bookshelf type Surround speakers Closed-box bookshelf type System 7.7 cm 1-way system Speaker 7.7 cm cone type Nominal impedance 6 Ω Dimensions. . . - Pioneer HTP-074 Refurbished | Operating Instructions - Page 39
for wall mounting 4 Screws 4 Non-Skid Pads 20 Quick start guide Safety Brochure Note • Specifications and the design are subject to possible by Onkyo & Pioneer Corporation is under license. "Pioneer", "PHASE CONTROL" and "AUTO LEVEL CONTROL" are trademarks of Pioneer Corporation, and are - Pioneer HTP-074 Refurbished | Operating Instructions - Page 40
we are referring to freedom, not price. Our General Public Licenses are designed to free software (and charge for this service if you wish), that you is not the original, so that any problems introduced by others will not reflect on so on) of the operating system on which the executable runs, - Pioneer HTP-074 Refurbished | Operating Instructions - Page 41
that system in reliance on consistent application of that system; it but may differ in detail to address new problems or concerns. Each version is given a this. Our decision will be guided by the two goals of preserving YOU ASSUME THE COST OF ALL NECESSARY SERVICING, REPAIR OR CORRECTION. 12. IN NO - Pioneer HTP-074 Refurbished | Operating Instructions - Page 42
http://www.pioneerelectronics.com (US) http://www.pioneerelectronics.ca (Canada) http://www.pioneer.co.uk (or http://www.pioneer.eu). (Europe) © 2016 Onkyo & Pioneer Corporation. All rights reserved. 2-3-12 Yaesu, Chuo-ku, Tokyo 104-0028 JAPAN 18 PARK WAY, UPPER SADDLE RIVER, NEW
-
 1
1 -
 2
2 -
 3
3 -
 4
4 -
 5
5 -
 6
6 -
 7
7 -
8
-
9
-
10
-
11
-
12
-
13
-
14
-
15
-
16
-
17
-
18
-
19
-
20
-
21
-
22
-
23
-
24
-
25
-
26
-
27
-
28
-
29
-
30
-
31
-
32
-
33
-
34
-
35
-
36
-
37
-
38
-
39
-
40
-
41
-
42
 |
 |

Operating Instructions
Home Theater Package / Home Cinema Package
HTP-074
S-12A
Speaker System
AV Receiver
VSX-325
Register your product on
http://www.pioneerelectronics.ca (Canada)
(or
).
(Europe)