Pioneer ND-BC2 Owner's Manual
Pioneer ND-BC2 - Rear View Camera Manual
 |
UPC - 012562856209
View all Pioneer ND-BC2 manuals
Add to My Manuals
Save this manual to your list of manuals |
Pioneer ND-BC2 manual content summary:
- Pioneer ND-BC2 | Owner's Manual - Page 1
Universal Rear View Camera Caméra de recul universelle Owner's Manual Mode d'emploi ND-BC2 PIONEER CORPORATION 4-1, MEGURO 1-CHOME, MEGURO-KU, TOKYO 153-8654, JAPAN PIONEER ELECTRONICS (USA) INC. P.O. Box 1540, Long Beach, California 90801-1540, U.S.A. TEL: (800) 421-1404 PIONEER EUROPE NV Haven - Pioneer ND-BC2 | Owner's Manual - Page 2
is a rear view camera for checking the view at the rear of a car. A rear view camera is a camera that provides symmetrical images in the same way as rear and side view mirrors. • Connection to a TV with an RCA video input is possible, but confirm whether the TV you use has a reverse gear connection - Pioneer ND-BC2 | Owner's Manual - Page 3
• Cuando monte esta unidad, cerciórese que ninguno de los cables queda aprisionado entre esta unidad y accesorios o partes metálicas circundantes. • Para evitar descargas eléctricas, no instale la unidad de suministro de energía en lugares donde pueda entrar en contacto con líquidos. • No monte esta - Pioneer ND-BC2 | Owner's Manual - Page 4
ée car de l'eau pourrait pénétrer dans la caméra, ou encore la caméra pourrait être arrachée de son support. • Vérifiez le support de Garniture étanche × 1 Ruban adhésif double-face × 1 Applique de support de la caméra × 1 Exemple d'installation (Fig. 1) ① Surface vitrée ② Assurez-vous que la camé - Pioneer ND-BC2 | Owner's Manual - Page 5
sulla parte Installate l'alimentatore in un punto sufficientemente prossimo alla videocamera di visione posteriore in modo da raggiungerla agevolmente con il cavo. ② Rear view camera connector ① Power supply unit CAMERA POWER VIDEO OUT ③ RCA power supply cable connector ④ Rear view camera - Pioneer ND-BC2 | Owner's Manual - Page 6
(Fig. 15) ① Clamps ② Rear view camera ③ RCA power supply cable ④ Product with a video input jack (Hideaway unit etc.) ⑤ Power supply unit ⑥ Made with a rasp etc. ⑦ Scuff plate ⑧ Clamp ⑨ Waterproof plate Cord installation points (Fig. 16) • When pulling the cord out of the car, pull from the outer - Pioneer ND-BC2 | Owner's Manual - Page 7
colores diferentes aun si tienen la misma función. Cuando se conecta este producto a otro, refiérase a los manuales de ⑦ Fusible (1A) Conexión a tierra A la carrocería del vehículo (parte metálica). ⑧ Negro Instalación del cable (Fig. 15) ① Abrazaderas ② Video-Eingangsbuchse An Video- - Pioneer ND-BC2 | Owner's Manual - Page 8
pour supporter sans éra de recul ⑤ Hayon Après l'installation du câble (Fig. 17, Fig manuale parte metallica) dell'automobile. ⑧ Nero Installazione del cavo (Fig. 15) ① Fermacavo ② Videocamera di visione posteriore ③ Cavo di alimentazione RCA ④ Apparecchio provvisto di presa per ingresso video
-
 1
1 -
 2
2 -
 3
3 -
 4
4 -
 5
5 -
 6
6 -
 7
7 -
8
 |
 |
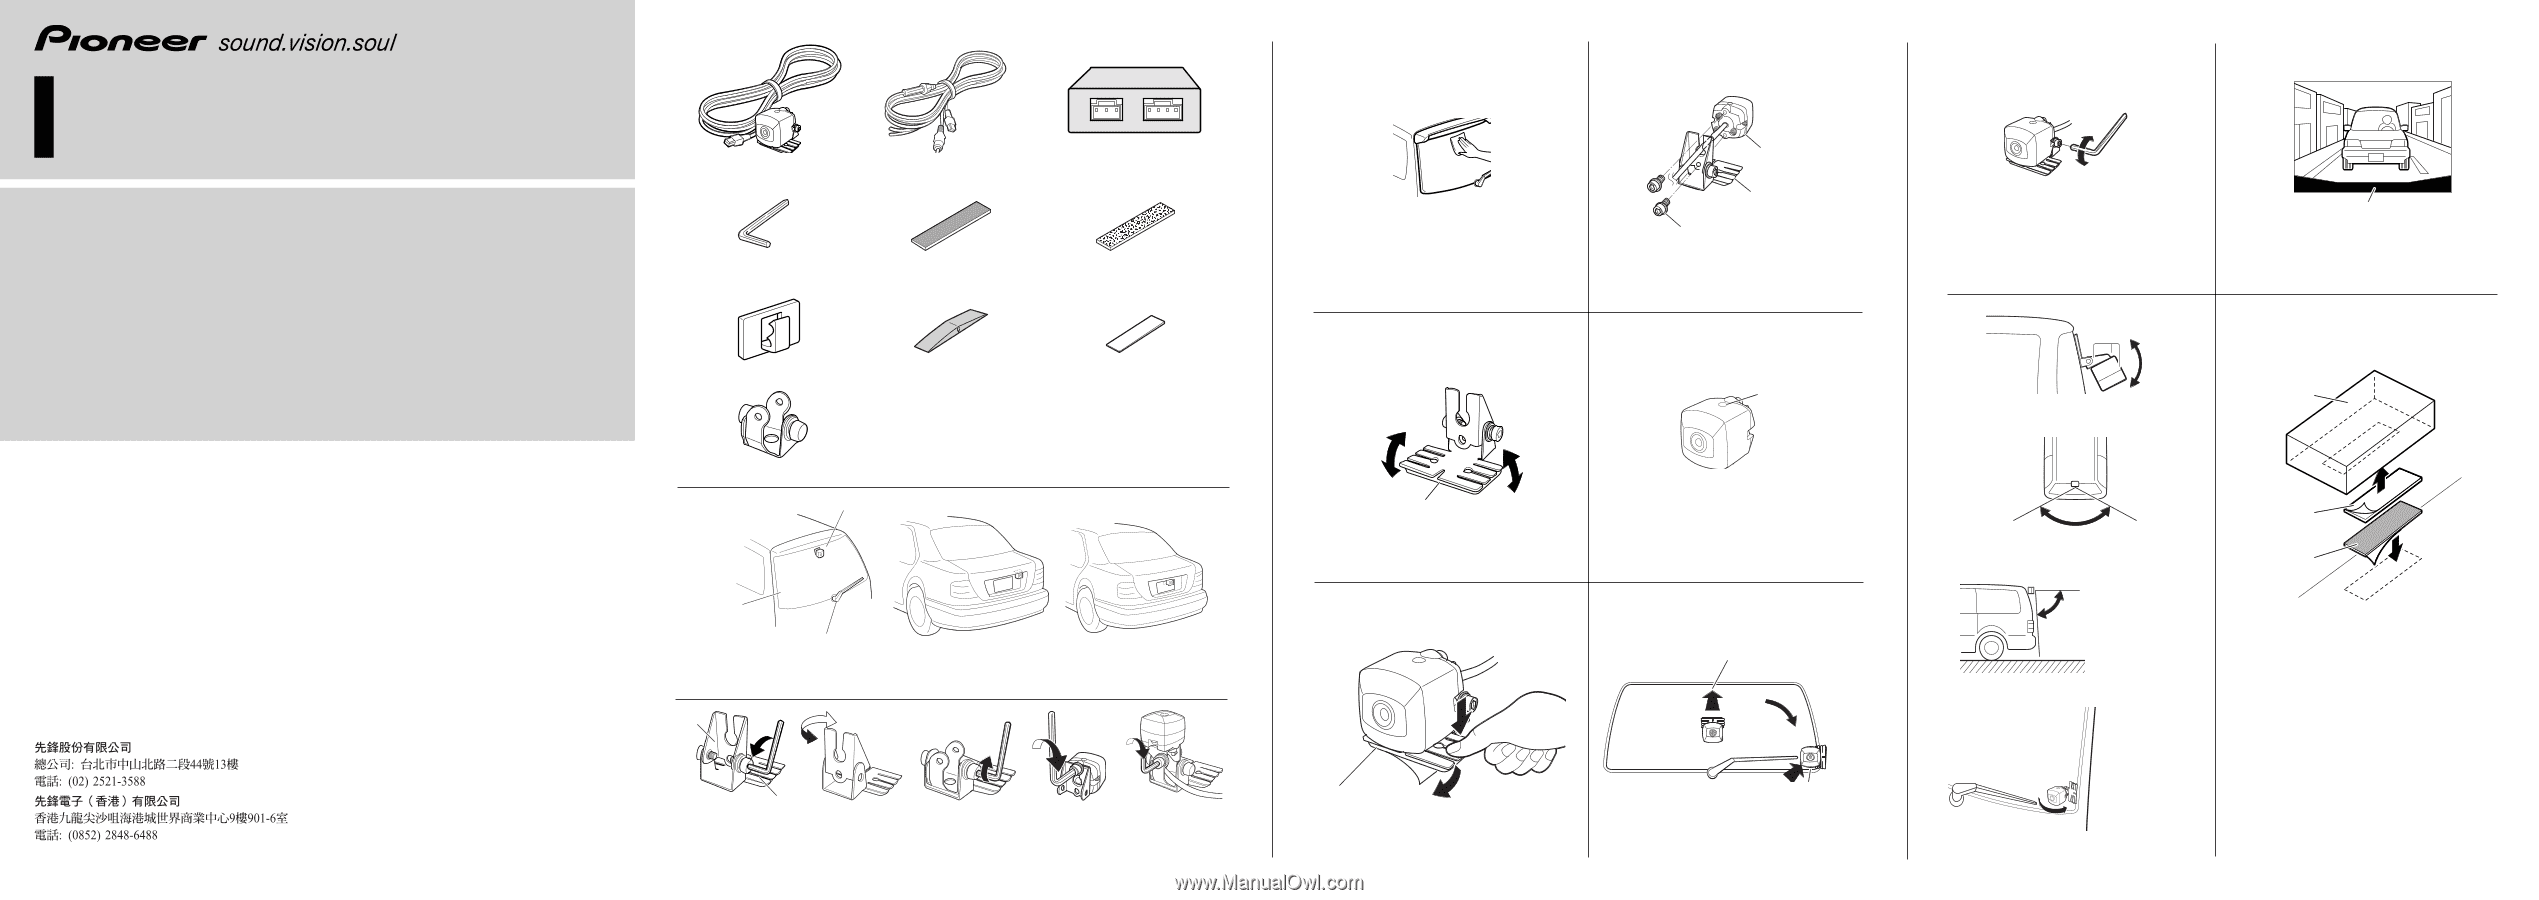
Fig. 11-2
Abb. 11-2
Fig. 11-3
Abb. 11-3
Fig. 11-1
Abb. 11-1
Fig. 11-4
Abb. 11-4
PIONEER CORPORATION
4-1, MEGURO 1-CHOME, MEGURO-KU, TOKYO 153-8654, JAPAN
PIONEER ELECTRONICS (USA) INC.
P.O. Box 1540, Long Beach, California 90801-1540, U.S.A.
TEL: (800) 421-1404
PIONEER EUROPE NV
Haven 1087, Keetberglaan 1, B-9120 Melsele, Belgium
TEL: (0) 3/570.05.11
PIONEER ELECTRONICS ASIACENTRE PTE. LTD.
253 Alexandra Road, #04-01, Singapore 159936
TEL: 65-6472-7555
PIONEER ELECTRONICS AUSTRALIA PTY. LTD.
178-184 Boundary Road, Braeside, Victoria 3195, Australia
TEL: (03) 9586-6300
PIONEER ELECTRONICS OF CANADA, INC.
300 Allstate Parkway, Markham, Ontario L3R OP2, Canada
TEL: 1-877-283-5901
PIONEER ELECTRONICS DE MEXICO, S.A. de C.V.
Blvd. Manuel Avila Camacho 138 10 piso
Col. Lomas de Chapultepec, Mexico, D.F. 11000
TEL: 55-9178-4270
Published by Pioneer Corporation.
Copyright © 2006 by Pioneer Corporation.
All rights reserved.
Publication de Pioneer Corporation.
Copyright © 2006 Pioneer Corporation.
Tous droits de reproduction et de traduction
réservés.
Printed in Japan
Imprimé au Japon
<CZR5068-A> E
<KSKNN> <06J00000>
Universal Rear View Camera
Caméra de recul universelle
Owner’s Manual
Mode d’emploi
ND-BC2
①
Glass surface
②
Make sure it doesn’t touch the wiper
③
Install on the center part
Fig. 1
Abb. 1
°
Rear view camera
×
1
±
Power supply unit
×
1
²
RCA power supply cable
×
1
³
Hexagon wrench
×
1
´
Velcro tape
(soft type)
×
1
µ
Velcro tape
(hard type)
×
1
Waterproof
pad
×
1
·
Clamp
×
10
¸
Double-sided
tape
×
1
③
Camera stand
⑤
Camera stand
①
Turn
②
Twist
①
Camera
stand
②
When sticking to the center
④
Installation
screw
③
Bottom
①
Top
②
Bottom
①
Top
Fig. 4
Abb. 4
Fig. 6
Abb. 6
Fig. 7
Abb. 7
Fig. 5
Abb. 5
②
Rear view
camera
Fig. 8
Abb. 8
Fig. 9
Abb. 9
③
Bumper or rear edge of car
①
Power supply unit
②
Velcro tape
(hard type)
③
Velcro tape
(soft type)
Fig. 10
Abb. 10
Fig. 12
Abb. 12
Fig. 13
Abb. 13
①
Angle of view
Horizontal: 135°
②
Angle of view
Vertical: 100°
¹
Camera stand bracket
±
×
1
²
°
Fig. 2
Abb. 2
Fig. 3-1
Abb. 3-1
Fig. 3-2
Abb. 3-2
Fig. 3-3
Abb. 3-3
Fig. 3-4
Abb. 3-4
③
Mark
③
When attaching using camera stand bracket
±
(attaching while rotating by 90°)