Pioneer SC-25 Owner's Manual - Page 123
The system and the other setup, Making receiver settings from the System Setup menu
 |
UPC - 012562957456
View all Pioneer SC-25 manuals
Add to My Manuals
Save this manual to your list of manuals |
Page 123 highlights
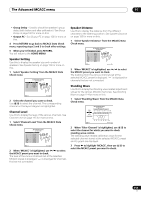
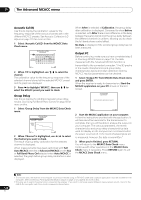
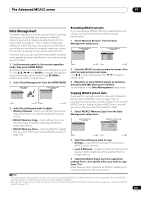
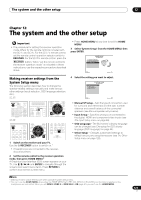
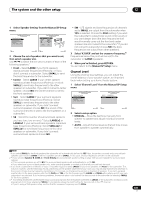
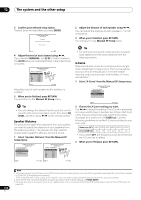
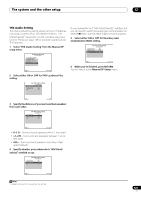
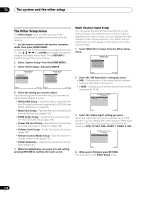
The system and the other setup 12 Chapter 12: The system and the other setup Important • The procedure for setting the receiver operation mode differs for the remote controls included with the SC-27 and SC-25. For the SC-27's remote control, set the remote control operation selector switch to RECEIVER. For the SC-25's remote control, press the RECEIVER button. When "set the remote control to the receiver operation mode" is indicated in these instructions, use the respective procedure described above. Making receiver settings from the System Setup menu The following section describes how to change the speaker-related settings manually and make various other settings (input selection, OSD language selection, etc.). SC-27: RECEIVER MAIN ZONE2 SOURCE 3 MULTI OPERATION DVD BD TV DVR HOME MEDIA VIDEO1 VIDEO2 HDMI GALLERY USB iPod CD CD-R TUNER MULTI CH SC-25: RECEIVER SOURCE DVD BD DVR HDMI HOME MEDIA TV CD CD-R GALLERY iPod USB TUNER XM SIRIUS SOURCE TV RECEIVER CH VOL VOL TV CONTROL AUDIO PARAMETER LIST TOP MENU BAND PRESET TUNE VIDEO PARAMETER TOOLS ENTER T.EDIT GUIDE PRESET CATEGORY HOME MENU iPod CTRL TUNE STATUS PHASE CTRL RETURN CH LEVEL AUDIO PARAMETER LIST VIDEO PARAMETER TUNE TOOLS TOP MENU BAND T.EDIT GUIDE PRESET ENTER PRESET CATEGORY HOME MENU TUNE iPod CTRL RETURN ANT MPX PQLS MEMORY AUDIO INFO CH DISP MULTI OPE TV CTRL RECEIVER REMOTE SETUP ZONE 2 ZONE 3 MAIN 1 Switch on the receiver and your TV. Use the RECEIVER button to switch on.1 • If headphones are connected to the receiver, disconnect them. 2 Set the remote control to the receiver operation mode, then press HOME MENU.2 A Graphical User Interface (GUI) screen appears on your TV. Use and ENTER to navigate through the screens and select menu items. Press RETURN to confirm and exit the current menu. • Press HOME MENU at any time to exit the HOME MENU. 3 Select 'System Setup' from the HOME MENU, then press ENTER. HOME MENU A/V RECEIVER 1. Advanced MCACC 2. MCACC Data Check 3. Data Management 4. System Setup Exit Return 4 Select the setting you want to adjust. 4.System Setup A/V RECEIVER a.Manual SP Setup b. Input Setup c. OSD Language d. Other Setup Exit Return • Manual SP Setup - Sets the type of connection used for surround back terminals and the size, number distance and overall balance of the connected speakers (see Manual speaker setup below). • Input Setup - Specifies what you've connected to the digital, HDMI and component video inputs (see The Input Setup menu on page 48). • OSD Language - The GUI screen's display language can be changed (see Changing the OSD display language (OSD Language) on page 45). • Other Setup - Changes customized settings to reflect how you are using the receiver (see The Other Setup menu on page 128). Note 1 Make sure not to switch off the power when using the System Setup menu. 2 You can't use the HOME MENU when either the HOME MEDIA GALLERY, XM, SIRIUS or iPod/USB input function is selected or the headphones are connected. When you set ZONE 2, ZONE 3 or ZONE 2&3 to ON (page 91), you can't use the HOME MENU. 123 en
-
 1
1 -
2
-
3
-
4
-
5
-
6
-
7
-
8
-
9
-
10
-
11
-
12
-
13
-
14
-
15
-
16
-
17
-
18
-
19
-
20
-
21
-
22
-
23
-
24
-
25
-
26
-
27
-
28
-
29
-
30
-
31
-
32
-
33
-
34
-
35
-
36
-
37
-
38
-
39
-
40
-
41
-
42
-
43
-
44
-
45
-
46
-
47
-
48
-
49
-
50
-
51
-
52
-
53
-
54
-
55
-
56
-
57
-
58
-
59
-
60
-
61
-
62
-
63
-
64
-
65
-
66
-
67
-
68
-
69
-
70
-
71
-
72
-
73
-
74
-
75
-
76
-
77
-
78
-
79
-
80
-
81
-
82
-
83
-
84
-
85
-
86
-
87
-
88
-
89
-
90
-
91
-
92
-
93
-
94
-
95
-
96
-
97
-
98
-
99
-
100
-
101
-
102
-
103
-
104
-
105
-
106
-
107
-
108
-
109
-
110
-
111
-
112
-
113
-
114
-
115
-
116
-
117
-
 118
118 -
 119
119 -
 120
120 -
 121
121 -
 122
122 -
 123
123 -
 124
124 -
 125
125 -
 126
126 -
 127
127 -
 128
128 -
129
-
130
-
131
-
132
-
133
-
134
-
135
-
136
-
137
-
138
-
139
-
140
-
141
-
142
-
143
-
144
-
145
-
146
-
147
-
148
-
149
-
150
-
151
-
152
-
153
-
154
 |
 |