Pioneer TS-A1072R Owner's Manual - Page 98
Checking the connections of leads and installation positions
 |
UPC - 012562846897
View all Pioneer TS-A1072R manuals
Add to My Manuals
Save this manual to your list of manuals |
Page 98 highlights
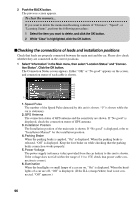
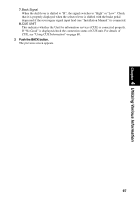
2 Push the BACK button. The previous screen appears. To clear the memory... If you want to delete the memorised learning contents of "Distance", "Speed", or "Learning Status", perform the following procedure: 1 Select the item you want to delete, and click the OK button. 2 While "Clear" is highlighted, click the OK button. ■Checking the connections of leads and installation positions Check that leads are properly connected between the main unit and the car. Please also check whether they are connected in the correct positions. 1 Select "Information" in the Main menu, then select "Location Status" and "Connection Status". Click the OK button. The Connection Status screen appears. Either "OK" or "No good" appears on the screen, and connection status of each cable is shown. 1 2 3 4 5 6 7 8 1. Speed Pulse The number of the Speed Pulse detected by this unit is shown. "0" is shown while the car is stationary. 2. GPS Antenna The connection status of GPS antenna and the sensitivity are shown. If "No good" is displayed, check the connection status of GPS antenna. 3. Installation Position The Installation position of the main unit is shown. If "No good" is displayed, refer to "Installation Manual" for the installation position. 4. Parking Brake When the parking brake is applied, "On" is displayed. When the parking brake is released, "Off" is displayed. Keep the foot brake on while checking that the parking brake connection works properly. 5. Power Voltage The power supply (reference value) provided from the car battery to this unit is shown. If the voltage does not fall within the range of 11 to 15V, check that power cable connection is correct. 6. Illumination When the headlights or small lamps of a car are on, "On" is displayed. When the headlights of a car are off, "Off" is displayed. (If the ILL (orange/white) lead is not connected, "Off" appears.) 96
-
 1
1 -
2
-
3
-
4
-
5
-
6
-
7
-
8
-
9
-
10
-
11
-
12
-
13
-
14
-
15
-
16
-
17
-
18
-
19
-
20
-
21
-
22
-
23
-
24
-
25
-
26
-
27
-
28
-
29
-
30
-
31
-
32
-
33
-
34
-
35
-
36
-
37
-
38
-
39
-
40
-
41
-
42
-
43
-
44
-
45
-
46
-
47
-
48
-
49
-
50
-
51
-
52
-
53
-
54
-
55
-
56
-
57
-
58
-
59
-
60
-
61
-
62
-
63
-
64
-
65
-
66
-
67
-
68
-
69
-
70
-
71
-
72
-
73
-
74
-
75
-
76
-
77
-
78
-
79
-
80
-
81
-
82
-
83
-
84
-
85
-
86
-
87
-
88
-
89
-
90
-
91
-
92
-
 93
93 -
 94
94 -
 95
95 -
 96
96 -
 97
97 -
 98
98 -
 99
99 -
 100
100 -
 101
101 -
 102
102 -
 103
103 -
104
-
105
-
106
-
107
-
108
-
109
-
110
-
111
-
112
-
113
-
114
-
115
-
116
-
117
-
118
-
119
-
120
-
121
-
122
-
123
-
124
-
125
-
126
-
127
-
128
-
129
-
130
-
131
-
132
-
133
-
134
-
135
-
136
-
137
-
138
-
139
-
140
-
141
-
142
-
143
-
144
-
145
-
146
-
147
-
148
-
149
-
150
-
151
-
152
-
153
-
154
-
155
-
156
-
157
-
158
-
159
-
160
-
161
-
162
-
163
-
164
-
165
-
166
-
167
-
168
-
169
-
170
-
171
-
172
-
173
-
174
-
175
-
176
-
177
-
178
-
179
-
180
-
181
-
182
-
183
-
184
-
185
-
186
-
187
-
188
-
189
-
190
-
191
-
192
-
193
-
194
-
195
-
196
-
197
-
198
-
199
-
200
 |
 |
