Pioneer VSX-33TX Owner's Manual - Page 68
Recording from Video Components, Recording from Digital Audio Components
 |
View all Pioneer VSX-33TX manuals
Add to My Manuals
Save this manual to your list of manuals |
Page 68 highlights
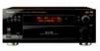
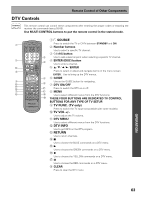
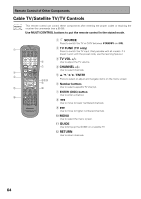
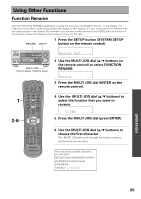
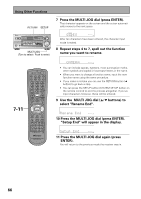
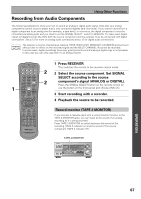
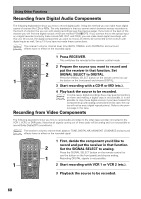
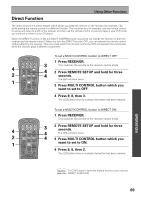
Using Other Functions Recording from Digital Audio Components The following explanations show you how to record digital audio. Using this method you can make exact digital copies of sources like CDs or MDs. The only drawback is that you cannot switch between various recorders at the touch of a button like you can with analog recordings (see the previous page). If you look on the back of the receiver you will find one digital out jack which are marked PCM/2/DTS. If you connect this to the optical input on a digital recorder (currently these include MD, DAT, and CD-R), you can make direct digital recordings with this unit. Of course, the digital components you want to record, all need to be connected to the receiver with digital inputs as well. See p.13 if you have not made these connections. memo The receiver's volume, channel level, tone (BASS, TREBLE, and LOUDNESS), and surround effects have no effect on the recorded signal. 1 Press RECEIVER. SOURCE RECEIVER This switches the remote to the receiver control mode. DVD CD TV VCR 1 MULTI CONTROL CD-R TUN VCR 2 TVC 2 2 Prepare the source you want to record and 1 LOUDNESS 4 2 3 VIDEO SELECT MULTI CH INPUT 5 6 put the receiver in that function. Set 1 INPUT ATT DIGITAL NR FL DIMMER 7 8 9 REMOTE SETUP SYSTEM SETUP SIGNAL SELECT +10 DISC 0 ENTER EFFECT/CH SEL RECEIVER 2 SIGNAL SELECT to DIGITAL. Press the SIGNAL SELECT button on the remote control (or use the button on the front panel) and choose DIGITAL. TV VOL TV MASTER VOLUME TV CONTROL TVFUNC 3 Start recording with a CD-R or MD (etc.). 4 CHANNEL TUNE ¢ 4 Play back the source to be recorded. ST ST ENTER TUNE memo In some cases, digital recordings have copy guard protections on them and making a digital copy is not possible. It is still possible to copy these digital sources if you have hooked the components up with analog connections (in this case, the copies will not be exact digital reproductions). Refer to the previous page in this case. Recording from Video Components The following operations show you how to record audio and video to the video tape recorder connected to the VCR 1, VCR 2 or DVR jacks. Note that all signals coming out of these jacks will be analog and it is not possible to record Dolby Digital/DTS soundtracks. memo The receiver's volume, channel level, balance, TONE, DIGITAL NR, MIDNIGHT, LOUDNESS and surround effects have no effect on the recorded signal. 1 SOURCE RECEIVER DVD CD TV VCR 1 MULTI CONTROL CD-R TUN VCR 2 TVC 1 LOUDNESS 2 3 VIDEO SELECT MULTI CH INPUT 4 5 6 INPUT ATT DIGITAL NR FL DIMMER 7 8 9 REMOTE SETUP SYSTEM SETUP SIGNAL SELECT +10 DISC 0 ENTER EFFECT/CH SEL RECEIVER TV VOL TV MASTER VOLUME TV CONTROL TVFUNC 4 CHANNEL ¢ TUNE ST ST ENTER 2 1 1 First, decide the component you'd like to record and put the receiver in that function. Set the SIGNAL SELECT to analog. Press the SIGNAL SELECT button on the remote control (or use the button on the front panel) and choose analog. Recording DIGITAL signals is not possible. 2 Start recording with VCR 1 or VCR 2 (etc.). 3 Playback the source to be recorded. 68
-
 1
1 -
2
-
3
-
4
-
5
-
6
-
7
-
8
-
9
-
10
-
11
-
12
-
13
-
14
-
15
-
16
-
17
-
18
-
19
-
20
-
21
-
22
-
23
-
24
-
25
-
26
-
27
-
28
-
29
-
30
-
31
-
32
-
33
-
34
-
35
-
36
-
37
-
38
-
39
-
40
-
41
-
42
-
43
-
44
-
45
-
46
-
47
-
48
-
49
-
50
-
51
-
52
-
53
-
54
-
55
-
56
-
57
-
58
-
59
-
60
-
61
-
62
-
 63
63 -
 64
64 -
 65
65 -
 66
66 -
 67
67 -
 68
68 -
 69
69 -
 70
70 -
 71
71 -
 72
72 -
 73
73 -
74
-
75
-
76
-
77
-
78
-
79
-
80
-
81
-
82
-
83
-
84
 |
 |