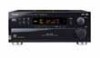
Pioneer VSX-37TX Owner's Manual - Page 23
Preparation
 |
View all Pioneer VSX-37TX manuals
Add to My Manuals
Save this manual to your list of manuals |
Page 23 highlights
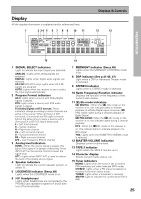
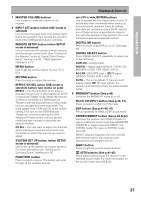
PREPARATION Displays & Controls 1 2 34 5 6 7 8 9 VSX-36TX AUDIO/VIDEO MULTI-CHANNEL RECEIVER N∫m¿≤>ım STANDBY/ON STANDBY DSP MODE STEREO/ DIRECT /DTS THX CINEMA ADVANCED STANDARD MULTI-ROOM &SOURCE CONTROL PHONES S-VIDEO VIDEO INPUT VIDEO L AUDIO R MULTI CH INPUT CHANNEL TONE SELECT DIGITAL SIGNAL FL LOUDNESS NR SELECT DIMMER CLASS BAND - TUNING + SPEAKERS - BASS + - TREBLE + VIDEO TAPE 2 SELECT MONITOR MPX TUNER CONTROL MEMORY - STATION + DOWN INPUT SELECTOR MASTER VOLUME UP 10 11 12 13 14 15 16 3 MULTI CH INPUT (See p.40, 51) Use to hook up an external component that can decode other types of signals and input them into the VSX-37TX/36TX. 4 TONE control buttons TONE button This button has two functions. Firstly, it switches between TONE ON and TONE BYPASS, which bypasses the tone circuitry. Secondly, you need to press the button before using the CHANNEL SELECT buttons to adjust the BASS & TREBLE (cannot be used in THX or MULTI CH IN modes). CHANNEL SELECT button Switches the tone adjust controls between the FRONT, CENTER, SURROUND and SURROUND BACK speakers. You can then use the BASS and TREBLE controls to adjust the sound. BASS (-/+) button (See p.50) Use to adjust low frequencies. TREBLE (-/+) button (See p.50) Use to adjust the high frequencies. 5 LOUDNESS button (See p.49) Switches the LOUDNESS mode on or off (cannot be used in THX or MULTI CH IN modes). DIGITAL NR button (See p.48) Switches the DIGITAL NR on or off (cannot be used in THX or MULTI CH IN modes). SIGNAL SELECT button (See p.47) Use to select the type of signal being input into the receiver. Press SIGNAL SELECT repeatedly to select one of the following: ANALOG - To select an analog signal. DIGITAL - To select a optical or coaxial digital signal. AC-3 RF (VSX-37TX only) - To select an 2 RF signal. AUTO - This is the default. If there are analog, digital and 2 RF signals input, the receiver automatically selects the 2 RF signal. If there are analog and digital signals input the digital will be selected. FL DIMMER button (See p.52) Use to adjust the brightness of the main display. 6 Display (See p.25) 7 Remote sensor Point the remote control toward the remote sensor to operate the receiver. 8 MULTI-ROOM & SOURCE button (See p.78-82) Press to use the multi room feature (requires an optional PIONEER Multi-Room Remote Sensor Unit MR-100 or another IR receiver). CONTROL button (See p.78-82): Used together with the INPUT SELECTOR to select the function or use with the MASTER VOLUME to select the volume of the MULTI ROOM system. 23
-
 1
1 -
2
-
3
-
4
-
5
-
6
-
7
-
8
-
9
-
10
-
11
-
12
-
13
-
14
-
15
-
16
-
17
-
 18
18 -
 19
19 -
 20
20 -
 21
21 -
 22
22 -
 23
23 -
 24
24 -
 25
25 -
 26
26 -
 27
27 -
 28
28 -
29
-
30
-
31
-
32
-
33
-
34
-
35
-
36
-
37
-
38
-
39
-
40
-
41
-
42
-
43
-
44
-
45
-
46
-
47
-
48
-
49
-
50
-
51
-
52
-
53
-
54
-
55
-
56
-
57
-
58
-
59
-
60
-
61
-
62
-
63
-
64
-
65
-
66
-
67
-
68
-
69
-
70
-
71
-
72
-
73
-
74
-
75
-
76
-
77
-
78
-
79
-
80
-
81
-
82
-
83
-
84
-
85
-
86
-
87
-
88
-
89
-
90
-
91
-
92
 |
 |
