Plantronics MX10 User Guide - Page 4
install - switcher
 |
UPC - 017229007048
View all Plantronics MX10 manuals
Add to My Manuals
Save this manual to your list of manuals |
Page 4 highlights
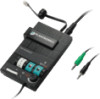
PA R T install in 5 easy steps Switcher.biling.ii-25 11/4/98 7:58 PM Page vi I PLUG INTO POWER SOURCE CONNECT TO PHONE AND HEADSET SET DEFAULT SETTINGS SET TELEPHONE/AMPLIFIER COMPATIBILITY SWITCH CONNECT TO AN AUDIO DEVICE vi INSTALLATION STEPS 1 S T E P plug into power source The AC power supply is shown installed and plugged in to a standard wall socket on the Installation Overview (see page v). The Switcher amplifier requires power to work with most phones. Power is not required for: • Lucent Merlin®, System 75/85 phones • Lucent Definity® and 8400 series phones Installing batteries We recommend an AC power supply (included). Two AA alkaline batteries (not included) may also be used, but batteries will need to be replaced frequently. 1. Remove the Battery Access Door located on the side of the amplifier by placing your thumb on the door and pushing down. 2. Install two AA alkaline batteries and replace the door. 3. You will hear three "beeps" through the head- set when the batteries are low. english 1
-
 1
1 -
 2
2 -
 3
3 -
 4
4 -
 5
5 -
 6
6 -
 7
7 -
 8
8 -
 9
9 -
 10
10 -
11
-
12
-
13
-
14
-
15
-
16
-
17
-
18
-
19
-
20
-
21
-
22
-
23
-
24
-
25
-
26
-
27
-
28
-
29
-
30
-
31
-
32
 |
 |
