Polaroid DRA-01601A User Manual
Polaroid DRA-01601A Manual
 |
View all Polaroid DRA-01601A manuals
Add to My Manuals
Save this manual to your list of manuals |
Polaroid DRA-01601A manual content summary:
- Polaroid DRA-01601A | User Manual - Page 1
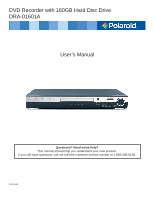
DVD Recorder with 160GB Hard Disc Drive DRA-01601A User's Manual Questions? Need some help? This manual should help you understand your new product. If you still have questions, call our toll-free customer service number at 1-866-286-5168. 20070406 - Polaroid DRA-01601A | User Manual - Page 2
Instructions To ensure proper use of this product, please read this user's manual carefully and save for future reference. This manual provides information regarding the use and maintenance of your DVD recorder and the unit may not work normally. In this case, keep the power on for an hour or two - Polaroid DRA-01601A | User Manual - Page 3
Safety Information 2 Identification of Controls 4 Remote Control 6 System Connections 8 System Setup 14 Source List 22 Recording 22 Copying from HDD to DVD 24 Playback 24 Editing 25 File Manager 28 USB and SD 29 YesDVD® 30 Troubleshooting 33 Technical Specifications 34 - Polaroid DRA-01601A | User Manual - Page 4
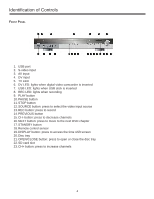
: press to select the video input source 13. REC button: press to record 14. PREVIOUS button 15. CH- button: press to decrease channels 16. NEXT button: press to move to the next DVD chapter 17. STANDBY button 18. Remote control sensor 19. DISPLAY button: press to access the time shift screen 20 - Polaroid DRA-01601A | User Manual - Page 5
Identification of Controls REAR PANEL 1. Analog Tuner - RF Signal Output: Connect to your TV (Home Theatre System): These outputs connect to your home theatre system's amplifier speaker inputs 10. Fan 11. AC Power 110-240V 50/60Hz 12. Analog Tuner - RF Signal Input: Connect to an external antenna or - Polaroid DRA-01601A | User Manual - Page 6
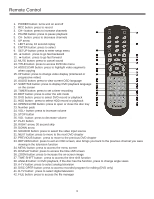
Remote Control 1. POWER button: turns unit on and off 2. REC button: press to record 3. CH+ button: press to increase channels a timer recording 19. EDIT button: press to enter the edit mode 20. DVD button: press to select DVD record or playback 21. HDD button: press to select HDD record or playback - Polaroid DRA-01601A | User Manual - Page 7
To install batteries and use remote control: Notes: • Do not drop the remote control or leave it in places with high humidity. • Do not leave the IR remote sensor exposed to direct sunlight or bright light. • Do not mix old and new batteries should they need replacing. • Do not use rechargeable - Polaroid DRA-01601A | User Manual - Page 8
in the "Setup" section of this user's manual for instructions on how to scan channels. • Using the RF connection from your wall outlet, connect the cable to the analog tuner input (#12) on the back panel of your DVD Recorder. CONNECTING AN ANALOG SIGNAL FROM DVD RECORDER TO TV: • Using the RF input - Polaroid DRA-01601A | User Manual - Page 9
TO AN HDMI SIGNAL: HDMI has the capability to support standard, enhanced, or high-definition video, plus standard (#2) on the rear panel of your DVD Recorder. • When using the HDMI connection, you may need to change the resolution (480p, 480i) in your DVD Recorder's setup menu. HDMI, the HDMI logo - Polaroid DRA-01601A | User Manual - Page 10
box, VCR, etc), connect the other ends of the cables to the analog audio input (#8) on the rear panel of your DVD Recorder. CONNECTING VIDEO INPUT TO YOUR DVD RECORDER: • Using the yellow video cable coming from your AV equipment (ie. set-top box, cable box, satellite box, VCR, etc), connect - Polaroid DRA-01601A | User Manual - Page 11
System Connections S-VIDEO: S-VIDEO OUTPUT: • Insert the S-video cable (not included) into the S-video output (#3) on the rear panel of your DVD Recorder. • Connect the other end of the S-video cable to the corresponding input on your TV. S-VIDEO INPUT: • Using the S-video cable coming from your AV - Polaroid DRA-01601A | User Manual - Page 12
your TV or home theatre system. OPTICAL (DIGITAL): • Insert the optical cable into the digital audio optical output (#6) on the read panel of your DVD Recorder. • Connect the other end of the optical cable to the corresponding inputs on either your TV or home theatre system. • Care should be taken - Polaroid DRA-01601A | User Manual - Page 13
system: FL (front left), FR (front right), SL (surround left), SR (surround right), Center, and Subwoofer. • Connect the RCA outputs from the DVD Recorder to the corresponding inputs on your home theatre system. • Note: the subwoofer connection needs to be made with a coaxial cable (not included - Polaroid DRA-01601A | User Manual - Page 14
arrow to highlight TV Display. 3. Press ENTER to select. This selects the aspect ratio for the DVD recorder for playback. Note: you may need to modify the aspect ratio on your TV. Please consult your TV's user's manual. 4. Use the down arrow to select the desired aspect ratio and ENTER to select - Polaroid DRA-01601A | User Manual - Page 15
SETUP. 2. Press right arrow key and then down arrow to highlight Reset to Factory Defaults. This will clear all changes you have made to the DVD recorder settings. 3. Press ENTER. A dialog box will appear. 4. Press "ok" to reset factory defaults, "cancel" to go back. 5. To exit setup, press SETUP - Polaroid DRA-01601A | User Manual - Page 16
System Setup AUDIO/VIDEO, CONTINUED LPCM OUTPUT (LINEAR PULSE CODE MODULATION): 1. Press SETUP. 2. Press down arrow to select the Video/Audio menu. 3. Press right arrow key and then down arrow to highlight LPCM Output. 4. Press ENTER. 5. Use the down arrow to select the desired LPCM output and ENTER - Polaroid DRA-01601A | User Manual - Page 17
text display. The default is C1. c. 708CC Type: press the right or left arrow to select the desired font and text side. The default is Service 1. d. CC Mode: use the right or left arrow to select "broadcast" or "customer". The default is "broadcast". e. CC Customer: If you changed the CC Mode - Polaroid DRA-01601A | User Manual - Page 18
then down arrow to highlight DTV Parental Control. 4. Press ENTER. A dialog box will appear. 5. Enter the password 3-3-0-8 using the number pads and select to turn on or off. RECORDING: AUTO CHAPTER MARKER: 1. Press SETUP. 2. Press down arrow to select the Recording menu. 3. Press right arrow key - Polaroid DRA-01601A | User Manual - Page 19
BUFFER LENGTH: 1. Press SETUP. 2. Press down arrow to select the Hard/Optical Disk menu. 3. Press right arrow key to highlight TimeShift Buffer Length. 4. Press ENTER. 5. Use the down arrow to select the desired length of time to record and ENTER to select. The default is "60 minutes". 6. To exit - Polaroid DRA-01601A | User Manual - Page 20
ERASE OPTICAL DISK: 1. Press SETUP. 2. Press down arrow to select the Hard/Optical Disk menu. 3. Press right arrow key and then down arrow to highlight SETUP. DATE/TIME: Note: Should you lose power or unplug the unit for more than 15 minutes, you must reset the date and time. DAYLIGHT SAVING: 1. - Polaroid DRA-01601A | User Manual - Page 21
System Setup DATE/TIME, CONTINUED TIME ZONE: 1. Press SETUP. 2. Press down arrow to select the Date-Time Setting menu. 3. Press right arrow key and then down arrow to highlight Time Zone. 4. Press ENTER. 5. Use the down arrow to select the desired time zone and ENTER to select. The default is "Samo - Polaroid DRA-01601A | User Manual - Page 22
to access the USB or SD card, press FILE. Recording Before recording, endure the timeshift buffer is off by pressing TIMESHIFT on the remote. To confirm timeshift is off, press DISPLAY. The system state should indicate "stop". RECORDING TO THE HDD USING THE REC BUTTON: 1. Select the source for the - Polaroid DRA-01601A | User Manual - Page 23
on the remote control. 2. Press ENTER. A dialog box will appear. a. Source: press ENTER. Use right arrow then up and down arrows to select the input source or DTV scanned channel. b. Record To: press ENTER. Use right arrow then up and down arrows to select to record to the HDD or DVD c. Quality - Polaroid DRA-01601A | User Manual - Page 24
. Playback PLAYBACK FROM HDD: 1. Press HDD. A dialog box will appear. 2. Using the up and down arrows, select the recorded segment you would like to watch and press ENTER. A preview screen will appear. 3. Press ENTER again to start watching. PLAYBACK FROM DVD: 1. Press DVD. Preview screens will - Polaroid DRA-01601A | User Manual - Page 25
DVD: 1. Press DVD. Preview screens will appear. 2. Using the up and down arrows, select the recorded DVD will record over the existing video clip space on the DVD appear. Recoding to DVD will record over the entire DVD disk. i. Append dialog box will appear. Recording to DVD will add to the current - Polaroid DRA-01601A | User Manual - Page 26
arrow and scroll down to "unlock". Using the number pads, enter the password 3-3-0-8. Press ENTER again. The title is now unlocked. i. Unprotect: press ENTER. • To copy from HDD to DVD, using the up and down arrows, select the recorded segment you would like to edit. Press ADD/CLEAR to make the - Polaroid DRA-01601A | User Manual - Page 27
the last input source used. Press REC button and using the right or left arrow, select the source to which you would like to record (HDD or DVD). Press STOP to stop recording. You will be asked if you want create a YesDVD. To create a YesDVD, select "yes, create YesDVD disc", select "no" to continue - Polaroid DRA-01601A | User Manual - Page 28
and down arrows, select "Unselect all" and press ENTER. This will uncheck all items. 8. Add to favorite 9. Show favorite list HDD: 1. Press FILE. The file manager will appear. Select "HDD" and press ENTER. 2. Using the up and down arrows, select the file you would like to access. 3. Press right arrow - Polaroid DRA-01601A | User Manual - Page 29
and press ENTER to view. Press ENTER again to return to the File Manager. COPY MATERIAL FROM YOUR USB/SD TO HDD: 1. Insert USB/SD into the appropriate slot on the DVD recorder. 2. Press FILE. A dialog box will appear. 3. Using the up and down arrows, highlight the material you want to copy. 4. Press - Polaroid DRA-01601A | User Manual - Page 30
your video and can be printed for a standard DVD case or a standard jewel case (not available for hard disc drive recordings) HOW TO SET UP YesDVD: 1. With your remote control, press the SETUP button to enter the setup menu. 2. Use the remote control arrow buttons to highlight the YesDVD option and - Polaroid DRA-01601A | User Manual - Page 31
the remote control to navigate through the chapters. • If you preform editing functions (ie. split, segment, combine) to YesDVD recordings on the hard drive, the YesDVD features will be lost. DUB HDD RECORDINGS TO DVD: Use this feature to archive hard disc drive recordings onto DVD+R/RW or DVD-R/RW - Polaroid DRA-01601A | User Manual - Page 32
YesDVD® PRINT THE CASE COVERSHEET: 1. Remove the YesDVD disc from the DVD Recorder. 2. Insert the YesDVD disc into your computer's DVD-ROM tray. 3. A window will appear with printing instructions. Choose a coversheet for a standard DVD case or a standard jewel case. Select the size of coversheet you - Polaroid DRA-01601A | User Manual - Page 33
Troubleshooting Guide Before contacting service personnel, please check possible problems and solutions below: SYMPTOM POSSIBLE CAUSE REMEDY No power 1. Power supply disconnected 2. Bad connection between power plug and receptacle 3. Power of receptacle switched off 1. Connect to power supply - Polaroid DRA-01601A | User Manual - Page 34
SPECIFICATIONS* Supported disc formats Supported recordable disc functions Recording format Recording quality Input Output Input RF features Video features Audio specifications General specifications Working humidity DVD, DVD+R/RW, DVD-R/RW, SVCD, VCD, JPEG, MPEG4 DVD+R/RW, DVD-R/RW DVD, MPEG - Polaroid DRA-01601A | User Manual - Page 35
disc can be played on other DVD players after being closed. DVD+RW discs are also called DVD+Rewritabe discs. You can record onto this disc multiple times. Erasing the disc means removing information stored on the optical disc or hard disc. Some DVDs record different images of one view taken - Polaroid DRA-01601A | User Manual - Page 36
region can only use DVD players and DVD discs with certain region DVDs, or VCDs is divided into several areas. Each area is a track. Each track has it own unique number so it can be searched easily. For service, support and warranty information, visit www.polaroid.com. "Polaroid" and "Polaroid
-
 1
1 -
 2
2 -
 3
3 -
 4
4 -
 5
5 -
 6
6 -
 7
7 -
8
-
9
-
10
-
11
-
12
-
13
-
14
-
15
-
16
-
17
-
18
-
19
-
20
-
21
-
22
-
23
-
24
-
25
-
26
-
27
-
28
-
29
-
30
-
31
-
32
-
33
-
34
-
35
-
36
 |
 |
DVD Recorder with 160GB Hard Disc Drive
DRA-01601A
20070406
User’s Manual
Questions? Need some help?
This manual should help you understand your new product.
If you still have questions, call our toll-free customer service number at 1-866-286-5168.