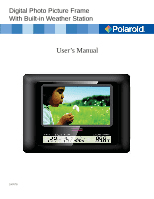
Polaroid XSA-00770S User Manual - Page 5
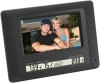
Quick Start - 7 digital photo frame with weather station
 |
UPC - 826219009838
View all Polaroid XSA-00770S manuals
Add to My Manuals
Save this manual to your list of manuals |
Page 5 highlights
Quick Start Quick Start Instructions 1. Plug the AC adapter into the Digital Photo Picture Frame with Built-in Weather Station and plug it into a wall outlet. 2. Insert a memory card into the slot or inset peripheral USB equipment into USB host: Memory Card Slot: Secure Digital™, MultiMedia Card™, Memory Stick™, Memory Stick Duo™ 3. Turn on the Power Switch on the back of the Digital Photo Picture Frame. 4. Once the Digital Photo Picture Frame has been turned on, the unit will enter the "Select Card" page automatically. 5. Press the >> or > or > or > button to next picture or press the > button to move to the right side of the picture and press the > or > or
-
 1
1 -
 2
2 -
 3
3 -
 4
4 -
 5
5 -
 6
6 -
 7
7 -
 8
8 -
 9
9 -
 10
10 -
 11
11 -
12
 |
 |

Quick Start
Quick Start Instructions
1. Plug the AC adapter into the Digital Photo Picture Frame with Built-in Weather Station and plug it
into a wall outlet.
2. Insert a memory card into the slot or inset peripheral USB equipment into USB host:
Memory Card Slot: Secure Digital™, MultiMedia Card™, Memory Stick™, Memory Stick Duo™
3. Turn on the Power Switch on the back of the Digital Photo Picture Frame.
4. Once the Digital Photo Picture Frame has been turned on, the unit will enter the “Select Card” page
automatically.
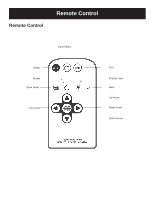
5. Press the >>
or <<
button to select one type of memory cards and press the Play (
►
II) button to
enter “Select Mode” page.
6. Press the >>
or <<
button to select one mode and press the Play (
►
II) button to enter.
7. Or press the EXIT button to back to the “Select Card” page.
8. Follow step 6, press the >>
or <<
button to select one picture and press the Play (
►
II) button to
view it in full screen. Then press the >>
button to next picture or press the <<
button to previous pic-
ture. Press the EXIT button to exit.
9. When viewing a picture, press the Play (
►
II) button again to enlarge the current picture. Under
zoom in state, press the >>
button to move to the right side of the picture and press the <<
button to
move to the left side. Press the EXIT button to zoom out the picture to original size.
10. Press the EXIT button for one second to access the on screen display (OSD). Press the >>
or
<<
button to choose one item and press the Play (
►
II) button to enter. Press the >>
or <<
button to
choose one option and press the Play (
►
II) button to con
fi
rm your choice. Press the EXIT button to
exit the OSD.