Polaroid Z340E Z340E Instant Print Digital Camera Manual - Page 55
Loading Customized Borders - z340 supplies
 |
View all Polaroid Z340E manuals
Add to My Manuals
Save this manual to your list of manuals |
Page 55 highlights
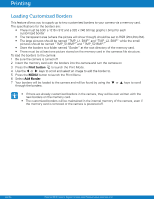
Printing Loading Customized Borders This feature allows you to supply up to two customized borders to your camera via a memory card. The specifications for the borders are: • There must be both a 1216 x 912 and a 320 x 240 bitmap graphic (.bmp) for each customized border • The transparent area (where the picture will show though) should be set to RGB (254,254,254). • The large pictures should be named "TMP_L1. BMP" and "TMP_L2. BMP" while the small pictures should be named "TMP_S1.BMP" and "TMP_S2.BMP". • Store the borders to a folder named "Border" at the root directory of the memory card. • There must be at least one picture stored on the memory card in the cameras file structure. To load the borders to the camera: 1 Be sure the camera is turned off. 2 Insert the memory card with the borders into the camera and turn the camera on 3 Press the Print button to launch the Print Mode. 4 Use the or keys to scroll and select an image to add the border to. 5 Press the MENU button to launch the Print Menu. 6 Select Add Border. 7 Your borders will be loaded to the camera and will be found by using the or keys to scroll through the borders. • If there are already customized borders in the camera, they will be over written with the new borders on the memory card. • The customized borders will be maintained in the internal memory of the camera, even if the memory card is removed or the camera is powered off. EN-54 Polaroid Z340 Instant Digital Camera User Manual www.polaroid.com
-
 1
1 -
2
-
3
-
4
-
5
-
6
-
7
-
8
-
9
-
10
-
11
-
12
-
13
-
14
-
15
-
16
-
17
-
18
-
19
-
20
-
21
-
22
-
23
-
24
-
25
-
26
-
27
-
28
-
29
-
30
-
31
-
32
-
33
-
34
-
35
-
36
-
37
-
38
-
39
-
40
-
41
-
42
-
43
-
44
-
45
-
46
-
47
-
48
-
49
-
 50
50 -
 51
51 -
 52
52 -
 53
53 -
 54
54 -
 55
55 -
 56
56 -
 57
57 -
 58
58 -
 59
59 -
 60
60 -
61
-
62
-
63
-
64
 |
 |