Poulan HD145H42H User Manual - Page 7
Assembly
 |
View all Poulan HD145H42H manuals
Add to My Manuals
Save this manual to your list of manuals |
Page 7 highlights
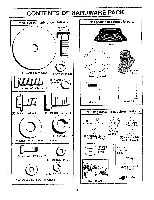
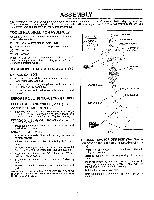
ASSEMBLY HOW TO SET UP YOUR TRACTOR CONNECT BATTERY (See Figs. 2 and 3) a CAUTION: Do not short battery terminais by allowing a wrench or any other object to contact both terminals at the same time. Before connecting battery, remove metal bracelets, wristwatch bands, rings, etc. Positive terminal must be connected first to prevent sparking from accidental grounding. • Remove cardboard packing from seat pan and lift seat pan to raised position. Open battery box door. • Remove terminal protective caps and discard. • If this battery is put into service after month and year indicated on label (label located between terminals) charge battery for minimum of one hour at 6-10 amps. • First connect RED battery cable to positive (+) terminal with hex bolt, flat washer, lock washer and hex nut as shown. Tighten securely. • Connect BLACK grounding cable to negative (-) terminal with remaining hex bolt, flat washer, lock washer and hex nut. Tighten securely. Close battery box door. Open battery box door for: • Inspection for secure connections (to tighten hardware). • Inspection for corrosion. • Testing battery. • Jumping (if required). • Periodic charging . DISCARD TERMINAL PROTECTIVE CAPS HEX NUT vk LOCK WASHER FLAT WASHER SEAT PAN BATTERY BOX DOOR FIG. 3 INSTALL SEAT (See Fig. 4) Adjust seat before tightening adjustment bolt. • Remove cardboard packing on seat pan. • Place seat on seat pan and assemble shoulder bolt.Tighten shoulder bolt securely. • Assemble adjustment bolt, lock washer and flat washer loosely. Do not tighten. • Lower seat into operating position and sit on seat. • Slide seat until a comfortable position is'reached which allows you to press clutch/brake pedal all the way down. • Get off seat without moving its adjusted position. • Raise seat and tighten adjustment bolt securely. SEAT PAN SHOULDER BOLT SEAT POSITIVE (RED) CABLE NEGATIVE (BLACK) CABLE FIG. 2 HEX BOLT ADJUSTMENT BOLT FLAT WASHER LOCK WASHER FIG. 4 7
-
 1
1 -
 2
2 -
 3
3 -
 4
4 -
 5
5 -
 6
6 -
 7
7 -
 8
8 -
 9
9 -
 10
10 -
 11
11 -
 12
12 -
13
-
14
-
15
-
16
-
17
-
18
-
19
-
20
-
21
-
22
-
23
-
24
-
25
-
26
-
27
-
28
-
29
-
30
-
31
-
32
-
33
-
34
-
35
-
36
-
37
-
38
-
39
-
40
-
41
-
42
-
43
-
44
-
45
-
46
-
47
-
48
-
49
-
50
-
51
-
52
 |
 |
