Poulan PR521 User Manual - Page 5
Setup, Loose Parts, Procedure
 |
View all Poulan PR521 manuals
Add to My Manuals
Save this manual to your list of manuals |
Page 5 highlights
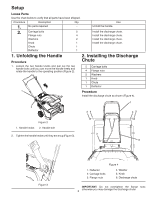
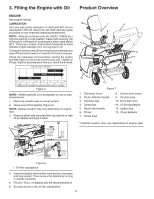
Setup Loose Parts Use the chart below to verify that all parts have been shipped. Procedure 1. 2. Description No parts required Carriage bolts Flange nuts Washers Knob Chute Deflector Qty. Use - Unfold the handle. 5 Install the discharge chute. 4 Install the discharge chute. 2 Install the discharge chute. 1 Install the discharge chute. 1 1 1. Unfolding the Handle Procedure 1. Loosen the two handle knobs and pull out the two handle bolts until you can move the handle freely and rotate the handle to the operating position (Figure 2). 2. Installing the Discharge Chute 5 Carriage bolts 4 Flange nuts 2 Washers 1 Knob 1 Chute 1 Deflector 1 Procedure Install the discharge chute as shown (Figure 4). 1 2 34 45 Figure 2 1. Handle knobs 2. Handle bolt 2. Tighten the handle knobs until they are snug (Figure 3). 2 3 6 Figure 3 Figure 4 1. Deflector 2. Carriage bolts 3. Flange nuts 4. Washer 5. Knob 6. Discharge chute IMPORTANT: Do not overtighten the flange nuts; otherwise you may damage the discharge chute. 5
-
 1
1 -
 2
2 -
 3
3 -
 4
4 -
 5
5 -
 6
6 -
 7
7 -
 8
8 -
 9
9 -
 10
10 -
 11
11 -
12
-
13
-
14
-
15
-
16
-
17
-
18
-
19
-
20
-
21
-
22
-
23
-
24
-
25
-
26
-
27
-
28
-
29
-
30
 |
 |
