ProForm 1210 Rt Treadmill English Manual - Page 22
How To Use The Settings Mode
 |
View all ProForm 1210 Rt Treadmill manuals
Add to My Manuals
Save this manual to your list of manuals |
Page 22 highlights
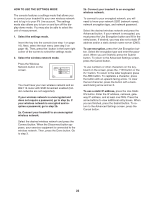
HOW TO USE THE SETTINGS MODE The console features a settings mode that allows you to connect your treadmill to your own wireless network and to log in to your iFit Live account. The settings mode also allows you to turn on and turn off the display demo mode. You may also be able to select the unit of measurement. 1. Select the settings mode. Insert the key into the console (see step 1 on page 16). Next, select the start menu (see step 2 on page 16). Then, press the i button in the lower right corner of the screen to select the settings mode. 2. Select the wireless network mode. Press the Wireless Network button on the screen. You must have your own wireless network and an 802.11b router with SSID broadcast enabled (hidden networks are not supported). If your wireless network is unencrypted and does not require a password, go to step 2a. If your wireless network is encrypted and requires a password, go to step 2b. 2a. Connect your treadmill to an unencrypted wireless network. Select the desired wireless network and press the Connect button. When the Disconnect button appears, your exercise equipment is connected to the wireless network. Then, press the Done button. Go to step 3. 2b. Connect your treadmill to an encrypted wireless network. To connect to your encrypted network, you will need to know your network SSID (network name), network encryption type, and network password. Select the desired wireless network and press the Advanced button. If your network is encrypted, you must press the Use Encryption button and fill in the entry boxes. If desired, you may also set a static IP address and/or a static domain name server (DNS). To use encryption, press the Use Encryption button. Select the encryption type and enter the password. When you are finished, press the Submit button. To return to the Advanced Settings screen, press the Cancel button. To use numbers or other characters on the keyboard on the screen, press the .?123 button or the #+= button. To return to the letter keyboard, press the ABC button. To capitalize a character, press the button with an upward-facing arrow. To clear the last character, press the button with a backward-facing arrow and an X. To use a static IP address, press the Use Static IPs button. Enter the IP address, netmask, gateway IP address, and at least one DNS. Press the arrow buttons to view additional entry boxes. When you are finished, press the Submit button. To return to the Advanced Settings screen, press the Cancel button. 22
-
 1
1 -
2
-
3
-
4
-
5
-
6
-
7
-
8
-
9
-
10
-
11
-
12
-
13
-
14
-
15
-
16
-
 17
17 -
 18
18 -
 19
19 -
 20
20 -
 21
21 -
 22
22 -
 23
23 -
 24
24 -
 25
25 -
 26
26 -
 27
27 -
28
-
29
-
30
-
31
-
32
-
33
-
34
-
35
-
36
 |
 |