ProForm 385ex Treadmill Canadian English Manual
ProForm 385ex Treadmill Manual
 |
View all ProForm 385ex Treadmill manuals
Add to My Manuals
Save this manual to your list of manuals |
ProForm 385ex Treadmill manual content summary:
- ProForm 385ex Treadmill | Canadian English Manual - Page 1
PROFORM® 385EX treadmill) • The SERIAL NUMBER of the product (see the front cover of this manual) • The KEY NUMBER AND DESCRIPTION OF THE PART(S) (see the EXPLODED DRAWING and PART LIST attached in the center of this manual ICON authorized service center, with the use or performance of the product or - ProForm 385ex Treadmill | Canadian English Manual - Page 2
you have questions, or if there are missing or damaged parts, we will guarantee complete satisfaction through direct assistance from our and instructions in this manual before using this equipment. Save this manual for future reference. ® USER'S MANUAL Visit our website at www.proform.com new - ProForm 385ex Treadmill | Canadian English Manual - Page 3
7 HOW TO FOLD AND MOVE THE TREADMILL 10 MAINTENANCE AND TROUBLE-SHOOTING 12 CONDITIONING GUIDELINES 14 ORDERING REPLACEMENT PARTS Back Cover LIMITED WARRANTY Back Cover Note: An EXPLODED DRAWING and PART LIST are attached in the center of this manual. Please save them for future reference - ProForm 385ex Treadmill | Canadian English Manual - Page 4
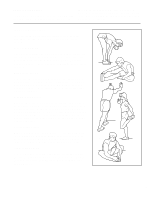
if desired. The key to success is to make exercise a regular and enjoyable part of your everyday life. SUGGESTED STRETCHES The correct form for several basic back leg straight and your back foot flat on the floor. Bend your front leg, lean forward and move your hips toward the wall. Hold for 15 - ProForm 385ex Treadmill | Canadian English Manual - Page 5
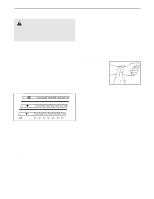
-existing health problems. The following strengthen your cardiovascular system, the key to achieving the desired results using your heart rate as a guide. The chart below shows recommended treadmill accordingly. WORKOUT GUIDELINES A well-rounded workout includes the following three important parts - ProForm 385ex Treadmill | Canadian English Manual - Page 6
de- scribed in this manual. Never remove the motor hood unless instructed to do so by an authorized service representative. Servicing other than the procedures in this manual should be performed by an authorized service representative only. 23. This treadmill is intended for in-home - ProForm 385ex Treadmill | Canadian English Manual - Page 7
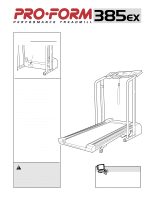
can be found on a decal attached to the treadmill (see the front cover of this manual for the location). Before reading further, please review the drawing below and familiarize yourself with the labeled parts. Accessory Tray Handrail Storage Latch Console Key/Clip Water Bottle Holder (Bottle not - ProForm 385ex Treadmill | Canadian English Manual - Page 8
cord, insert the key and run the treadmill for a few minutes. Repeat until the walking belt is properly tightened. b 2"-3" Rear Roller Adjustment Bolts c. If the walking belt still slows when walked on, please call our Customer Service Department, tollfree. PROBLEM: The walking belt is off-center - ProForm 385ex Treadmill | Canadian English Manual - Page 9
sure that the power cord is plugged in. c. Remove the key from the console. Reinsert the key fully into the console. d. If the treadmill still will not run, please call our Customer Service Department, toll-free. PROBLEM: The displays of the console do not function properly SOLUTION: a. Check - ProForm 385ex Treadmill | Canadian English Manual - Page 10
condition and does not affect treadmill performance. If there is lubricant on top of the walking belt, wipe off the lubricant with a soft cloth and a mild, non-abrasive cleaner. During assembly, refer to the drawings at the right to identify the small parts used in assembly. Assembly requires - ProForm 385ex Treadmill | Canadian English Manual - Page 11
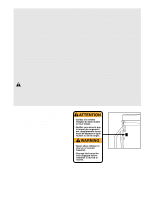
Latch (12) to the left Upright (14) with 7 two 1/2" Screws (13). Be careful not to overtighten the Screws. 8. Make sure that all parts are tight before you use the treadmill. (Note: The ratchet screws shown at the far right are factory set and should not be adjusted.) To protect the floor or - ProForm 385ex Treadmill | Canadian English Manual - Page 12
as shown. Using your left thumb, press the storage latch and hold it. Pivot the treadmill until the frame and foot rail are past the storage latch. 2. Hold the treadmill firmly with both hands, and lower the treadmill to the floor. Caution: To decrease the possibility of injury, bend your legs and - ProForm 385ex Treadmill | Canadian English Manual - Page 13
1. Hold the handrails and place one foot on the base as shown. 2. Tilt the treadmill back until it rolls freely on the front wheels. Carefully move the treadmill to the desired location. Never move the treadmill without tipping it back. To reduce the risk of injury, use extreme caution while moving - ProForm 385ex Treadmill | Canadian English Manual - Page 14
Your treadmill features a walking belt coated with grounding plug. Plug the power cord into a surge PERFORMANT LUBETM, a high-performance lubricant. the walking belt or the walking plat- grounded in accordance with all local codes and form. They will deteriorate the walking belt and ordinances. - ProForm 385ex Treadmill | Canadian English Manual - Page 15
when turning on the power. • Always wear the clip (see the drawing above) while operating the treadmill. When the key is removed from the console, the walking belt will stop. • Adjust the speed in small increments. • To reduce the possibility of electric shock, keep the console dry. Avoid spilling - ProForm 385ex Treadmill | Canadian English Manual - Page 16
simply wait for about four minutes. If the walking belt is stationary and the console buttons are not pressed for TREADMILL The incline of the treadmill can be changed by raising or lowering the back end. Before changing the incline, remove the key and unplug the power cord. Hold the rear roller - ProForm 385ex Treadmill | Canadian English Manual - Page 17
Platform Walking Belt Front Roller Adjustment Bolt Incline Leg Spacer (long) Ratchet Pivot Bolt Sensor Clip Front Roller/Pulley Reed Switch Magnet Incline Leg Spacer (short) 4" Cable Tie Bumper 8" White Wire, Male/Female User's Manual * Includes all parts shown in the box # These parts are not - ProForm 385ex Treadmill | Canadian English Manual - Page 18
REMOVE THIS EXPLODED DRAWING AND PART LIST FROM THE MANUAL. Save this page for future reference. Note: Specifications are subject to change without notice. For information about ordering replacement parts, see the back cover of the User's Manual. 34 - ProForm 385ex Treadmill | Canadian English Manual - Page 19
EXPLODED DRAWING-Model No. PCTL38580 1 15 16 30 7 9 30 14 17 6 2 8 11* 26 15 59 12 16 30 59 59 18 19* 13 28 29 3 34 20 59 21 30 74 73 72 16 71 71 55 5 70 76 47 31 64 88 65 16 41 25 37 16 59 4 39 38 46 77 87 86 39 36 30 27 75 52 84 49 22 24 23 10 85
-
 1
1 -
 2
2 -
 3
3 -
 4
4 -
 5
5 -
 6
6 -
 7
7 -
8
-
9
-
10
-
11
-
12
-
13
-
14
-
15
-
16
-
17
-
18
-
19
 |
 |

Part No. 167053 R0800A
Printed in Canada © 2000 ICON Health & Fitness, Inc.
ORDERING REPLACEMENT PARTS
To order replacement parts, simply call our Customer Service Department toll-free at 1-888-963-4266 Monday
through Friday, 8 a.m. until 6:30 p.m. Eastern Standard Time (excluding holidays). To help us assist you, please
be prepared to give the following information when calling:
•
The MODEL NUMBER of the product (PCTL38580)
•
The NAME of the product (PROFORM
®
385EX treadmill)
•
The SERIAL NUMBER of the product (see the front cover of this manual)
•
The KEY NUMBER AND DESCRIPTION OF THE PART(S) (see the EXPLODED DRAWING and PART LIST
attached in the center of this manual).
LIMITED WARRANTY
ICON OF CANADA INC., (ICON), warrants this product to be free from defects in workmanship and material,
under normal use and service conditions, for a period of one (1) year from the date of purchase. This war-
ranty extends only to the original purchaser. ICON's obligation under this warranty is limited to replacing or
repairing, at ICON's option, the product at one of its authorized service centers. All products for which war-
ranty claim is made must be received by ICON at one of its authorized service centers with all freight and
other transportation charges prepaid, accompanied by sufficient proof of purchase. All returns must be pre-
authorized by ICON. This warranty does not extend to any product or damage to a product caused by or at-
tributable to freight damage, abuse, misuse, improper or abnormal usage or repairs not provided by an ICON
authorized service center, to products used for commercial or rental purposes, or to products used as store
display models. No other warranty beyond that specifically set forth above is authorized by ICON.
ICON is not responsible or liable for indirect, special or consequential damages arising out of or in connection
with the use or performance of the product or damages with respect to any economic loss, loss of property,
loss of revenues or profits, loss of enjoyment or use, costs of removal, installation or other consequential dam-
ages of whatsoever nature. Some provinces do not allow the exclusion or limitation of incidental or conse-
quential damages. Accordingly, the above limitation may not apply to you. The warranty extended hereunder
is in lieu of any and all other warranties and any implied warranties of
merchantability or fitness for a particular
purpose is limited in its scope and duration to the terms set forth herein. Some provinces do not allow limita-
tions on how long an implied warranty lasts. Accordingly, the above limitation may not apply to you.
This warranty gives you specific legal rights. You may also have other rights which vary from province to
province or so specified by the retailer of your equipment.
ICON OF CANADA, 900 de l’Industrie, St. Jérôme, QC J7Y 4B8
PROFORM is a registered trademark of ICON Health & Fitness, Inc.