ProForm 5.2 Uk Manual
ProForm 5.2 Manual
 |
View all ProForm 5.2 manuals
Add to My Manuals
Save this manual to your list of manuals |
ProForm 5.2 manual content summary:
- ProForm 5.2 | Uk Manual - Page 1
committed to providing complete customer satisfaction. If you have questions, or if there are missing parts, please contact us at the numbers or addresses listed below: Call: 08457 089 009 8JG, UK CAUTION Read all precautions and instructions in this manual before using this equipment. Save this - ProForm 5.2 | Uk Manual - Page 2
FOLD AND MOVE THE TREADMILL 21 TROUBLESHOOTING 22 EXERCISE GUIDELINES 25 PART LIST 26 EXPLODED DRAWING 28 ORDERING REPLACEMENT PARTS cover of this manual and request a free replacement decal. Apply the decal in the location shown. Note: The decals may not be shown at actual size. PROFORM is a - ProForm 5.2 | Uk Manual - Page 3
, including the user's movement, may affect the accuracy of heart rate readings. The pulse sensor is intended only as an exercise aid in determining heart rate trends in general. 19. Never leave the treadmill unattended while it is running. Always remove the key, unplug the power cord, and switch - ProForm 5.2 | Uk Manual - Page 4
procedures described in this manual. Never remove the motor hood un- less instructed to do so by an authorized ser- vice representative. Servicing other than the procedures in this manual should be performed by an authorized service representative only. 25. This treadmill is intended for in - ProForm 5.2 | Uk Manual - Page 5
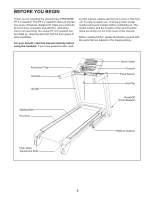
Thank you for selecting the revolutionary PROFORM® PF 5.2 treadmill. The PF 5.2 treadmill offers an impressive array of features designed to make your workouts at home more enjoyable and effective. And when you're not exercising, the unique PF 5.2 treadmill can be folded up, requiring less than half - ProForm 5.2 | Uk Manual - Page 6
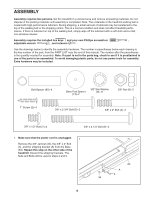
carton. This is a normal condition and does not affect treadmill performance. If there is lubricant on top of the walking belt, part, from the PART LIST near the end of this manual. The number after the parentheses is the quantity needed for assembly. Note: If a part is not in the parts - ProForm 5.2 | Uk Manual - Page 7
2. With the help of a second person, carefully tip 2 the treadmill onto its left side. Partially fold the Frame (56) so that the treadmill is more stable; do not fully fold the Frame yet. Cut the tie securing the Upright Wire (38) to the Base (83). Locate the tie in the indicated hole in the - ProForm 5.2 | Uk Manual - Page 8
do not fully tighten the Bolts yet. 83 6. With the help of a second person, carefully tip the treadmill onto its right side. Partially fold the Frame (56) so the treadmill is more stable; do not fully fold the Frame yet. Attach a Base Pad (81) to the Base (83) in the location shown with a Base - ProForm 5.2 | Uk Manual - Page 9
Handrail (96) near the Right Upright (78). Remove the wire tie from the Upright Wire (38). Connect the Upright Wire (38) to the Handrail Wire (52). See the lower inset drawing. The connectors should slide together easily and snap into place. If they do not, turn one connector and try again - ProForm 5.2 | Uk Manual - Page 10
Attach the console assembly with three 3/8" x 2 3/4" Bolts (5) and three 3/8" Star Washers (9). Be careful not to pinch the wires. 10 Console Assembly Console Wires 52 101 96 9 5 11. Identify the Storage Latch (53). Remove the tie from the end of the tube. Make sure that the sleeve has been slid - ProForm 5.2 | Uk Manual - Page 11
the Frame (56) (see HOW TO LOWER THE TREADMILL FOR USE on page 21). 56 8 4 53 54 Large Barrel 109 83 8 4 13. Make sure that all parts are properly tightened before you use the treadmill. If there are sheets of clear plastic on the treadmill decals, remove the plastic. To protect the floor or - ProForm 5.2 | Uk Manual - Page 12
the electrode areas are wetted and the heart rate monitor is put on; the chest pulse sensor shuts off when it is removed and the electrode areas are dried. If the chest pulse sensor is not dried after CHEST PULSE SENSOR TROUBLESHOOTING The instructions on the following pages explain how the chest - ProForm 5.2 | Uk Manual - Page 13
cord into an appropriate outlet that is properly installed and earthed in accordance with all local codes and 3 ordinances. IMPORTANT: The treadmill is not compatible with RCD-equipped outlets. Outlet DANGER: Improper connection of the equipment-earthing conductor can result in an in- creased - ProForm 5.2 | Uk Manual - Page 14
to make your workouts more effective and enjoyable. When you use the manual mode of the console, you can change the speed and incline of the treadmill with the touch of a button. As you exercise, the console will display continuous exercise feedback. You can even measure your heart rate using the - ProForm 5.2 | Uk Manual - Page 15
time you insert the key, the manual mode will be selected. If you have selected a workout, press either of the workout buttons repeatedly until only zeros appear in the display. IMPORTANT: The console features a display demo mode, designed to be used if the treadmill is displayed in a store. If the - ProForm 5.2 | Uk Manual - Page 16
run on the treadmill, the display can show the following workout Your pace in minutes per kilometer or minutes per mile. • Your heart rate. treadmill to the lowest setting. The incline must be at the lowest setting when you fold the treadmill to the storage position or you may damage the treadmill - ProForm 5.2 | Uk Manual - Page 17
or too low, you can manually override the setting by pressing workout. A moment after you press the Start button, the treadmill will automatically adjust to the first speed and incline settings of the workout workout. The display will also show your energy output in watts. 5. Measure your heart rate - ProForm 5.2 | Uk Manual - Page 18
information is shown. Press the Display button repeatedly to select the desired display option. As you walk or run on the treadmill, the display can show the following workout information: To select the iFIT Competition Training Center, press the Select Event button. Use the Increase and Decrease - ProForm 5.2 | Uk Manual - Page 19
). • The bank of energy your opponents have left. • The tactics your opponents are using. • Your heart rate. 4. Measure your heart rate if desired. See step 6 on page 16. To view your heart rate, select the display option which shows the animation of the runners. 5. When you are finished exercising - ProForm 5.2 | Uk Manual - Page 20
. Note: Make sure that both cushions are set at the same firmness level. The faster you run on the treadmill, or the more you weigh, the firmer the walking platform should be. The display will show the selected unit of measurement. To change the unit - ProForm 5.2 | Uk Manual - Page 21
HOW TO FOLD AND MOVE THE TREADMILL HOW TO FOLD THE TREADMILL FOR STORAGE Before folding the treadmill, adjust the incline to the lowest position. If you do not do this, you may damage the treadmill when you fold it. Remove the key and unplug the power cord. CAUTION: You must be able to safely lift - ProForm 5.2 | Uk Manual - Page 22
plug it back in. c. Remove the key from the console. Reinsert the key into the console. d. If the treadmill still will not run, please see the front cover of this manual. PROBLEM: The console displays remain lit when you remove the key from the console SOLUTION: a. The console features a display - ProForm 5.2 | Uk Manual - Page 23
Run the treadmill for a few minutes to check for a correct speed reading. PROBLEM: The incline of the treadmill treadmill will automatically rise to the maximum incline level and then return to the minimum level. This will recalibrate the incline system. PROBLEM key, and run the treadmill for a few - ProForm 5.2 | Uk Manual - Page 24
the key, and run the treadmill for a few minutes treadmill for a few minutes. Repeat until the walking belt is properly tightened. PROBLEM: The chest pulse sensor does not function properly SOLUTION: a. If the chest pulse sensor does not function properly, see CHEST PULSE SENSOR TROUBLESHOOTING - ProForm 5.2 | Uk Manual - Page 25
problems. The pulse sensor is not a medical device. Various factors may affect the accuracy of heart rate rate as a guide to find the proper intensity level. The chart below shows recommended heart rates your heart rate is near the highest number in your training zone. WORKOUT GUIDELINES Warming up - ProForm 5.2 | Uk Manual - Page 26
No. PETL41307.0 R1207A To locate the parts listed below, see the EXPLODED DRAWING near the end of this manual. Key No. Qty. Description Key No Walking Platform Cushion Walking Platform Walking Belt Belt Guide Motor Isolator Frame Spacer Front Roller Spacer Magnet 51 1 52 1 53 1 54 1 55 1 56 - ProForm 5.2 | Uk Manual - Page 27
- * - * - Description Transformer Filter Electronics Bracket Chest Pulse Sensor 4" Black Wire, M/F 4" Black Wire, 2F 10" Blue Wire, M/F 8" Blue Wire, 2F 8" White Wire, 2F 4" Red Wire, M/F User's Manual *These parts are not illustrated. Specifications are subject to change without notice. 27 - ProForm 5.2 | Uk Manual - Page 28
EXPLODED DRAWING A-Model No. PETL41307.0 R1207A 28 25 49 25 48 17 50 1 103 25 41 102 51 90 46 28 29 17 28 25 43 28 28 42 45 44 24 18 57 31 58 30 36 20 24 59 30 32 40 108 3 20 31 67 60 18 57 36 25 28 28 28 55 56 29 102 90 28 28 25 28 43 25 54 53 32 8 40 - ProForm 5.2 | Uk Manual - Page 29
EXPLODED DRAWING B-Model No. PETL41307.0 R1207A 12 37 12 65 19 62 64 27 47 10 37 12 37 61 70 115 16 26 24 112 24 24 107 24 33 24 33 24 117 116 24 24 66 19 71 69 11 68 15 11 72 63 77 11 106 105 11 73 105 29 - ProForm 5.2 | Uk Manual - Page 30
EXPLODED DRAWING C-Model No. PETL41307.0 R1207A 9 7 74 6 21 35 34 75 22 34 104 7 38 9 4 34 84 9 80 76 8 23 82 83 8 13 81 2 109 34 84 23 81 8 2 38 82 4 13 4 81 2 81 79 2 110 85 78 9 6 6 9 80 80 86 30 - ProForm 5.2 | Uk Manual - Page 31
EXPLODED DRAWING D-Model No. PETL41307.0 R1207A 1 87 12 91 88 1 1 1 1 113 95 100 89 1 11 1 1 1 1 1 93 39 1 92 94 114 99 52 94 96 99 95 14 97 9 24 101 5 99 14 118 14 99 52 98 31 - ProForm 5.2 | Uk Manual - Page 32
the name of the product (see the front cover of this manual) • the key number and description of the part(s) (see the PARTS LIST and the EXPLODED DRAWING near the end of this manual) RECYCLING INFORMATION This electronic product must not be disposed of in municipal waste. To preserve the environment
-
 1
1 -
 2
2 -
 3
3 -
 4
4 -
 5
5 -
 6
6 -
 7
7 -
8
-
9
-
10
-
11
-
12
-
13
-
14
-
15
-
16
-
17
-
18
-
19
-
20
-
21
-
22
-
23
-
24
-
25
-
26
-
27
-
28
-
29
-
30
-
31
-
32
 |
 |

Serial
Number
Decal
Model No. PETL41307.0
Serial No.
CAUTION
Read all precautions and instruc-
tions in this manual before using
this equipment. Save this manual
for future reference.
QUESTIONS?
As a manufacturer, we are commit-
ted to providing complete customer
satisfaction. If you have questions,
or if there are missing parts,
please contact us at the numbers
or addresses listed below:
Call: 08457 089 009
Outside UK: 0 (44) 113 3877133
Fax: 0 (44) 113 3877125
E-mail: [email protected]
Write:
ICON Health & Fitness, Ltd.
Unit 4
Revie Road Industrial Estate
Revie Road, Beeston
Leeds, LS11 8JG,
UK
Write the serial number in the space
above for reference.
USER'S MANUAL