ProForm 505s Treadmill User Manual
ProForm 505s Treadmill Manual
 |
View all ProForm 505s Treadmill manuals
Add to My Manuals
Save this manual to your list of manuals |
ProForm 505s Treadmill manual content summary:
- ProForm 505s Treadmill | User Manual - Page 1
Model No. 831.294240 Serial No. TREADMILL EXERCISER User's Manual Serial Number Decal • Assembly • Operation • Maintenance • Part List and Drawing CAUTION Read all precautions and instructions in this manual before using this equipment. Save this manual for future reference. Sears, Roebuck and - ProForm 505s Treadmill | User Manual - Page 2
TABLE OF CONTENTS IMPORTANT PRECAUTIONS 3 BEFORE YOU BEGIN 5 ASSEMBLY 6 OPERATION AND ADJUSTMENT 10 HOW TO FOLD AND MOVE THE TREADMILL 14 TROUBLESHOOTING 16 CONDITIONING GUIDELINES 18 ORDERING REPLACEMENT PARTS Back Cover FULL 90 DAY WARRANTY Back Cover Note: An EXPLODED DRAWING and a PART - ProForm 505s Treadmill | User Manual - Page 3
treadmill at a time. 9. Wear appropriate exercise clothes when using the treadmill. Do not wear loose clothes that could become caught in the treadmill. Athletic support to the control system of the treadmill. If the control system is damaged, the walking belt may change speed or stop unexpectedly, - ProForm 505s Treadmill | User Manual - Page 4
adjustment procedures described in this manual. Never remove the motor hood unless instructed to do so by an authorized service representative. Servicing other than the procedures in this manual should be performed by an authorized service representative only. 25. This treadmill is intended for in - ProForm 505s Treadmill | User Manual - Page 5
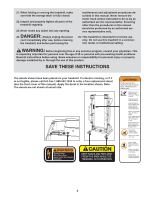
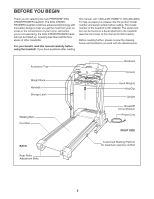
found on a decal attached to the treadmill (see the front cover of this manual for the location). Before reading further, please review the drawing below and familiarize yourself with the labeled parts. Accessory Tray Weight Rack Handrail Storage Latch Walking Belt Foot Rail Bookrack Console Hand - ProForm 505s Treadmill | User Manual - Page 6
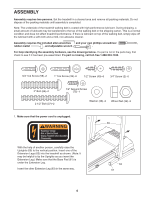
in a cleared area and remove all packing materials. Do not dispose of the packing materials until assembly is completed. Note: The underside of the treadmill walking belt is coated with high-performance lubricant. During shipping, a small amount of lubricant may be transferred to the top of the - ProForm 505s Treadmill | User Manual - Page 7
2. With the help of another person, carefully lower the Uprights (69) as shown. Note: It may be helpful to place one foot on one of the Extension Legs [63] as you tip the Uprights. Make sure that the Extension Legs remain in the Uprights. Attach each Extension Leg (63) with two 1" Tek Screws (39) - ProForm 505s Treadmill | User Manual - Page 8
4. Hold the Console Base (47) near the Left Handrail (71). Attach the end of the ground wire on the Console Base to the indicated small hole in the Left Handrail with the 1/2" Ground Screw (75). 4 Ground Wire 47 Small Hole 75 71 5. Set the Console Base (47) on the Right Handrail (72) and the - ProForm 505s Treadmill | User Manual - Page 9
44 2 9. Make sure that all parts are properly tightened before you use the treadmill. Note: Extra hardware may be included. Keep the included allen wrenches in a secure place. The large allen wrench is used to adjust the walking belt (see page 17). To protect the floor or carpet, place a mat under - ProForm 505s Treadmill | User Manual - Page 10
is functioning properly. Failure to use a properly functioning surge suppressor could result in damage to the control system of the treadmill. If the control system is damaged, the walking belt may change speed or stop unexpectedly, which may result in a fall and serious injury. This product must be - ProForm 505s Treadmill | User Manual - Page 11
precautions. • Do not stand on the walking belt when turning on the power. • Always wear the clip (see the drawing above) while operating the treadmill. • Adjust the speed in small increments (see SPEED DISPLAY on page 12). For simplicity, all instructions in this section refer to miles. 11 - ProForm 505s Treadmill | User Manual - Page 12
flash. Note: During the first few minutes that the treadmill is used, inspect the alignment of the walking belt, and align it if necessary (see page 16). 3 Change the incline of the treadmill as desired. To change the incline of the treadmill, press either of the Incline buttons until the desired - ProForm 505s Treadmill | User Manual - Page 13
HOW TO USE THE HAND WEIGHTS To exercise your upper body as you walk on the treadmill, hold the 2-pound weights at your sides or press the weights above your head. To increase the intensity of your exercise, use the 3-pound or 5- - ProForm 505s Treadmill | User Manual - Page 14
damaged. Next, unplug the power cord. CAUTION: You must be able to safely lift 45 pounds (20 kg) to raise, lower, or move the treadmill. 1. Hold the treadmill with your hands in the locations shown at the right. To decrease the possibility of injury, bend your legs and keep your back straight - ProForm 505s Treadmill | User Manual - Page 15
down until the frame and foot rail are past the storage latch. 2. Hold the treadmill firmly with both hands, and lower the treadmill to the floor. Do not drop the treadmill frame to the floor. To decrease the possibility of injury, bend your legs and keep your back straight. Storage Latch Catch - ProForm 505s Treadmill | User Manual - Page 16
TROUBLESHOOTING Most treadmill problems can be solved by following the simple steps below. Find the symptom that applies, and follow the steps listed. If further assistance is needed, call toll-free 1-800-4-MY-HOME® (1-800-469-4663). PROBLEM: The power does not turn on SOLUTION: a. Make sure that - ProForm 505s Treadmill | User Manual - Page 17
the key, and run the treadmill for a few minutes. Repeat until the walking belt is properly tightened. b 2"-3" Rear Roller Adjustment Bolts c. If the walking belt still slows when walked on, please call toll-free 1-800-4-MY-HOME® (1-800469-4663). PROBLEM: The walking belt is off-center or slips - ProForm 505s Treadmill | User Manual - Page 18
be found by using your heart rate as a guide. The chart below shows recommended heart rates for exercise, adjust the speed and incline of the treadmill until your heart rate is near the highest number your muscles and will help prevent postexercise problems. EXERCISE FREQUENCY To maintain or improve - ProForm 505s Treadmill | User Manual - Page 19
SUGGESTED STRETCHES The correct form for several basic stretches is shown at the right. Move slowly as you stretch-never bounce. 1. Toe Touch Stretch Stand with your knees bent slightly - ProForm 505s Treadmill | User Manual - Page 20
Power Cord Grommet Belly Pan Belt Guide Belt Guide Screw Plastic Fastener Isolator Cushion Frame Releasable Tie Warning Decal Cable Tie Clamp Ground Wire Left Rear Endcap Pad Rear Roller Adjustable Bolt Right Rear Endcap Allen Wrench Left Rear Endcap Walking Belt Walking Platform Left Foot Rail Hand - ProForm 505s Treadmill | User Manual - Page 21
EXPLODED DRAWING-Model No. 831.294240 R0204A 47 37 2 77 3 4 5 6 34 27 7 45 20 46 43 37 25 2 1 77 9* 26 8 59 28 10 26 58 35 74 12 2 42 75 2 88 102 44 29 2 13 2 2 27 36 71 72 40 98 19 67 13 26 14 18 23 49 13 51 64 13 66 53 32 54 2 50 40 78 15 52 38 82 - ProForm 505s Treadmill | User Manual - Page 22
the date of purchase, if failure occurs due to defect in material or workmanship in this Sears Treadmill Exerciser, contact the nearest Sears Service Center throughout the United States and Sears will repair or replace the Treadmill Exerciser, free of charge. This warranty does not apply when the
-
 1
1 -
 2
2 -
 3
3 -
 4
4 -
 5
5 -
 6
6 -
 7
7 -
8
-
9
-
10
-
11
-
12
-
13
-
14
-
15
-
16
-
17
-
18
-
19
-
20
-
21
-
22
 |
 |
Model No. 831.294240
Serial No.
CAUTION
Read all precautions and instruc-
tions in this manual before using
this equipment. Save this manual
for future reference.
Sears, Roebuck and Co., Hoffman Estates, IL 60179
TREADMILL EXERCISER
User’s Manual
• Assembly
• Operation
• Maintenance
• Part List and Drawing
Serial Number
Decal