ProForm 6.5q Uk Manual - Page 10
How To Fold And Move The Treadmill
 |
View all ProForm 6.5q manuals
Add to My Manuals
Save this manual to your list of manuals |
Page 10 highlights
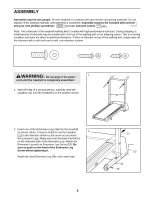
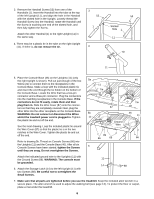
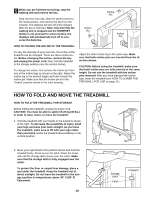
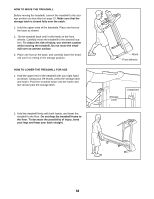
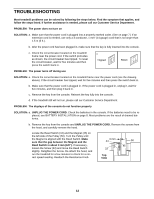
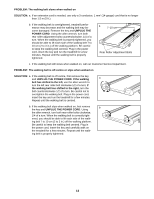
5 When you are finished exercising, stop the walking belt and remove the key. Step onto the foot rails, slide the speed control to the reset position, and remove the key from the console. The displays will turn off a few minutes after the key is removed. Note: Any time that the walking belt is stopped and the ON/RESET button is not pressed for a few minutes, the displays will automatically turn off to conserve the batteries. Incline Pin Incline Pin Incline Pin HOW TO CHANGE THE INCLINE OF THE TREADMILL To vary the intensity of your exercise, the incline of the treadmill can be changed. There are three incline levels. Before changing the incline, remove the key and unplug the power cord. Next, fold the treadmill to the storage position (see the section below). To change the incline, first remove the incline pin from one of the incline legs as shown at the right. Adjust the incline leg to the desired height and fully reinsert the incline pin. Make sure that the incline pin is in the "locked" position shown in the inset drawing. Adjust the other incline leg in the same way. Make sure that both incline pins are inserted from the direction shown. CAUTION: Before using the treadmill, make sure that both incline pins are fully inserted at the same height. Do not use the treadmill with the incline pins removed. After you have adjusted the incline legs, lower the treadmill (see HOW TO LOWER THE TREADMILL FOR USE on page 11). HOW TO FOLD AND MOVE THE TREADMILL HOW TO FOLD THE TREADMILL FOR STORAGE Before folding the treadmill, unplug the power cord. CAUTION: You must be able to safely lift 20 kg (45 lbs.) in order to raise, lower, or move the treadmill. 1. Hold the treadmill with your hands in the locations shown at the right. To decrease the possibility of injury, bend your legs and keep your back straight. As you raise the treadmill, make sure to lift with your legs rather than your back. Raise the treadmill about halfway to the vertical position. 2. Move your right hand to the position shown and hold the treadmill firmly. Press out on the latch. Raise the treadmill until the storage latch closes over the catch. Make sure that the storage latch is fully engaged over the catch. To protect the floor or carpet from damage, place a mat under the treadmill. Keep the treadmill out of direct sunlight. Do not leave the treadmill in the storage position in temperatures above 30° C (85° F) Fahrenheit. 10 Storage Latch Catch Engaged
-
 1
1 -
2
-
3
-
4
-
 5
5 -
 6
6 -
 7
7 -
 8
8 -
 9
9 -
 10
10 -
 11
11 -
 12
12 -
 13
13 -
 14
14 -
 15
15 -
16
-
17
-
18
-
19
 |
 |
