ProForm 625 Ex English Manual - Page 6
Next, connect the Wire Harness 35 to the Console Wire - treadmill parts
 |
View all ProForm 625 Ex manuals
Add to My Manuals
Save this manual to your list of manuals |
Page 6 highlights
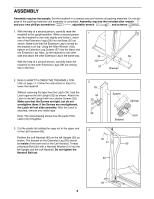
4. Cut the indicated plastic tie from the Right Handrail (62). Next, feed the large wire tie and the Console Wire Harness (90) into the Right Handrail and out through the indicated bracket. Pull as much of the Console Wire Harness through the Right Handrail as possible. Note: It may be helpful to turn the Console over on a flat surface as you do this. Next, rest the left side of the Console Base (46) on the Left Handrail (not shown). While a second person holds the Console Base and the Right Handrail (62) in the position shown, cut the plastic tie holding the Wire Harness (35) in the right Upright (32). Note: Be careful not to drop the Wire Harness into the right Upright. Next, connect the Wire Harness (35) to the Console Wire Harness (90) (refer to the inset drawing). The latch on the Wire Harness should snap onto the Console Wire Harness. If the Wire Harnesses do not fit together easily, turn them; do not force them together. Remove the large wire tie from the Console Wire Harness (90) and insert the slack Wire Harness into the Right Upright (32). Refer to step 3 on page 5 and attach the Right Handrail (62) as described. Be careful to avoid damaging the wires in the Right Handrail. 5. Make sure that the Console Base (46) is on the Handrails (60, 62). Route the Console Wire Harness (90) up into the Console Base as shown. Insert any slack into the Right Handrail (62). Attach the Console Base (46) to the Handrails (60, 62) with four 1 1/4Ó Screws. 4 90 35 62 46 Plastic Tie Bracket 90 35 Plastic Tie Wire Tie 32 5 46 62 90 1 1/4Ó 60 1 1/4Ó 6. Refer to HOW TO FOLD THE TREADMILL FOR STORAGE on page 11. Follow the instructions in step 2 6 to fold the treadmill. Attach the lower end of the Right Handrail (62) to the right Extension Leg (59) with a Screw (29). Attach the lower end of the Left Handrail (60) in the same way. Tighten all parts used in steps 3, 4, 5 and 6. 60 29 59 29 62 59 7. Remove the backing from the Adhesive Clip (101). Press the Adhesive Clip onto the base of the right 7 Upright (32) as shown. Press the Allen Wrench (102) into the Adhesive Clip. 8. Make sure that all parts are tightened before you use the treadmill. To protect the floor or carpet, place a mat under the treadmill. 6 32 102 101
-
 1
1 -
 2
2 -
 3
3 -
 4
4 -
 5
5 -
 6
6 -
 7
7 -
 8
8 -
 9
9 -
 10
10 -
 11
11 -
 12
12 -
13
-
14
-
15
-
16
-
17
-
18
 |
 |
