ProForm 725 Treadmill English Manual - Page 6
Handrail Arm with a Handrail Bolt 7 and a Handrail Nut
 |
View all ProForm 725 Treadmill manuals
Add to My Manuals
Save this manual to your list of manuals |
Page 6 highlights
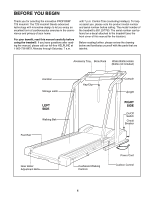
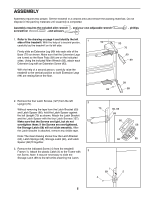
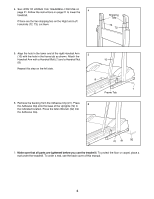
4. See HOW TO LOWER THE TREADMILL FOR USE on page 21. Follow the instructions on page 21 to lower the 4 treadmill. If there are the two shipping ties on the Right and Left Handrails (72, 73), cut them. Shipping Ties 73 72 5. Align the hole in the lower end of the right Handrail Arm 5 (10) with the hole in the frame tab as shown. Attach the Handrail Arm with a Handrail Bolt (7) and a Handrail Nut 10 (8). Repeat this step on the left side. 8 7 Frame Tab 6. Remove the backing from the Adhesive Clip (91). Press 6 the Adhesive Clip onto the base of the Uprights (70) in the indicated location. Press the Allen Wrench (92) into the Adhesive Clip. 70 91 92 7. Make sure that all parts are tightened before you use the treadmill. To protect the floor or carpet, place a mat under the treadmill. To order a mat, see the back cover of this manual. 6
-
 1
1 -
 2
2 -
 3
3 -
 4
4 -
 5
5 -
 6
6 -
 7
7 -
 8
8 -
 9
9 -
 10
10 -
 11
11 -
 12
12 -
13
-
14
-
15
-
16
-
17
-
18
-
19
-
20
-
21
-
22
-
23
-
24
-
25
-
26
-
27
-
28
-
29
-
30
 |
 |
