ProForm 745 Ekg Instruction Manual - Page 6
Maintenance And Troubleshooting
 |
View all ProForm 745 Ekg manuals
Add to My Manuals
Save this manual to your list of manuals |
Page 6 highlights
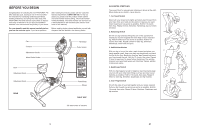
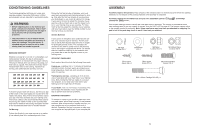
1. Identify the Front Stabiliser (2). While another person lifts the front of the Frame (1) slightly, attach the Front 1 65 50 Stabilizer to the Frame with two M10 x 65mm Carriage Bolts (65) and two M10 Black Nylon Locknuts (63). Make sure that the Front Stabiliser is turned so the 50 Wheels (50) are not touching the floor. 2 2. While another person lifts the back of the Frame (1) slightly, attach the Rear Stabilizer (9) to the Frame with two M10 x 65mm Carriage Bolts (65) and two M10 Black Nylon Locknuts (63). 2 63 1 3. Whilst another person holds the Upright (13) in the 3 position shown, connect the Upper Wire Harness (36) to the Lower Wire Harness (73). Slide the Upright (13) onto the Frame (1). Be careful to avoid pinching the Wire Harnesses (36, 73). Attach the Upright to the Frame with three M8 x 25mm Button Screws (14) and three M8 Split Washers (64). Attach the Water Bottle Holder (70) to the Upright (13) with two M4 X 22mm Screws (71). 13 14 64 14 36 73 1 63 63 9 65 70 71 14 64 1 4. The Console (16) requires four "D" batteries (not 4 included); alkaline batteries are recommended. Remove the screw from the battery drawer. Pull the battery drawer open and insert four batteries. Make sure that the batteries are oriented as shown by the markings inside the battery drawer. Close the battery drawer and reattach the screw. Note: When the batteries are installed correctly, the fan will turn on for a moment. 16 Batteries Screw 6 Battery Drawer MAINTENANCE AND TROUBLESHOOTING Inspect and tighten all parts of the exercise cycle regularly. Replace any worn parts immediately. To clean the exercise cycle, use a damp cloth and a small amount of mild detergent. Important: To avoid damage to the console, keep liquids away from the console and keep the console out of direct sunlight. HANDGRIP PULSE SENSOR TROUBLESHOOTING • Avoid moving your hands or holding the metal contacts too tightly whilst using the handgrip pulse sensor. Excessive movement or pressure may interfere with heart rate readings. • For the most accurate heart rate reading, hold the metal contacts for about 15 seconds. • Keep the metal contacts clean. The contacts can be cleaned with a soft cloth-never use alcohol, abrasives, or chemicals. HOW TO ADJUST THE REED SWITCH If the console does not display correct feedback, the reed switch should be adjusted. In order to adjust the reed switch, the Left Side Shield (17) must be removed. Remove the seven Screws (52) from the Right Side Shield (18). Next, remove the Screw (59) from the right side of the Side Shield Cover (19). Using an adjustable wrench, turn the Left Pedal (24) clockwise and remove it. Next, remove the two Screws (66) from the Left Side Shield (17). Remove the Screw (59) from the left side of the Side Shield Cover (19) and lift it off. Gently remove the Left Side Shield. 19 59 24 17 66 Next, locate the Reed Switch (43). Turn the Left Crank Arm (42) until the Magnet (38) is aligned with the Reed Switch. Loosen but do not remove the Screw (66). Slide the Reed Switch slightly closer to or away from the Magnet. Retighten the Screw. Turn the Crank for a moment. Repeat until the console displays correct feedback. When the Reed Switch is correctly adjusted, reattach the left side shield, side shield cover and the pedal. 19 52 18 59 38 43 66 42 52 BATTERY REPLACEMENT If the console display becomes dim, the batteries should be replaced; most console problems are the result of low batteries. See assembly step 4 on page 6 for replacement instructions. 19
-
 1
1 -
 2
2 -
 3
3 -
 4
4 -
 5
5 -
 6
6 -
 7
7 -
 8
8 -
 9
9 -
 10
10 -
 11
11 -
 12
12
 |
 |
