ProForm 860 Owners Manual - Page 8
Trouble, Shooting, Maintenance
 |
View all ProForm 860 manuals
Add to My Manuals
Save this manual to your list of manuals |
Page 8 highlights
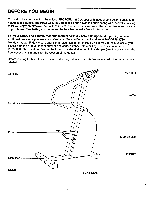
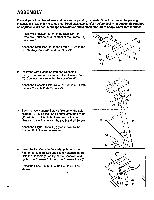
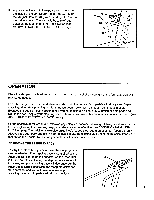
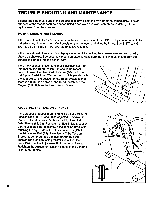
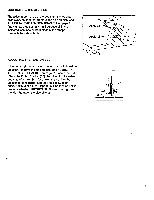
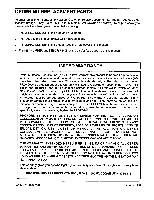
TROUBLE-SHOOTING AND MAINTENANCE Inspect and tighten all parts of the stepper regularly. Replace any worn parts immediately. Outside surfaces of the stepper can be cleaned using a soft cloth and mild, non-abrasive detergent. Keep liquids away from the console. MOTIVATIONAL FITNESS MONITOR If the motivational fitness monitor does not function properly, or if the LCD displays become faint, the batteries should be replaced. Most problems are the result of drained batteries. See INSTALLING BATTERIES on page 6. Two "AA" batteries are required. If the motivational fitness monitor displays incorrect information, the console wire and sensor wire should be checked. See assembly step 4 on page 4. Make sure that the wire extending from the console is plugged into the sensor wire. If the motivational fitness monitor still displays incorrect information, the Reed Switch (62) should be repositioned. Loosen the Reed Switch Screw (10). Hold the Left Upper Pedal Arm (57) down so that it is parallel with the floor. Adjust the position of the Reed Switch so that there is a 3/16" gap between the Reed Switch and the Magnet (61). Tighten the Reed Switch Screw. 62 61 57 10 ADJUSTING THE TENSION BRACKET If the stepper produces a grinding noise as you step, the Tension Bracket (24) should be adjusted. Remove the ten Side Shield Screws (54) from the Right and Left Side Shields (52, 53). Remove the Side Shields. Loosen the Adjustment Nut (4) slightly. If the Tension Bracket is touching the right side of the Resistance Disk (19), turn the Adjustment Bolt (33) clockwise until the Tension Bracket is centered (see the inset drawing). If the Tension Bracket is touching the left side of the Resistance Disk, turn the Adjustment Bolt counterclockwise. Retighten the Adjustment Nut (4). Reattach the Left and Right Side Shields. 54 j 33 24 19 547 53 24„ 19 54 54 52 8
-
 1
1 -
2
-
 3
3 -
 4
4 -
 5
5 -
 6
6 -
 7
7 -
 8
8 -
 9
9 -
 10
10 -
 11
11 -
 12
12
 |
 |