ProForm Lx360 Treadmill English Manual
ProForm Lx360 Treadmill Manual
 |
View all ProForm Lx360 Treadmill manuals
Add to My Manuals
Save this manual to your list of manuals |
ProForm Lx360 Treadmill manual content summary:
- ProForm Lx360 Treadmill | English Manual - Page 1
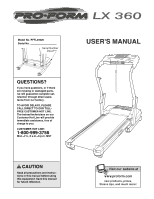
Number Decal USER'S MANUAL QUESTIONS? If you have questions, or if there are missing or damaged parts, we will guarantee complete all precautions and instructions in this manual before using this equipment. Save this manual for future reference. Visit our website at www.proform.com new products, - ProForm Lx360 Treadmill | English Manual - Page 2
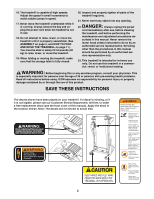
AND ADJUSTMENT 8 HOW TO FOLD AND MOVE THE TREADMILL 11 TROUBLESHOOTING 13 CONDITIONING GUIDELINES 15 ORDERING REPLACEMENT PARTS Back Cover LIMITED WARRANTY Back Cover Note: An EXPLODED DRAWING and a PART LIST are attached in the center of this manual. IMPORTANT PRECAUTIONS WARNING: To - ProForm Lx360 Treadmill | English Manual - Page 3
motor hood unless instructed to do so by an authorized service representative. Servicing other than the procedures in this manual should be performed by an authorized ser- vice representative only. 23. This treadmill is intended for in-home use only. Do not use this treadmill in a commercial - ProForm Lx360 Treadmill | English Manual - Page 4
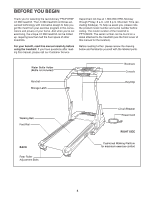
exercising, the unique LX 360 treadmill can be folded up, requiring less than half the floor space of other treadmills. For your benefit, read this manual carefully before using the treadmill. If you have questions after reading this manual, please call our Customer Service Department toll-free at - ProForm Lx360 Treadmill | English Manual - Page 5
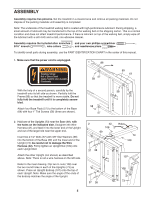
To identify small parts during assembly, use the PART IDENTIFICATION CHART in the center of this manual. 1. Make sure that the power cord is unplugged. 1 86 57 58 69 57 With the help of a second person, carefully tip the 58 treadmill onto its left side as shown. Partially fold the Frame (86 - ProForm Lx360 Treadmill | English Manual - Page 6
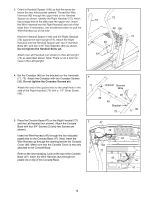
a large hole in the side near the upper end. Insert the Wire Harness into the Right Handrail and out of the large hole. If necessary, use needlenose pliers to pull the Wire Harness out of the hole. 3 73 72 42 106 Hold the Handrail Spacer (106) and the Right Handrail (72 - ProForm Lx360 Treadmill | English Manual - Page 7
centered between the Handrails. Firmly tighten all of the bolts and screws used in assembly steps 3-6. Then, raise the Handrails. 69 13 66 64 9. Make sure that all parts are properly tightened before you use the treadmill. Note: Extra hardware may be included. Keep the included allen wrenches in - ProForm Lx360 Treadmill | English Manual - Page 8
off. To decrease the possibility of 2 your treadmill being damaged, always use a surge suppressor with your treadmill (see drawing 1 at the right). To purchase a surge suppressor, see your local PROFORM dealer or call 1-800-806-3651 and order part number 146148. Grounding Pin Grounded Outlet - ProForm Lx360 Treadmill | English Manual - Page 9
the power cord is properly plugged in (see page 8). Next, stand on the foot rails of the treadmill. Find the clip attached to the key (see the drawing above), and slide the clip onto the kilometers (see SPEED DISPLAY on page 10). For simplicity, all instructions in this section refer to miles. 9 - ProForm Lx360 Treadmill | English Manual - Page 10
belt, press the Stop button. The elapsed time will begin to flash in the Time/Distance display. Note: During the first few minutes that the treadmill is used, inspect the alignment of the walking belt, and align it if necessary (see page 14). 3 Change the incline of the - ProForm Lx360 Treadmill | English Manual - Page 11
about halfway to the vertical position. 2. Move your right hand to the position shown and hold the treadmill firmly. Using your left hand, pull the latch knob to the left and hold it. Raise the treadmill until the frame passes the latch pin. Slowly release the latch knob. Make sure that the frame - ProForm Lx360 Treadmill | English Manual - Page 12
LOWER THE TREADMILL FOR USE 1. Hold the upper end of the treadmill with your right hand as shown. Using your left hand, pull the latch knob to the left and hold it. Pivot the treadmill down until the frame is past the latch pin. Slowly release the latch knob. 2. Hold the treadmill firmly with both - ProForm Lx360 Treadmill | English Manual - Page 13
TROUBLESHOOTING Most treadmill problems can be solved by following the steps below. Find the symptom that applies, and follow the steps listed. If further assistance is needed, please call our Customer Service Department tollfree at 1-800-999-3756, Monday through Friday, 6 a.m. until 6 p.m. - ProForm Lx360 Treadmill | English Manual - Page 14
cord, insert the key, and run the treadmill for a few minutes. Repeat until the walking belt is properly tightened. b 2"-3" Rear Roller Adjustment Bolts c. If the walking belt still slows when walked on, call our Customer Service Department toll-free. PROBLEM: The walking belt is off-center or - ProForm Lx360 Treadmill | English Manual - Page 15
guide. The chart below shows recommended heart rates for fat burning and aerobic exercise. ergy. Only after the first few minutes does your body begin to use stored fat calories for energy. If your goal is to burn fat, adjust the speed and incline of the treadmill three parts: problems. - ProForm Lx360 Treadmill | English Manual - Page 16
) • The NAME OF THE PRODUCT (PROFORM® LX 360 treadmill) • The SERIAL NUMBER OF THE PRODUCT (see the front cover of this manual) • The KEY NUMBER AND DESCRIPTION OF THE PART(S) (see the EXPLODED DRAWING and PART LIST attached in the center of this manual) LIMITED WARRANTY ICON Health & Fitness, Inc - ProForm Lx360 Treadmill | English Manual - Page 17
IDENTIFICATION CHART Remove this chart and use it to identify small parts during assembly. Save this chart and the EXPLODED DRAWING/PART LIST for future reference. 3/4" Screw (2)-8 1" Latch Screw (110)-2 1" Tek Screw (58)-4 1/2" Silver Screw (49)-3 Crossbar Screw (39)-2 5/16" Star Washer (63 - ProForm Lx360 Treadmill | English Manual - Page 18
2 Ring 34 1 Lock Pin Clip 77 4 Belly Pan Screw # 1 User's Manual 35 1 Lock Pin 78 1 Circuit Breaker 36 1 Storage Latch 79 1 Power Cord * Includes all parts shown in the box 37 4 2 1/2" Bolt 80 1 Power Cord Grommet # These parts are not illustrated 38 4 3/8" Star Washer 81 1 Belly Pan 39 - ProForm Lx360 Treadmill | English Manual - Page 19
3 1 2 2 2 74 98 68 14 82 15 84 85 83 97 11 15 95 96 102 38 92 94 99 102 93 38 92 41 102 100 102 91 15 86 56 90 45 6 40 42 49 2 7 9* 8 10 56 12 13 19 18 17 16 85 103 20 29 27 28 24 26 105 26 25 104 53 72 107 13 23 13 2 13 21 12 26 15 14 65 82 84 83 22
-
 1
1 -
 2
2 -
 3
3 -
 4
4 -
 5
5 -
 6
6 -
 7
7 -
8
-
9
-
10
-
11
-
12
-
13
-
14
-
15
-
16
-
17
-
18
-
19
 |
 |

Serial Number
Decal
USER'S MANUAL
Model No. PFTL39020
Serial No.
CAUTION
Read all precautions and instruc-
tions in this manual before using
this equipment. Save this manual
for future reference.
Visit our website at
www.proform.com
new products, prizes,
fitness tips, and much more!
QUESTIONS?
If you have questions, or if there
are missing or damaged parts,
we will guarantee complete sat-
isfaction through direct assis-
tance from our factory.
TO AVOID DELAYS, PLEASE
CALL DIRECT TO OUR TOLL-
FREE CUSTOMER HOT LINE.
The trained technicians on our
Customer Hot Line will provide
immediate assistance, free of
charge to you.
CUSTOMER HOT LINE:
1-800-999-3756
Mon.–Fri., 6 a.m.–6 p.m. MST