ProForm Lx360 Treadmill English Manual - Page 6
Hold the Handrail Spacer 106 and the Right Handrail
 |
View all ProForm Lx360 Treadmill manuals
Add to My Manuals
Save this manual to your list of manuals |
Page 6 highlights
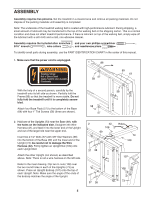
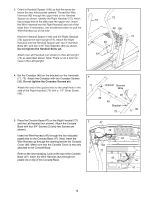
3. Orient a Handrail Spacer (106) so that the arrow between the two holes points upward. Thread the Wire Harness (42) through the upper hole in the Handrail Spacer as shown. Identify the Right Handrail (72), which has a large hole in the side near the upper end. Insert the Wire Harness into the Right Handrail and out of the large hole. If necessary, use needlenose pliers to pull the Wire Harness out of the hole. 3 73 72 42 106 Hold the Handrail Spacer (106) and the Right Handrail (72) against the right Upright (73). Attach the Right Handrail and the Handrail Spacer with two 3" Handrail Bolts (61) and two 5/16" Star Washers (63) as shown. Do not tighten the Handrail Bolts yet. 73 63 Attach the Left Handrail (not shown) to the Left Upright 61 (73) as described above. Note: There is not a wire har- ness in the Left Upright. 4. Set the Crossbar (40) on the brackets on the Handrails (71, 72). Attach the Crossbar with two Crossbar Screws (39). Do not tighten the Crossbar Screws yet. Attach the end of the ground wire to the small hole in the side of the Right Handrail (72) with a 1/2" Silver Screw (49). 4 71 Bracket Ground Wire 49 39 40 Bracket 39 72 5. Place the Console Base (47) on the Right Handrail (72) 5 and the Left Handrail (not shown). Attach the Console Base with four 3/4" Screws (2) (only two Screws are shown). Insert the Wire Harness (42) through the two indicated plastic ties on the Console Base (47). Next, insert the Wire Harness up through the opening beside the Console Cover (44). Make sure that the Console Cover is securely attached to the Console Base. 2 Refer to the inset drawing. Look at the top of the Console Base (47). Insert the Wire Harness (42) through the plastic tie on top of the Console Base. 47 42 44 Ties 72 42 Tie 47 6
-
 1
1 -
 2
2 -
 3
3 -
 4
4 -
 5
5 -
 6
6 -
 7
7 -
 8
8 -
 9
9 -
 10
10 -
 11
11 -
 12
12 -
13
-
14
-
15
-
16
-
17
-
18
-
19
 |
 |
