Pyle P3201BT Instruction Manual - Page 3
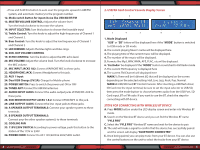
USB/SD Card Control Console Display Screen, STEPS FOR CONNECTING WITH WIRELESS BT DEVICE
 |
View all Pyle P3201BT manuals
Add to My Manuals
Save this manual to your list of manuals |
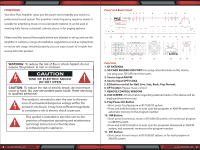
Page 3 highlights
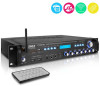
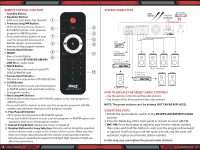
• Press and hold this button to auto scan the programs upward in AM/FM system, and automatic memory to the program number. 12. Mode switch button for input choice like USB/SD/BT/FM 13. MASTER VOLUME CONTROL: Adjusts the volume level. Turn the knob clockwise to increase the volume. 14. INPUT SELECTOR: Turn this button to choose the favorable input 15. Treble Control: Turn this knob to adjust the high frequencies of Channel 1 and Channel 2. 16. Bass Control: Turn this knob to adjust the low frequencies of Channel 1 and Channel 2. 17. LED DIMMER: Adjusts the blue lights and blue rings. 18. SUB. OUT VOLUME CONTROL 19. ECHO CONTROL: Turn the knob to adjust the MIC echo level. 20. MIC VOLUME: Adjust the volume level. Turn the knob clockwise to increase the MIC volume. 21. MIC INPUT JACKS 1&2: Connect KARAOKE MIC to these jacks. 22. HEADPHONE JACK: Connect Headphone to this jack. 23. AUX 1 Input 24. Dual USB Charge (5V/2A): Charge for Mobile-phone 25. POWER SWITCH: Press to switch the power unit ON or OFF 26. TUNER ANT: Connect for AM/FM antennas. 27. AUDIO INPUT JACKS: Connect the audio output jacks of DVD/CD. AUX to these jacks. 28. SUB-WOOFER OUTPUT JACKS 1 & 2: Connect IPOD/MP3 to this jack. 29. LINE OUTPUT JACKS: Connect the line input jacks to these jacks. 30. A SPEAKER OUTPUT TERMINALS: Connect your speaker system to these terminals. 31. B SPEAKER OUTPUT TERMINALS: Connect your the other speaker system(s) to these terminals. 32. COOLING FAN 33. 115V/230V SWITCH: According to power voltage, push this button to the station of the 115V or 230V. 34. POWER CORD: Connect to AC 115V/60Hz & 230V/50Hz outlet. 4 www.PyleUSA.com 2. USB/SD Card Control Console Display Screen 1. Mode Displayed "USB" or "SD" letters will be displayed here if the "MODE" button is switched to USB mode or SD mode. 2. The current playing Music's name will be displayed here. 3. The playing time of the current music will be displayed. 4. The number of the music will be displayed. 5. Formats like Mp3, WAV, WMA, APE, FLAC, etc.will be displayed. 6. "Fm Radio" be displayed if the "MODE" button is switched to FM Radio mode. 7. The current FM Frequency is displayed here 8. The current FM Channel will displayed here MARK 1: There will be 6 diferent EQ that will be displayed on the screen depending on the selected setting: Hall, Live, Jazz, Rock, Pop, Normal. MARK 2: USB/SD Card/BT Control Console: After inserting a USB ash drive/ SD Card into the input terminal, be sure to set the input selector to USB/SD, then press the mode button to choose between audio from the USB Port, SD Card input, BT or FM radio. If you want to use the BT, check the steps for connecting with BT device. STEPS FOR CONNECTING WITH WIRELESS BT DEVICE A. Press MODE button under the LCD display screen and enter into Wireless BT mode. B. Search on the Wireless BT device and you can fnd the Wireless BT name "PYLE PRO" C. Select the "PYLE PRO" Wireless BT name and wait for the device to pair. D. The unit will make a signal to confrm that the device has successfully paired and the screen will display "BLUETOOTH CONNECTED" E. Once being paired, you can play music from your BT device. You can also use the control buttons on the unit to select the tracks from your BT device. www.PyleUSA.com 5
-
 1
1 -
 2
2 -
 3
3 -
 4
4 -
 5
5
 |
 |
