RCA 26LA33RQ User Manual - Page 24
OSD Menu Operations
 |
View all RCA 26LA33RQ manuals
Add to My Manuals
Save this manual to your list of manuals |
Page 24 highlights
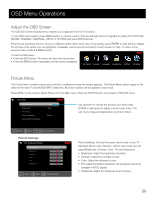
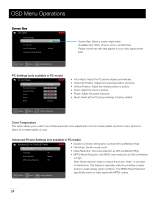
OSD Menu Operations Adjust the OSD Screen The OSD (On Screen Display) menu enables you to approach to the TV functions. To use OSD menu system, press MENU button on remote control, then use left/right arrow to highlight an option from PICTURE, SOUND, CHANNEL, PARENTAL, SETUP or OTHERS and press ENTER button. Press the up and down arrow to move to a different option within each menu. If necessary, press ENTER or right arrow to display the choices of the option you've highlighted. If available, use the text at the bottom of each screen for help. To return to the previous menu, press the MENU button. To exit the OSD menu: • Press the EXIT button. The menu will clear from the screen. • Press the MENU button repeatedly until the menus disappear. PICTURE SOUND CHANNEL PARENTAL SETUP OTHERS Picture Menu The Picture Menu contains menus and controls to configure the way the picture appears. The Picture Menu options apply to the video for the main TV and VIDEO INPUT selections. All picture options can be applied to each input. Press MENU on the remote. Select Picture from the Main menu. Press the ENTER button to proceed to PICTURE menu. PICTURE Picture Settings Screen Size PC Settings Color Temperature Advanced Picture Settings Wide Normal Use up/down to choose the function you need, press ENTER or right arrow to adjust or enter a sub-menu. The sub-menu image and explanation are shown below. MENU :Return :Move ENTER / :Go to Next Menu Picture Settings PICTURE SETTINGS Picture Mode Brightness Contrast Color Tint Sharpness Standard MENU :Return :Move :Change Setting Picture Settings: Choose the preset visual mode of your TV: Standard, Movie, User, Dynamic. Only in User mode you can adjust Brightness, Contrast, Color, Tint and Sharpness. • Brightness: Adjust the brightness of picture. • Contrast: Adjust the contrast of color. • Color: Adjust the richness of color. • Tint: Adjust the balance between red and green level (only available in NTSC signal). • Sharpness: Adjust the sharpness level of picture. 23
-
 1
1 -
2
-
3
-
4
-
5
-
6
-
7
-
8
-
9
-
10
-
11
-
12
-
13
-
14
-
15
-
16
-
17
-
18
-
 19
19 -
 20
20 -
 21
21 -
 22
22 -
 23
23 -
 24
24 -
 25
25 -
 26
26 -
 27
27 -
 28
28 -
 29
29 -
30
-
31
-
32
-
33
-
34
-
35
-
36
-
37
-
38
-
39
-
40
-
41
-
42
-
43
-
44
-
45
-
46
-
47
 |
 |