RCA ANT700F User Guide
RCA ANT700F Manual
 |
View all RCA ANT700F manuals
Add to My Manuals
Save this manual to your list of manuals |
RCA ANT700F manual content summary:
- RCA ANT700F | User Guide - Page 1
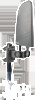
ENGLISH ANT700R / ANT700F Digital Amplified Indoor/Outdoor Antenna User's Guide FCC Statement This device complies with part frequency energy and, if not installed and used in accordance with the instructions, may cause harmful interference to radio communications. However, there is no guarantee - RCA ANT700F | User Guide - Page 2
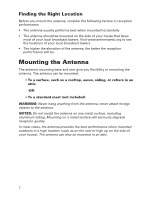
attach foreign objects to the antenna. NOTES: Do not install the antenna on any metal surface, including aluminum siding. Mounting on a metal surface will seriously degrade reception quality. In most cases, the antenna provides the best performance when mounted outdoors in a high location (such as - RCA ANT700F | User Guide - Page 3
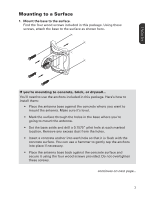
hole so that it is flush with the concrete surface. You can use a hammer to gently tap the anchors into place if necessary. • Place the antenna base back against the concrete surface and secure it using the four wood screws provided. Do not overtighten these screws. continues on next page... 3 - RCA ANT700F | User Guide - Page 4
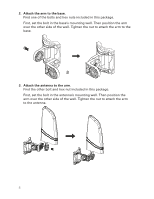
's mounting well. Then position the arm over the other side of the well. Tighten the nut to attach the arm to the base. 3. Attach the antenna to the arm. Find the other bolt and hex nut included in this package. First, set the bolt in the - RCA ANT700F | User Guide - Page 5
. Cover the connector with the cable's attached weather boot. To adjust the antenna's position: 1. Loosen the bolt on either end of the arm. 2. Move the arm or antenna to the desired position. 3. Re-tighten the bolt so that the antenna and arm stay firmly in position. Mounting to a Mast 1. If you're - RCA ANT700F | User Guide - Page 6
end of each U-bolt as shown here. 3. Mount the base to the mast (not included). Slide the antenna clamp assembly over the mast, positioning the mast between the clamp and the antenna base. Position the antenna base as high as possible on the mast. Orient the base in the direction you want. Then - RCA ANT700F | User Guide - Page 7
position the arm over the other side of the well. Tighten the nut to attach the arm to the base as shown here. 5. Attach the antenna to the arm. Find the other bolt and hex nut included in this package. First, set the bolt in the - RCA ANT700F | User Guide - Page 8
to the desired position. 3. Re-tighten the bolt so that the antenna and arm stay firmly in position. 6. Connect the coaxial cable to the antenna. Connect the coaxial cable to the F-connector of the antenna as shown here. Then cover the connector with the attached weather boot. Note: If you're using - RCA ANT700F | User Guide - Page 9
short coaxial cable built into the amplifier insert to your splitter (splitter sold separately). DO NOT PUT THE SIGNAL SPLITTER BETWEEN THE AMPLIFIER INSERT AND THE ANTENNA. 3. After all other connections are made, connect the power adapter into the amplifier insert. Plug it into a standard AC outlet - RCA ANT700F | User Guide - Page 10
product to the Retailer. This Warranty is not transferable and does not cover product purchased, serviced or used outside the United States or Canada. The warranty does not extend to the VOXX Accessories Corporation 3502 Woodview Trace, Suite 220, Indianapolis, IN 46268 ANT700R/ANT700F NA IB 04 10
-
 1
1 -
 2
2 -
 3
3 -
 4
4 -
 5
5 -
 6
6 -
 7
7 -
8
-
9
-
10
 |
 |

1
ENGLISH
FCC Statement
This device complies with part 15 of the FCC Rules. Operation is subject to the following two conditions: (1) This device may
not cause harmful interference, and (2) this device must accept any interference received, including interference that may
cause undesired operation.
This equipment has been tested and found to comply with the limits for a Class B Digital Device, pursuant to Part 15 of the
FCC Rules. These limits are designed to this equipment generates, uses, and can radiate radio frequency energy and, if not
installed and used in accordance with the instructions, may cause harmful interference to radio communications. However,
there is no guarantee that interference will not occur in a particular installation. If this equipment does cause harmful
interference to radio or television reception, which can be determined by turning the radio or television off and on, the user
is encouraged to try to correct interference by one or more of the following measures:
•
Reorient or relocate the receiving antenna.
•
Increase the separation between the equipment and receiver.
•
Connect the equipment into an outlet on another circuit.
•
Consult the dealer or an experienced radio/TV technician for help.
Caution: Any changes or modifications not expressly approved by the party responsible for compliance could void the user’s
authority to operate this equipment.
Industry Canada Regulatory Information
CAN ICES-3 (B)/NMB-3 (B)
Avis d’Industrie Canada
CAN ICES-3 (B)/NMB-3 (B)
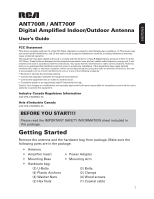
ANT700R / ANT700F
Digital Amplified Indoor/Outdoor Antenna
User’s Guide
Getting Started
Remove the antenna and the hardware bag from package. Make sure the
following parts are in the package:
•
Antenna
•
Amplifier Insert
•
Power Adapter
•
Mounting Base
•
Mounting Arm
•
Hardware bag:
(2) U-Bolts
(2) Bolts
(4) Plastic Anchors
(2) Clamps
(4) Washer Nuts
(4) Wood screws
(2) Hex Nuts
(1) Coaxial cable
BEFORE YOU START!!!
Please read the IMPORTANT SAFETY INFORMATION sheet included in
this package.
ENGLISH