RCA DRC8052N User Guide
RCA DRC8052N - Dvd Recorder With Hdmi Manual
 |
UPC - 840356939995
View all RCA DRC8052N manuals
Add to My Manuals
Save this manual to your list of manuals |
RCA DRC8052N manual content summary:
- RCA DRC8052N | User Guide - Page 1
DVD Recorder User's Guide Changing Entertainment. Again. - RCA DRC8052N | User Guide - Page 2
. DO NOT OPEN COVERS AND DO NOT REPAIR YOURSELF. REFER SERVICING TO QUALIFIED PERSONNEL. CAUTION FCC Regulations state that unauthorized changes or modifications to this equipment may void the user's authority to operate it. Note: This DVD Recorder is designed and manufactured to respond to the - RCA DRC8052N | User Guide - Page 3
DVD recorder to Watch TV 19 Discs for Recording 19 Next Steps 20 Explanation of the Remote Control Buttons 21 Button Descriptions for TV 22 TV Controls 22 Using the Remote Schedule Menu (Timer Recording 34 Erase Disc 35 Finalize 35 Edit Disc Name 35 Troubleshooting 36 Handling Cautions 39 - RCA DRC8052N | User Guide - Page 4
of information that can be stored on the disc. VCDs typically have lower picture and sound quality than DVD discs. You must use DVD±R or DVD±RW discs to record on your DVD recorder not VCDs. Things to consider before you connect Protect components from overheating • Don't block ventilation holes on - RCA DRC8052N | User Guide - Page 5
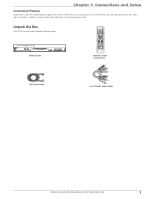
right, and video). Graphics contained within this publication are for representation only. Unpack the Box Your DVD recorder came with the following items: CLEAR DVD recorder Remote control and batteries RF Coaxial cable 1 set of audio video cables Graphics contained within this publication are - RCA DRC8052N | User Guide - Page 6
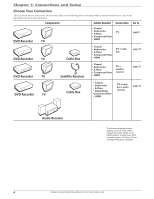
. Turn to the appropriate page for specific instructions. Components Cables Needed Connection Go to INPUT CH-/SKIP- CH+/SKIP+ OPEN/CLOSE RECORD STOP REV FWD PLAY/PAUSE DVD Recorder TV • Coaxial • Audio/video TV • S-Video • Component Video • HDMI page 8 INPUT CH-/SKIP- CH+/SKIP - RCA DRC8052N | User Guide - Page 7
order online at www.rca.com, or go to your local electronics store). There are several ways to connect your DVD recorder to your TV depending upon left (white) audio jack on the DVD recorder and don't connect the right (red) audio part of the cable. HDMI™ OUTPUT (High-Definition Multimedia Interface) - RCA DRC8052N | User Guide - Page 8
DVD recorder is turned off. HDMI OUT - If your TV has an HDMI jack, connects to your TV for high-definition video signal. Also provides 2-channel audio signal when the audio output is set to PCM. See page 34. Press the HDMI button on the remote control parts (cables not supplied with DVD recorder). - RCA DRC8052N | User Guide - Page 9
jack is provided when you're connecting a DV camcorder through a IEEE 1394 Firewire connection. The DV connection can also control the DV playback using the DVD recorder's remote. INPUT 2: Audio/Video jacks - These Input jacks are provided for convenience when you're connecting a temporary component - RCA DRC8052N | User Guide - Page 10
1: Connections and Setup DVD recorder + TV In from cable or antenna 1 DVD recorder IN ANTENNA /CABLE OUT COAXIAL OUT HDMI OUT S-VIDEO OUT COMPONENT channel Tune the DVD recorder to the channel you want to record, and press RECORD. Use the buttons on the TV (or the TV's remote control*) to tune - RCA DRC8052N | User Guide - Page 11
the cable as explained below. Cable service: If you have cable service via a cable that comes out of the wall, connect the end of that cable to the ANTENNA/CABLE INPUT jack on the DVD recorder. Note: If you have a cable box, go to page 10 for connection instructions. Off-air antenna: If you use - RCA DRC8052N | User Guide - Page 12
Box might look different than the ones pictured here. DVD recorder 1a IN ANTENNA /CABLE OUT COAXIAL OUT HDMI OUT S-VIDEO OUT COMPONENT VIDEO OUT Y Pb DVD recorder. There are also DIGITAL cable boxes that are relatively new and are used with digital cable service. Even with digital cable service - RCA DRC8052N | User Guide - Page 13
Jack, you can achieve optimum picture quality. Connect one end of the HDMI cable to the HDMI jack on the back of the TV and the other end to the HDMI jack on the back of the DVD recorder. Press the HDMI button on the remote to toggle the available progressive scan and interlace modes. Notes: If - RCA DRC8052N | User Guide - Page 14
DVD recorder SATELLITE DISH ANTENNA SATELLITE IN LOW SPEED DATA OUT TO TV IN FROM ANT S-VIDE O AUDIO OUT R VIDEO L DIGITAL OUT PHONE JACK 1 2d IN ANTENNA /CABLE OUT COAXIAL OUT HDMI . Tune the DVD recorder to the INPUT 1 channel (press the INPUT button on the remote). Tune the satellite - RCA DRC8052N | User Guide - Page 15
Jack, you can achieve optimum picture quality. Connect one end of the HDMI cable to the HDMI jack on the back of the TV and the other end to the HDMI jack on the back of the DVD recorder. Press the HDMI button on the remote to toggle the available progressive scan and interlace modes. Notes: If - RCA DRC8052N | User Guide - Page 16
VIDEO S-VIDEO (ONLY DVD) VIDEO OUT TO TV / MONITOR DVD recorder 1a Cable Box CABLE IN IN ANTENNA /CABLE OUT COAXIAL OUT HDMI OUT S-VIDEO OUT CABLE DVD recorder. There are also DIGITAL cable boxes that are relatively new and are used with digital cable service. Even with digital cable service - RCA DRC8052N | User Guide - Page 17
and Setup Connection: DVD recorder + TV + Basic Cable Box +Audio Receiver You'll need to consult instructions that came with your HDMI jack on the back of the DVD recorder. Press the HDMI button on the remote to toggle the available progressive scan and interlace modes. 3. Connect the DVD recorder - RCA DRC8052N | User Guide - Page 18
(go to page 34 for information). Notes: If your TV is capable of progressive scan, connect the DVD recorder to the TV using the COMPONENT VIDEO OUT jacks, and press the HDMI button on the remote to toggle between progressive scan and interlace. Please note that the component video output mode will - RCA DRC8052N | User Guide - Page 19
if inserted incorrectly, if all batteries are not replaced at the same time, if disposed of in remote to operate the DVD recorder, point the remote at the DVD recorder, not the TV. The remote has to be pointed in the correct direction and toward the correct component in order for the remote control - RCA DRC8052N | User Guide - Page 20
highlighted. 4. Press OK to select it. The signal types, Antenna and Cable appear. Choose the type of signal you are using and press OK. The DVD recorder searches for all available channels. 5. When finished, highlight the cancel icon and press OK to return to the main menu. • To cancel, press OK at - RCA DRC8052N | User Guide - Page 21
" in order for other DVD players to be able to play DVD±R discs. Throughout this User's Guide, you'll notice that some features and menu options are only available for a specific type of disc. Make sure you use discs from a reputable manufacturer. Many problems encountered when recording (or playing - RCA DRC8052N | User Guide - Page 22
list of suggestions is provided below. • Consult the Instruction Manual that came with your TV. • If you can't find the information in the manual, or can't find the manual, review the following list. • There might be a button on the TV's remote control that accesses the Video Input Channel (see table - RCA DRC8052N | User Guide - Page 23
and Setup Explanation of the Remote Control Buttons (in alphabetical order) You can use this remote to operate the DVD recorder, and to access the features available. The descriptions that follow describe how each button works when operating the DVD recorder. Many buttons will perform different - RCA DRC8052N | User Guide - Page 24
jacks being used. TV Controls buttons Using the Remote's Features Understanding the INPUT button Another important button is the INPUT button. The INPUT button selects the programming from a specific component that is connected to one of the input jacks on the DVD recorder. We call these Video - RCA DRC8052N | User Guide - Page 25
you must set the clock to the correct time and date. The Schedule menu, with a timer recording schedule set up. Setting Up a Timer Recording 1. Press SETUP on the remote control to bring up the DVD recorder's Main menu. 2. Press the down arrow button until Schedule is highighted and press OK. The - RCA DRC8052N | User Guide - Page 26
(if you need help, go to page 20). 2. Using the DVD recorder's channel buttons, tune to the program you want to record. Press the RECORD button. 3. Use the TV's remote control to change the channels on the TV. 4. When you're finished recording, remember to turn the TV back to its Video Input Channel - RCA DRC8052N | User Guide - Page 27
a DVD±R or DVD±RW disc you recorded using the DVD recorder. Once a rewriteable disc is finalized, it can be edited. However, write-once discs (DVD±R) cannot be edited once they have been finalized. Only DVD±RW discs can be erased. 1. While playing the disc, press the EDIT button on the remote. The - RCA DRC8052N | User Guide - Page 28
off unless the disc is removed or the player is unplugged, or you press the STOP button twice. ) How to Load and Play Discs Turn on the TV and your DVD recorder (press ON•OFF on the remote or press the STANDBY/ ON button on the DVD recorder). 1. Make sure the TV is tuned to its - RCA DRC8052N | User Guide - Page 29
with different features. There are three separate types of menus that you can use to access features: • The DVD's Disc menu - The Disc menu is part of each disc and is separate from the DVD recorder's menu. The contents of each Disc menu vary according to how the disc was authored and what features - RCA DRC8052N | User Guide - Page 30
on the remote control. The Info Display. Playing Discs You Recorded (DVD±R and DVD±RW) Playback of DVD±R and DVD±RW discs that you used to record programs is format is the ability to store CD-quality music tracks that are user-friendly and compressed on a personal computer. mp3 (MPEG-3, which - RCA DRC8052N | User Guide - Page 31
on Your Computer Your DVD recorder handles MPEG-1, layer disc's contents. 3. Select a folder using the arrow buttons on the remote control, then press OK to display the list of files or press PLAY long to be completely displayed. • JPEG file: the player starts the slide show with the JPEG file you have - RCA DRC8052N | User Guide - Page 32
DivX Subtitles Rating You can set up ratings limits and lock your player in order to control the type of content people watch on your DVD recorder. The Password setting indicates whether the parental controls are on or off (locked or unlocked). On: You need to enter the password in order to play - RCA DRC8052N | User Guide - Page 33
the parental controls again. Clock The Clock menu allows you to set the time and the date. You set this up the first time you turned on the unit. See Chapter 1 for complete details. Recording The Recording menu contains the settings that deal with how content is recorded to DVD. Recording Quality - RCA DRC8052N | User Guide - Page 34
This screen shows you the version of software the DVD recorder is using. Restore You can restore the unit to factory default settings with Restore. This does not reset the password or parental controls. Highlight Yes and press OK to reset the settings. 32 Graphics contained within this publication - RCA DRC8052N | User Guide - Page 35
This might mean that parts of the picture (the setting if your DVD player is connected to a widescreen TV. If you choose this setting and you don't have a widescreen TV, the images on the screen might appear distorted due to vertical compression. If you play a disc recorded - RCA DRC8052N | User Guide - Page 36
DVD recorder to a receiver via the DIGITAL AUDIO OUT jack on the back of the player, without disturbing anyone. • Off Dynamic Range Control is off and the volume dynamics are set remote. • To exit at any time, highlight the Exit icon and press OK. Schedule Menu (Timer Recording) Timer recordings - RCA DRC8052N | User Guide - Page 37
finalizing the discs. Erase Disc Erases a DVD+RW disc so you can record new programming onto it. Not available for DVD±R discs. Finalize Only appears if you have a DVD±R disc in the DVD recorder. In order for a DVD±R disc to be played in other DVD player, you must finalize it. Discs are automatically - RCA DRC8052N | User Guide - Page 38
can be corrected by consulting the following troubleshooting list. If you still have problems or need additional help, call 1-866-775-0976 or visit www.rca.com/customersupport. General Problems Player won't work (locks up) • Try turning off the DVD recorder by pressing and holding the STANDBY/ON - RCA DRC8052N | User Guide - Page 39
33 for more information. Disc I recorded won't play in another DVD player • If it's a DVD±R disc, make sure you finalize the disc (page 35). • Some DVD players won't play DVD±R and/or DVD±RW discs. Check the DVD player's manual. Recording Problems Not enough space on the DVD+R or DVD+RW disc • To get - RCA DRC8052N | User Guide - Page 40
the DVD recorder operate the DVD recorder's basic functions, but you won't be able to use the menu system without the remote control. The buttons on the front of the unit are described on page 7. Also, if you have another RCA, GE, or Proscan brand product with a remote control that has a DVD button - RCA DRC8052N | User Guide - Page 41
while a disc is being played. The disc may get scratched or broken, and the player's internal parts may be damaged. • Don't put any container filled with liquid or any small metal objects on the DVD recorder. • Don't put your hand into the disc tray. • Don't place anything other than the disc in - RCA DRC8052N | User Guide - Page 42
Authorized RCA Service Center the labor charges to repair your DVD recorder. • Pay any Authorized RCA Service Center for the new or, at our option, refurbished replacement parts required to repair your DVD recorder. How you get service: • Take your DVD recorder to any Authorized RCA Service Center - RCA DRC8052N | User Guide - Page 43
Chapter 5: Additional Information How state law relates to warranty: • Some states do not allow the exclusion nor limitation of incidental or consequential damages, or limitations on how long an implied warranty lasts, so the above limitations or exclusions may not apply to you. • This warranty - RCA DRC8052N | User Guide - Page 44
about accessories, go on-line to www.rca.com Digital Coaxial Audio cable for Coaxial Audio connection to a compatible receiver. 3 feet; price $15.95 6 feet; price $19.95 Surge Protector (part number PS83202C2); price $34.95 CLEAR Remote Control (RCR192DA1) part number 56194400; $23.10 How to - RCA DRC8052N | User Guide - Page 45
- RCA DRC8052N | User Guide - Page 46
Visit the RCA website at www.rca.com Please do not send any products to the Indianapolis address listed in this manual or on the carton. This will only add delays in service for your product. Thomson Inc. 10330 North Meridian Street Indianapolis, IN 46290 ©2006 Thomson Inc. Trademark(s) ®
-
 1
1 -
 2
2 -
 3
3 -
 4
4 -
 5
5 -
 6
6 -
 7
7 -
8
-
9
-
10
-
11
-
12
-
13
-
14
-
15
-
16
-
17
-
18
-
19
-
20
-
21
-
22
-
23
-
24
-
25
-
26
-
27
-
28
-
29
-
30
-
31
-
32
-
33
-
34
-
35
-
36
-
37
-
38
-
39
-
40
-
41
-
42
-
43
-
44
-
45
-
46
 |
 |

Changing Entertainment. Again.
DVD Recorder
User’s Guide