RCA EZDVD1BD User Manual - EZDVD2BD - Page 5
General controls, Discs for playback and recording - small wonder
 |
View all RCA EZDVD1BD manuals
Add to My Manuals
Save this manual to your list of manuals |
Page 5 highlights
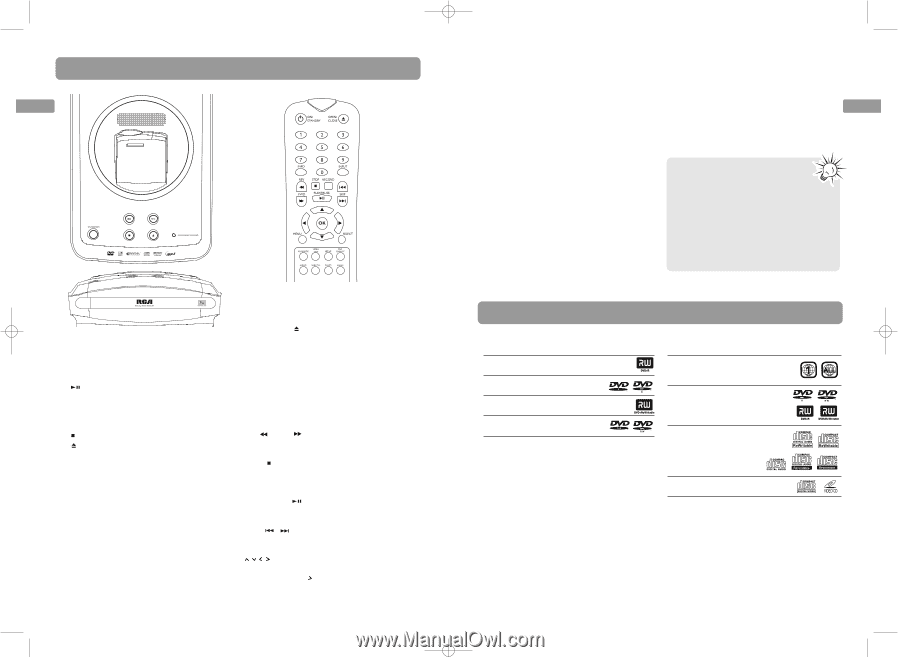
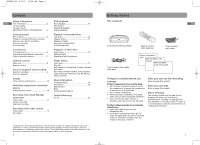
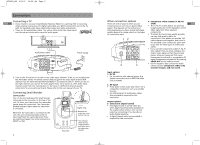
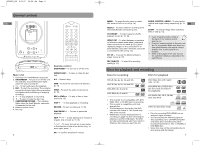
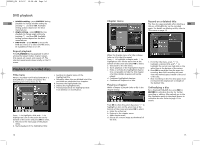
EZDVD1_EN 8/9/07 10:08 AM Page 8 General controls EN 1 3 4 7 2 5 6 8 9 Main unit 1. Connector for Small Wonder camcorder 2. ON/STANDBY - To turn on or off the unit. The indicator around the button lights when the unit is turned off. 3. - To start and pause the playback. 4. REC - To start the recording. The indicator around the button lights during recording and flashes while initializing or stopping recording. 5. - To stop playback or recording. 6. - To open or close the disc tray. 7. CAMCORDER DOCKED - This indicator lights when the Small Wonder camcorder is connected to the unit. 8. Remote control sensor 9. Disc tray 8 Remote control ON/STANDBY - To turn on or off the unit. OPEN/CLOSE - To open or close the disc tray. 0-9 - Numeric keys INFO - To show the on-screen info banners (p. 13). INPUT - To select the audio visual sources (p. 10). REV /FWD - To play in fast or slow motion (p. 13). STOP - To stop playback or recording. RECORD - To start recording (p. 11-13). PLAY/PAUSE - To start or pause the playback. SKIP / - To skip backward or forward a chapter, title or track (p. 11-13). - To move through on-screen menus in the direction of the arrow button (e.g., to move right, press ). OK - To confirm selections in menus. MENU - To access the disc menu or select AUDIO, SUBTITLE, ANGLE - To select audio, PBC mode of VCD on or off (p. 14). subtitle and angle setting respectively (p. 13- EN 14). SELECT - To select video for recording from the Small Wonder camcorder (p. 12). ZOOM - To enlarge image when watching DVD or VCD (p. 13). PLAYMODE - To select repeat or shuffle playback modes (p. 14, 16). • Insert 2 batteries (AAA, LR03) at VIDEO OUT - To select between progressive or interlace output mode when component video connections are made (p.7); to select displaying images on the connected TV or Small Wonder camcorder while the camcorder is connected to the unit (p. 12). the back of the remote control prior to use. • Point the remote control at the unit, not the TV, to operate. Make sure there is a clear path between the remote control and the unit, so the signal is not blocked. SET UP - To access the Memory Maker's player menus (p. 17). • Refer to the pages in the user manual for operation details as indicated in the parentheses. REC QUALITY - To select the recording quality (p. 17). Discs for playback and recording Discs for recording Discs for playback DVD+R 2.4x, 4x, 8x, 16x and 32x DVD-R 2.4x, 4x, 8x, 16x and 32x DVD+RW 2.4x, 4x and 8x DVD-RW 2.4x, 4x and 8x • This recorder is not compatible with DVDRAM, CD-R, or CD-RW discs for recording. • This recorder is compatible with duallayered discs. • The first time you load a disc, the DVD recorder will format it. This should only take a few seconds. • DVD±R disc must be finalized (refer to recording on page 11) after recording for playing in another DVD player. The DVD recorder automatically asks if you want to finalize a disc when you eject the disc. DVD Video discs with region code 1 or ALL DVD±R/RW discs, DVD±R discs (the discs must be finalized for playback) CDs (Audio CDs, CD-R, CD-RW, mp3, jpeg discs) Video CD discs (VCD, SVCD) • Discs for recording (DVD±R/RW) are not assigned region numbers. • You cannot play the following types of discs: Laserdiscs, CD-I, CD-ROM (computer only discs), discs recorded using other broadcast standards (i.e. PAL or SECAM), or DVD-RAM discs. • Some discs may not be compatible due to laser pickup and disc design. 9
-
 1
1 -
 2
2 -
 3
3 -
 4
4 -
 5
5 -
 6
6 -
 7
7 -
 8
8 -
 9
9 -
 10
10 -
 11
11 -
12
 |
 |