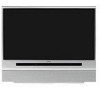
RCA HD61LPW165 User Guide & Warranty
RCA HD61LPW165 - 61" Rear Projection TV Manual
 |
View all RCA HD61LPW165 manuals
Add to My Manuals
Save this manual to your list of manuals |
RCA HD61LPW165 manual content summary:
- RCA HD61LPW165 | User Guide & Warranty - Page 1
HDTV with DLP technology High-Definition Television User's Guide - RCA HD61LPW165 | User Guide & Warranty - Page 2
. Refer servicing to qualified service personnel. This symbol indicates "dangerous voltage" inside the product that presents a risk of electric shock or personal injury. This symbol indicates important instructions accompanying the product. This symbol indicates that the lamp in the HDTV contains - RCA HD61LPW165 | User Guide & Warranty - Page 3
on-screen instructions that guide you through all of the TV's features. This introduction has three parts that describe why an RCA Scenium HDTV featuring DLP technology is an excellent choice: Part 1: DLP-brilliance in color, design, and technology Part 2: Why RCA Scenium DLP is better Part 3: Other - RCA HD61LPW165 | User Guide & Warranty - Page 4
Introduction Part 2: Why RCA Scenium DLP is better DLP is just part of the story. You have chosen to embark on the next generation of TV viewing- HDTV. There are many technological advancements that make HDTV better than analog TV, but there are basically three things about HDTV that bring you a - RCA HD61LPW165 | User Guide & Warranty - Page 5
Part 3: Other Key Features of owning an RCA Scenium HDTV There are other HDTV's on the market- even some that use DLP technology. But your RCA Scenium HDTV has been designed with features that will enhance your TV Amplitude Modulation). Note analog frame rate back 3 Auto Color 4 Color Warmth 5 - RCA HD61LPW165 | User Guide & Warranty - Page 6
(Internet Service Provider). DSL, cable modem, and ISP subscription sold separately. To get the most out of your HDTV's web browser, purchase the keyboard (model KBR755TA1) designed specifically for your TV (go to page 84 for ordering information). Additionally, your RCA Scenium HDTV enables you - RCA HD61LPW165 | User Guide & Warranty - Page 7
HDMI 18 How to Connect: TV + CableCARD 19 Setting Up Digital Cable Television Service 19 Audio Connections ...20 How to Connect: TV + Router via the HDTV's ETHERNET Jack 22 Plug in the TV ...23 Put Batteries in the Remote ...23 Turn on the TV ...23 Use the Remote Control to Complete the Assisted - RCA HD61LPW165 | User Guide & Warranty - Page 8
...50 Chapter 4: Using the TV's Menu System Menus, On- Color Scheme ...67 Translucency ...67 Menu Language ...67 Power Indicator ...67 Lamp Power ...67 Chapter 5: Reference Troubleshooting...70 Lamp Replacement Instructions 74 HDTV Specifications ...77 Accessory Information ...79 Custom DLP HDTV - RCA HD61LPW165 | User Guide & Warranty - Page 9
Before You Connect • Choose Your Connection • Explanation of Jacks and Cables • The Front of Your TV • How To Connect • Plug in the TV • Put Batteries in the Remote • Turn on the TV • Use the Remote Control to Complete the Assisted Setup • Complete the Assisted Setup Graphics contained within this - RCA HD61LPW165 | User Guide & Warranty - Page 10
indirect lighting. Using a Stand If a stand, base, or cabinet is used, insure that it is of adequate size and strength to prevent the TV from being accidentally tipped over, pushed off, or pulled off. This could cause personal injury and/or damage the TV. Refer to the Important Safety Instructions - RCA HD61LPW165 | User Guide & Warranty - Page 11
system and to instruct you in its operation. For details about this service, call 1-888-206-3359. For additional assistance while using your RCA Scenium product, please visit www.rcascenium.com/customer support. Components Video Connections POWER VOL + VOL - CH MENU CH TV DVD VCR Cables - RCA HD61LPW165 | User Guide & Warranty - Page 12
to the Antenna or Cable input is fair. TV CENTER SPEAKER INPUT EXTERNAL AMP MAX POWER RATING! (60 WATTS into 8 OHMS) FIXED/VARIABLE left rear surround sound. Note: To turn the TV's internal speakers on and off, press MENU on the remote control and choose Audio, then Audio Connections. Then choose - RCA HD61LPW165 | User Guide & Warranty - Page 13
. The S-Video jack provides better picture quality than the composite video jacks because the color (chrominance, also called chroma) part of the signal is separated from the black and white (luminance) part of the picture. INPUT 3 COMPOSITE INPUT Provides connection to a second NTSC (analog) video - RCA HD61LPW165 | User Guide & Warranty - Page 14
as three separate parts through these to page 61 for more TV won't respond to the remote. ETHERNET Connect a router, cable modem, or Digital Subscriber Line (DSL) modem to the TV using an Ethernet cable (CAT 5). Do not connect a telephone cable because of risk of fire or shock. A green light - RCA HD61LPW165 | User Guide & Warranty - Page 15
TV outputs audio/video through the DTVLink jack only to a component that enforces video copy protection. CableCARD Allows you to use a digital cable television card to receive digital cable services, including premium and HDTV the jack on the back of your TV is compatible with DVI components. Note: - RCA HD61LPW165 | User Guide & Warranty - Page 16
Power indicator TV and close it. Turn off the TV and turn back on. The lamp should turn on. Lamp is dead. You can replace the lamp yourself following the instructions on page 74. Go to page 79 MMEENU/OOKK CH CH VOL VOL for ordering information. Lamp power supply within TV may need service - RCA HD61LPW165 | User Guide & Warranty - Page 17
DVD PR PB Y S-VIDEO L/ L/ L/ 2A 2B DVD VCR TV CENTER SPEAKER INPUT EXTERNAL AMP MAX POWER RATING! (60 WATTS into 8 OHMS) FIXED/VARIABLE AUDIO OUTPUTS CENTER R REAR L REAR MATRIX SURROUND OUTPUTS AUDIO/VIDEO OUTPUT POWER (AC 120V~60Hz) SUBWOOFER R L WIRED IR R L V DIGITAL AUDIO - RCA HD61LPW165 | User Guide & Warranty - Page 18
- CH MENU CH TV VIDEO R AUDIO L S-VIDEO SATELLITE RECEIVER 3 SRateecleliitveer VCR TV CENTER SPEAKER INPUT EXTERNAL AMP MAX POWER RATING! (60 WATTS into 8 OHMS) FIXED/VARIABLE AUDIO OUTPUTS CENTER R REAR L REAR MATRIX SURROUND OUTPUTS AUDIO/VIDEO OUTPUT POWER (AC 120V~60Hz) SUBWOOFER - RCA HD61LPW165 | User Guide & Warranty - Page 19
, PAUSE, and PLAY when remote is in TV mode. Three types of 1394 connectors are available on DTVLink components; 4-pin connector (no power); 6-pin connector (with power) and 6-pin connector (without power supplied). Your DTVLink is a 6-pin connector (without power supplied). Both the 4-pin and - RCA HD61LPW165 | User Guide & Warranty - Page 20
Connections & Setup TV CENTER SPEAKER INPUT EXTERNAL AMP MAX POWER RATING! (60 WATTS into 8 OHMS) FIXED/VARIABLE AUDIO OUTPUTS CENTER R REAR L REAR MATRIX SURROUND OUTPUTS AUDIO/VIDEO OUTPUT POWER (AC 120V~60Hz) SUBWOOFER R L WIRED IR R L V DIGITAL AUDIO ETHERNET OUTPUT CableCARD™ - RCA HD61LPW165 | User Guide & Warranty - Page 21
box. For more information, call your local cable operator. How to Connect: TV + CableCARD The CableCARD slot allows you to use a digital cable television card to receive digital cable services, including premium and HDTV cable channels, without the need for a set-top box. Please contact your local - RCA HD61LPW165 | User Guide & Warranty - Page 22
HDTV, you can choose various connection options depending on the type and quality of sound that you want. From good to best sound, choose one of the options or refer to the user's manual levels are controlled by the volume controls on the TV and TV remote control. 3. If you connect the SUBWOOFER jack - RCA HD61LPW165 | User Guide & Warranty - Page 23
Connections & Setup -+ TV CENTER SPEAKER INPUT EXTERNAL AMP MAX POWER RATING! (60 WATTS into 8 OHMS) FIXED/VARIABLE AUDIO OUTPUTS CENTER R REAR L REAR MATRIX SURROUND OUTPUTS POWER (AC 120V~60Hz) SUBWOOFER R L WIRED IR R AUDIO/VIDEO OUTPUT L V ETHERNET DIGITAL AUDIO OUTPUT CableCARD™ - RCA HD61LPW165 | User Guide & Warranty - Page 24
TV that are stored on your computer. Refer to www.rca.com/Access Scenium/311 for more information on viewing photos. Computer How to Connect: TV + Router via the HDTV the manuals that accompany your router and other Internet components for specific instructions. To connect the router to the TV, use - RCA HD61LPW165 | User Guide & Warranty - Page 25
replace the batteries to remove the message. learning ON-OFF TV DVD VCR SAT/CAB AUX AUDIO PIP SWAP CH. CTRL FREEZE CC PRESETS FAV CC LIGHT FORMAT CLEAR C INFO i MENU M SOUND SKIP TV button MENU button OK button Arrow buttons Turn on the TV Press TV on the remote, or press the Power - RCA HD61LPW165 | User Guide & Warranty - Page 26
or off-air antenna to the corresponding inputs before you start channel search. 1. To do a complete channel search, check each box that pertains to your TV. For example, if you're only receiving cable from the CABLE INPUT, highlight Cable Input and press OK to place a checkmark in the box. 2. Select - RCA HD61LPW165 | User Guide & Warranty - Page 27
Chapter Overview: • The Buttons on the Remote Control • Programming the Remote to Operate Other Components • How To Use the Remote After You've Programmed It • The Learning Feature • Volume Punchthrough Feature • Using the INPUT Button • Remote Code List Graphics contained within this publication - RCA HD61LPW165 | User Guide & Warranty - Page 28
learning ON-OFF TV DVD VCR SAT/CAB AUX AUDIO PIP SWAP CH. CTRL FREEZE CC PRESETS FAV CC LIGHT FORMAT CLEAR C INFO i MENU M SOUND SKIP GUIDE VOL CH MUTE GO BACK 1 2 3 4 5 6 7 8 9 INPUT IN ANT•CAB 0 REVERSE PLAY FORWARD RECORD STOP PAUSE Tip Some remote buttons can be - RCA HD61LPW165 | User Guide & Warranty - Page 29
Press to illuminate the remote control's buttons. To conserve battery power, the light turns off after several seconds. Backlight won't activate if batteries are low, but blinks on and off quickly. MENU Makes Main Menu appear and disappear. MUTE Reduces the TV's volume to its minimum level. Press - RCA HD61LPW165 | User Guide & Warranty - Page 30
RCA TV can be programmed to any component button, except the TV button. Go to page 63 for more information on programming the remote to another TV. Note: The TV button can't be programmed on this remote entry method. The following instructions can be used to program the remote to operate each of your - RCA HD61LPW165 | User Guide & Warranty - Page 31
component button (DVD, TV, VCR, SAT/CAB, AUDIO, AUX) to set the remote to control the component. 2. Press ON•OFF to turn the component ON or OFF. 3. Use the remote buttons that apply to that component. Notes: The remote control may not be compatible with all brands and models of components. If you - RCA HD61LPW165 | User Guide & Warranty - Page 32
a learned function to the following buttons on the TV's remote control: component buttons (TV, VCR, DVD, SAT/CAB, AUX, and AUDIO), the CLEAR button, and the LIGHT button. • Before adding a Learned Function, you must program this TV's remote control to operate that component because programming the - RCA HD61LPW165 | User Guide & Warranty - Page 33
each learned function uses in the TV's remote control varies. If your TV remote is out of memory, the component button(s) light flashes 4 times and turn off, Remote is now in Clear learned function mode. 3. Press and release the button where learning is to be cleared. The component button blinks - RCA HD61LPW165 | User Guide & Warranty - Page 34
the TV's remote control to operate your audio receiver or amplifier. Go to page 28 for instructions. If you can't program this remote to seconds and then turn off. The remote returns to the factory settings. Note: If an invalid button is pressed, all component buttons blink 4 times and turn off. At - RCA HD61LPW165 | User Guide & Warranty - Page 35
Remote Control Input source Acquiring Channel... Front Input Listening to English in SRS MPAA - Not Rated VCR tape using the remote that came with your TV, you must first press the VCR or Kenwood 4014 Onkyo 4022 Optimus 4028 Panasonic 4023, 4024 RCA 4003, 4015, 4029, 4030 Sherwood 4026 Sony - RCA HD61LPW165 | User Guide & Warranty - Page 36
Using the Remote Control HD Receiver Code Programmable for AUX button. RCA 7000 TV Codes Programmable for DVD, VCR, DVD VCR Broksonic 3075 2075 Emerson 3076 2076 Go Video 3077 2077 JVC 3078 2078 RCA 3079 2079 Samsung 3080, 3081 ....... 2080, 2081 Sanyo 3082 2082 Sony 3083 2083 - RCA HD61LPW165 | User Guide & Warranty - Page 37
Chapter Overview: • About the Channel Banner • Digital or Analog TV Channels • Parental Controls • How V-Chip Works for the USA and Canada • Auto Tuning Feature • PIP (Picture-In-Picture) Operation • Using the Web Browser • DTVLink Recording • - RCA HD61LPW165 | User Guide & Warranty - Page 38
Using the TV's Features Program Title/Acquiring Channel Ch 8-1 WLPJ Listening to English in SRS MPAA - Not Rated 12:30 AM 00:30 12:39 PM Antenna Input 16:9 Normal 1080i HD About the Channel Banner The Channel Banner appears when you press the INFO button on the remote. If an icon in the - RCA HD61LPW165 | User Guide & Warranty - Page 39
Rated Cable Input 4:3 Normal 480i SD learning ON-OFF TV DVD VCR SAT/CAB AUX AUDIO PIP SWAP CH. CTRL FREEZE CC PRESETS FAV CC LIGHT FORMAT CLEAR C INFO i MENU M SOUND SKIP TV a Channel 1. Make sure the remote is in TV mode by pressing TV on the remote control. 2. Enter the primary - RCA HD61LPW165 | User Guide & Warranty - Page 40
and Unlocked channel lists, ratings, and blocking features: •Lock TV/Unlock TV: Choose to either lock or unlock the TV. •Video Input List: the remote for three seconds. This resets the password only and unlocks the TV; all other settings in Parental Controls are not changed. 0 Go Back 1 Lock TV 2 - RCA HD61LPW165 | User Guide & Warranty - Page 41
your password. 2. Highlight and select USA V-Chip. 3. Highlight and select V-Chip TV Rating. 4. Once you get to the V-Chip TV Rating screen, use the arrow buttons and OK on your remote to change the status of a TV program rating or content theme from Viewable to Blocked. Proceed to the next sections - RCA HD61LPW165 | User Guide & Warranty - Page 42
, and whether the status of the content theme is currently Viewable (V) or Blocked (B). Age-Based Rating TV-MA TV-14 TV-PG TV-G TV-Y7 TV-Y USA Description and Content Themes for Age-Based Ratings Mature Audience Only. Specifically designed to be viewed by adults and may be unsuitable for children - RCA HD61LPW165 | User Guide & Warranty - Page 43
child to watch. 2. Use the up and down arrow buttons on the remote to highlight the age-based ratings that correspond with the lowest content you do not want the child to watch. (In the example above, you would highlight TV-PG.) 3. Press the OK button to change content status from (V) Viewable to - RCA HD61LPW165 | User Guide & Warranty - Page 44
when the TV is locked. V-Chip Movie Rating Limit You set movie (MPAA) rating limits by blocking movies rated above a specified rating. How to block movie ratings and view movie ratings is explained in the next two sections. To access the V-Chip Movie Rating menu: 1. Press MENU on the remote control - RCA HD61LPW165 | User Guide & Warranty - Page 45
Canadian TV V-Chip supports two different Canadian rating systems: English and French. Age-Based Rating 18+ 14+ PG G C8+ C Canada V-Chip English Rating specifically for children, it is understood younger viewers may be part of the audience. Violence guidelines: will contain very little violence - RCA HD61LPW165 | User Guide & Warranty - Page 46
. 2. Highlight Canada V-Chip and select either Canada's English Ratings or French Ratings. 3. Once you get to the English or French Ratings screen, use the arrow buttons and OK on your remote to change the status of a TV program rating or content theme from Viewable to Blocked. V-Chip Unrated - RCA HD61LPW165 | User Guide & Warranty - Page 47
TV when a guardian is not present (you must hide the remote for this to be effective.) Note: If power to the TV is lost for a prolonged time (e.g., due to a power second receiver with the AUX button using the 5001 code. Then use the RCA SAT2 option in the auto tuning menu to set auto tuning. 1. Press - RCA HD61LPW165 | User Guide & Warranty - Page 48
Pb•Pr) on the back of the TV and you want the TV to tune to the composite/component video with analog channels and inputs; PIP doesn't support digital signals. The main and PIP channels must FAV CC LIGHT FORMAT CLEAR C INFO i MENU M SOUND SKIP There are certain remote buttons that control - RCA HD61LPW165 | User Guide & Warranty - Page 49
TV's Features Main picture channel number Channel control indicator Program Title/Acquiring Channel Ch 8-1 WLPJ Listening to English in SRS MPAA - Not Rated Press the PIP button on the remote control. The PIP window appears on press the CH CTRL button. PIP Problems? • If you are channel surfing - RCA HD61LPW165 | User Guide & Warranty - Page 50
an Internet Service Provider (ISP). You can start the browser on your TV by selecting it from the main menu. The TV front panel and remote control (model number KBR755TA1) is available at www.rca.com/keyboard or 800-798-5875. When you start the browser for the first time, it goes to an RCA website - RCA HD61LPW165 | User Guide & Warranty - Page 51
in this area to explain the feature and instruct the user on how to use it. DTVLink AVHDD component is model DVR2080 or DVR2160, available at your local RCA dealer or www.rca.com. The manual). • When the TV is tuned to the DTVLink input channel and the remote is in the TV mode, you can use the remote - RCA HD61LPW165 | User Guide & Warranty - Page 52
digital program: DVR2160 RCA Select a functionality as the default recording device, and autotune the TV to that device when RECORD is pressed. you press RECORD on the remote or set up a Record/Wake Timer). Press 5 or 6 to option is only available on some models. Emergency Alert System (EAS) The - RCA HD61LPW165 | User Guide & Warranty - Page 53
Chapter 4 Using the TV's Menu System Chapter Overview: • Menus, On-Screen Help, and Control Panels • Picture Quality Menu • Audio Menu • Recordings Menu • Connections Menu • Preferences Menu Graphics contained within this publication are for representation only. 51 - RCA HD61LPW165 | User Guide & Warranty - Page 54
which input or channel should be automatically tuned when a button listed below is pressed on the remote control. VCR Front Input VCR2 (AUX default) Front Input AUDIO (Audio Receiver/Amp) Front Input RCA SAT2 Front Input DVD Front Input SAT-CABLE (Satellite or Cable Box) Front Input Press OK - RCA HD61LPW165 | User Guide & Warranty - Page 55
at: 12:00 pm Turn TV Off at: 1:11:515 pm Numeric Entries Numeric entry fields are used to enter numbers, passwords, and time values. The number buttons on the remote and the arrow, channel up/down, volume up/down, and MENU/OK buttons on the front panel can be used to enter - RCA HD61LPW165 | User Guide & Warranty - Page 56
100 50 0 51% 61% 48% 45% 13% Contrast Color Tint Black Sharpness Level Picture Difference between the light and dark areas of the picture. Color The richness of the color. Tint The 2. Press the right and left arrow buttons on the remote control to select the slider. 3. Press the up and - RCA HD61LPW165 | User Guide & Warranty - Page 57
return to the menu. Auto Color Auto Color minimizes the flesh tone variations of the TV picture. Choose On or Color 4 Color Warmth 5 Noise Reduction 6 Green Stretch 7 CEdogneveErngheanncceement 8 Contrast Expand 9 Advanced Settings Main Menu Picture Quality Off Low High Edge Enhancement "replaces - RCA HD61LPW165 | User Guide & Warranty - Page 58
TV's Menu System 0 Go Back 1 Picture Settings 2 Picture Presets 3 Auto Color 4 Color black parts of the Reset Controls: Sets this input's settings to factory defaults. Press OK or4to access the Advanced Settings menu. Smoothing Adjust only available for models HD44LPW165, HD50LPW165, and HD61LPW165 - RCA HD61LPW165 | User Guide & Warranty - Page 59
minimize variations in volume. •Audio Mode: Select default or current audio for digital TV. •SAP: Turn on SAP to hear different audio for NTSC sources. • adjust audio output. To access the Audio menu, press MENU on the remote, and then select Audio from the main menu. The following audio items can - RCA HD61LPW165 | User Guide & Warranty - Page 60
Mode The Audio Mode menu lets you choose the default audio mode you want to hear for ATSC or QAM (digital TV) programs. If the Audio Mode icon ( ) in the banner lights, it means there is more than one audio mode available. The system automatically sets the audio program to the default - RCA HD61LPW165 | User Guide & Warranty - Page 61
be controlled by the TV. Use Fixed Output when connecting to an audio receiver or amplifier with its own remote control for volume control. that was manufactured in the last several years. • PCM (Pulse Code Modulation) The TV sends all signals through the Digital Audio Output in PCM. DVI Audio Input - RCA HD61LPW165 | User Guide & Warranty - Page 62
TV's internal speakers as the center speaker, choose The center channel output from an audio receiver option. 0 Go Back 1 Picture Quality 2 Audio 3 Recordings 4 Parental Controls 5 Connections 6 Preferences 7 Assisted Setup 8 Web Browser Main Menu DTVLink (DVR10) AVDISC: 11 : Lost remote? This - RCA HD61LPW165 | User Guide & Warranty - Page 63
on-screen menus, and tune to it by using the number buttons on the remote. If the channel can be tuned, it will be added to the channel on the TV can be changed to accept composite video instead. When using composite video, connect the yellow RCA cable to the Y/VIDEO connector on the TV. You can - RCA HD61LPW165 | User Guide & Warranty - Page 64
instruct the user on how to use it. 0 Go Back 1 TIneixtitahl eCrheannel 2 Initial Volume 3 Maximum Volume 4 CableCARD Tools 5 Remote Setup Main Menu Connections Special Features Select what should occur when power is restored to the TV use the RCA SAT2 option field under your model, and press OK - RCA HD61LPW165 | User Guide & Warranty - Page 65
is different than the first two RCA TVs. Remote Setup can be used to control up to three TV's in the same location. Press OK to continue. 0 Go Back 1 Host Name 2 IP Address 3 Proxy Server 4 Reset All Main Menu Connections Ethernet Setup Some Internet Service Providers (phone/cable company) may - RCA HD61LPW165 | User Guide & Warranty - Page 66
:9 screen. •Time Menu: Set up time-related features. •Color Scheme: Pick a color for the menu system. •Translucency: Pick a level of translucency for the menus. •Menu Language: Select from English, Español, and Français. •Lamp Power: Set the TV's lamp to a preferred brightness. Press OK or to access - RCA HD61LPW165 | User Guide & Warranty - Page 67
then the digital caption mode you select is used for digital-TV programs. Note: Services 1 and 2 usually have the primary and secondary language captions for Yellow Transparent Translucent Caption Size Caption Font Caption Color Background Color Background Opacity Caption Opacity Aa Bb Cc Press - RCA HD61LPW165 | User Guide & Warranty - Page 68
Using the TV's Menu System 0 Go Back 1 Closed Captioning 2 Screen Format 3 Time Menu 4 Color Scheme 5 Translucency 6 Menu Language 7 Lamp Power Main Menu Preferences Normal Cinerama Stretch Zoom Use this screen or the FORMAT button on the remote to change how the picture is displayed. To the left - RCA HD61LPW165 | User Guide & Warranty - Page 69
it for future reference. The lamp that lights the TV picture can be set for a brighter picture or a longer life (less bright). Press OK to continue. Lamp Power Your HDTV is equipped with a special lamp system. Eventually, the lamp (like a light bulb) will need to be replaced and you'll need to know - RCA HD61LPW165 | User Guide & Warranty - Page 70
This page intentionally left blank - RCA HD61LPW165 | User Guide & Warranty - Page 71
Reference Chapter Overview: • Troubleshooting • Lamp Replacement Instructions • Specifications • Accessory Information • Limited Warranty • Care and Cleaning • FCC Information • Index Chapter 5 Graphics contained within this publication are for representation only. 69 - RCA HD61LPW165 | User Guide & Warranty - Page 72
is dead. You can replace the lamp yourself following the instructions on page 74. Go to page 79 for ordering information. • Power supply within TV may need service. Go to page 81 for warranty information. Buttons don't work • If you're using the remote control, press the TV button first to make sure - RCA HD61LPW165 | User Guide & Warranty - Page 73
Timer feature may have been activated. Go to page 66 for instructions. • Initial Channel feature us enabled and you lost power to your TV. Go to page 62 for instructions okay • If the indicator on the front of the TV is blinking, the lamp inside of your TV may need to be changed. Go to page 79 for - RCA HD61LPW165 | User Guide & Warranty - Page 74
station. Use Audio menu to choose Mono sound. No picture, no sound but TV is on • Maybe the cable/antenna option wasn't chosen in the Channel Search sharpness function to improve weak signals. Go to page 54 for more instructions. • Press the FORMAT button repeatedly to view the picture in different - RCA HD61LPW165 | User Guide & Warranty - Page 75
Setup might be set to the wrong option. Press MENU/OK on the front panel. Select Connections, then Special Features, then Remote Setup. Choose TV (default). Problems with V-Chip/Parental Controls The rating limits don't work • You must lock the settings. Go to the MAIN MENU (press MENU on your - RCA HD61LPW165 | User Guide & Warranty - Page 76
it may need to be replaced eventually. When to replace the lamp You probably need a new lamp if there's no picture, but you still can hear the audio and the power light on the front of the TV does the following: blinks 5 times, pauses, blinks 5 times again. If the TV doesn't turn on after 5 minutes - RCA HD61LPW165 | User Guide & Warranty - Page 77
SERIE LAMP EXAMPLE: Service Model Number sticker with lamp type listed. 1. Read the precautions listed above. 2. Make sure your hands are dry and clean before you begin replacing the lamp. 3. Unplug the TV's power cord from the wall outlet (or power strip). Unplug the power cord from the - RCA HD61LPW165 | User Guide & Warranty - Page 78
turning on the TV both ways: with the remote control, and then with the power button on the front of the TV. • Make sure the lamp unit access door is properly and completely closed. • Make sure the screws are completely tightened. • Unplug the power cord from the TV and from the power outlet. Return - RCA HD61LPW165 | User Guide & Warranty - Page 79
HDTV Reduction Yes Adjustable Color Warmth Yes Adjustable Picture Control Yes Auto Color Control Yes Auto Flesh Light Engine Type DLP Light Engine Picture Screen Pitch Screen .155mm Scan Rate Converter Yes Vertical Viewing Angle (Alpha V 20˚ Wide Band Video Amplifier Yes Sound Audio Power - RCA HD61LPW165 | User Guide & Warranty - Page 80
Reset Yes, in Menu Picture-in-Picture (PIP Analog on Analog Picture Memory Presets for Video Inputs Yes (Individual Memory) Clock (Time), Sleep and Record/Wake Timers 2 - Y,Pr,Pb (RCA Jacks SYNCROSCAN Antenna/Cable Inputs Center Channel Input Maximum amplifier power rating 60 watts into 8 ohms - RCA HD61LPW165 | User Guide & Warranty - Page 81
on-line at www.rca.com/keyboard. Replacement Lamp Your DLP is equipped with a special lamp unit. If you have sound, no picture, and the light on the front of the TV blinks, you may need to change the lamp. Locate the sticker on the side of the TV or go to the Lamp Power menu for the lamp type. To - RCA HD61LPW165 | User Guide & Warranty - Page 82
learning ON-OFF TV DVD VCR SAT/CAB AUX AUDIO PIP SWAP CH. CTRL FREEZE CC PRESETS FAV CC LIGHT FORMAT CLEAR C INFO i MENU M SOUND SKIP GUIDE VOL CH MUTE GO BACK 1 2 3 4 5 6 7 8 9 INPUT IN ANT•CAB 0 REVERSE PLAY FORWARD RECORD STOP PAUSE Remote Control 2-way Splitter - RCA HD61LPW165 | User Guide & Warranty - Page 83
, or at our option, refurbished replacement parts, light engine, and lamp assembly required to repair your unit. How you get service: • Call 1-866-SCENIUM and have your unit's date of purchase and model/serial number ready. • A representative will troubleshoot your problem over the phone. • If the - RCA HD61LPW165 | User Guide & Warranty - Page 84
defective materials or workmanship are not covered by this warranty. Costs of such service calls are the sole responsibility of the purchaser. Care and Cleaning CAUTION: Turn OFF your TV before cleaning. You can clean the TV as required, using a soft lint-free cloth. Be sure to occasionally dust - RCA HD61LPW165 | User Guide & Warranty - Page 85
service 9, 70 Auto color 55 Auto Tuning 62 Auto tuning 45 Automatic code search 28 Autotuning Front Input 46 AUX button 26 B Balance 58 Batteries, installing 23 Batteries, remote 73 Black Level 54 Block Age-Based Ratings 41 Front Panel 45 Movie ratings BACK 26 GUIDE 26 INFO 27 INPUT 27 LIGHT 27 MENU - RCA HD61LPW165 | User Guide & Warranty - Page 86
movies 42 Ratings Blocking movie 42 Viewing movie 42 RECORD button 27 Record/Wake Timer 66 Recording DTVLink 49 Recordings menu 60 Remote Programming 28 setup 63 Remote Control Buttons 26 Installing the Batteries 23 Remote control Code list 33 Learning feature 30 Replacing the lamp 74 Reset controls - RCA HD61LPW165 | User Guide & Warranty - Page 87
Themes 39 USA 39 USA TV ratings 39 Viewing age-based rating 41 V-chip display 36 V-Chip rating screen 40 V-Chip unrated program 44 VCR button 27 VCR remote codes 34 Vertical Position 56 VIDEO 11 Video connections 9 Video Input Setup 61 Viewing Movie ratings 42 Specific content themes 42 Volume - RCA HD61LPW165 | User Guide & Warranty - Page 88
This page intentionally left blank - RCA HD61LPW165 | User Guide & Warranty - Page 89
This page intentionally left blank - RCA HD61LPW165 | User Guide & Warranty - Page 90
This page intentionally left blank - RCA HD61LPW165 | User Guide & Warranty - Page 91
This page intentionally left blank - RCA HD61LPW165 | User Guide & Warranty - Page 92
This page intentionally left blank - RCA HD61LPW165 | User Guide & Warranty - Page 93
This page intentionally left blank - RCA HD61LPW165 | User Guide & Warranty - Page 94
This page intentionally left blank - RCA HD61LPW165 | User Guide & Warranty - Page 95
This page intentionally left blank - RCA HD61LPW165 | User Guide & Warranty - Page 96
Visit the RCA Scenium website at www.rcascenium.com Please do not send any products to the Indianapolis address listed in this manual or on the carton. This will only add delays in service for your product. TTE Technology, Inc. 10330 North Meridian Street Indianapolis, IN 46290 ©2004 TTE Technology,
-
 1
1 -
 2
2 -
 3
3 -
 4
4 -
 5
5 -
 6
6 -
 7
7 -
8
-
9
-
10
-
11
-
12
-
13
-
14
-
15
-
16
-
17
-
18
-
19
-
20
-
21
-
22
-
23
-
24
-
25
-
26
-
27
-
28
-
29
-
30
-
31
-
32
-
33
-
34
-
35
-
36
-
37
-
38
-
39
-
40
-
41
-
42
-
43
-
44
-
45
-
46
-
47
-
48
-
49
-
50
-
51
-
52
-
53
-
54
-
55
-
56
-
57
-
58
-
59
-
60
-
61
-
62
-
63
-
64
-
65
-
66
-
67
-
68
-
69
-
70
-
71
-
72
-
73
-
74
-
75
-
76
-
77
-
78
-
79
-
80
-
81
-
82
-
83
-
84
-
85
-
86
-
87
-
88
-
89
-
90
-
91
-
92
-
93
-
94
-
95
-
96
 |
 |
HDTV with DLP technology
High-Definition Television
User’s Guide