RCA M3804 Quick Start Guide - Page 1
RCA M3804 Manual
 |
UPC - 044476070976
View all RCA M3804 manuals
Add to My Manuals
Save this manual to your list of manuals |
Page 1 highlights
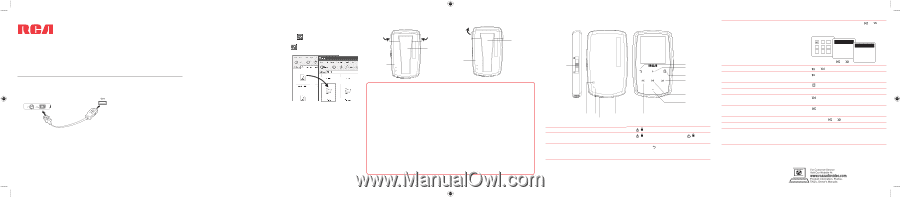
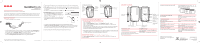
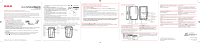
QuickStartGuide M39/M38 series Congratulations on purchasing your new RCA Player. www.rcaaudiovideo.com Please read these instructions for quick tips on using the player. A comprehensive User Manual in your selected language (English, Spanish, or French) will be copied to your PC as part of the easyRip software installation. You can find the User Manual PDF file as a shortcut on your desktop. The User Manual PDF file can also be found in the player memory under the User Manuals folder. Getting Started 1. Connect your player to your computer. 2. Transfer audio/video/picture files to your player with either of the two methods below: a) RCA easyRip: Helps to rip CD's, create playlists, load content and manage your library with an intuitive and modular design. Click the easyRip icon ( ) on your PC desktop to launch the software. • For details in using RCA easyRip, click the Help icon ( ) on the module dock. b) Windows Explorer: drag-and-drop audio/image files to the Internal Storage folder (Windows Vista™, Windows® 7) or the Music or Picture folder (Windows® XP) of the player. • Video files must be transferred via easyRip, which automatically converts files to the Lyra's optimal format. The player USB port of your PC USB cable (supplied) • The RCA easyRipTM Media Software installer is stored in the player, go to MyComputer in the Start menu, find and open the drive letter associated with the player (i.e. LYRA) and then double-click the rcaeasyrip_setup file to launch the installer. • The player charges automatically every time you connect it to your computer. It should be charged for at least 3 hours before using for the first time. • The player is also compatible with most PC music management software. • Secure music transfer requirements: to enable function of transferring subscription music content to the player, please select MTP (Media Transfer Protocol) mode under Protocol in the player's Settings menu (refer to page 30 of the user manual). 3. Disconnect the player from the computer and enjoy media on the go. * The latest software can be downloaded from www.rcaaudiovideo.com. ** RCA easyRip is currently not compatible with DRM files and Audiobooks. v4.0 (1.0.4.0) (EN/E) Windows is a registered trademark of Microsoft Corporation in the United States and other countries. Installing the belt clip Step 2: Push here until the belt clip completely locks in place Player Step1: Place the belt clip here Belt clip Removing the belt clip Lift up the clip here Player Belt clip Learn more about the player • To view the user manual directly from the player: Step 1: Click Start. Step 2: Click My Computer (XP users) / Click Computer (Vista and 7 users). Step 3: Find and open the drive letter associated with the player (i.e. LYRA) and then open User Manuals folder. Step 4: From the User Manuals folder, select the user manual in your preferred language for more information on the player's features, safety and warranty information, and answers to Frequently Asked Questions (FAQ's). • Keep player out of direct sunlight. Exposure to direct sunlight or extreme heat (such as inside a parked car) may cause damage or malfunction. Need more help? Do not return this product to the store. Visit www.rcaaudiovideo.com for the latest firmware, RCA easyRip Media Software, user manual and FAQ's. General controls Navigate to an audio/video/picture file Display Power on/off, Lock/Unlock RESET MIC Reset Micro Earphones Jack button -phone USB jack Navigate to the left/ skip back/reverse/ menu back Back/Home Navigate or scroll up/ increase volume Option menu Navigate to the right/skip forward/ fast forward/menu advance Play/pause/select menu option Navigate or scroll down/decrease volume Turn the player on/off Slide / downward Lock/Unlock the keys Slide / upward. To unlock, slide / to the middle position. Go to the Home menu (to access Music, Press and hold to display the Home menu. Pictures, Videos, Radio, Audiobooks, Favorites, Voice Memo and Settings) Play an audio/video/picture file Pause playback Show the Option menu Adjust the volume Skip to the next file (or section of audiobooks*) Skip to the previous file (or section of audiobooks*) Reverse or fast forward an audio file Delete files from the player Reset the player (if it is not responding) * Refer to the user manual for information on section skipping for audiobooks. In the Home menu, Press + or - and or to select the player menu and press + or - to scroll up or down to the desired file + Home or - Music Titles Artists Albums Genres Years or Play All Songs + Song 1 Song 2 or Song 3 - Song 4 Press or Press at the playback (Now Playing) screen, press again to resume Press Press + or - at the playback (Now Playing) screen Press Press within the beginning 4 seconds of the current audio file Press and hold or during playback Refer to page 19-29 of the user manual Press the RESET button on the back of the player with a non-metal pointed object (e.g. toothpick). Audiovox Electronics Corp. 150 Marcus Blvd., Hauppauge, NY 11788 © 2010 Audiovox Electronics Corp. Trademark Registered Printed in China
-
 1
1 -
 2
2
 |
 |