RCA RCD039 RCD039 Product Manual - Page 1
RCA RCD039 Manual
 |
UPC - 044319651096
View all RCA RCD039 manuals
Add to My Manuals
Save this manual to your list of manuals |
Page 1 highlights
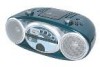
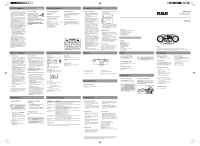
FCC Information English This device complies with Part 15 of the FCC Rules. Operation is subject to the following two conditions: (1) This device may not cause harmful interference, and (2) this device must accept any interference received, including interference that may cause undesired operation. In accordance with FCC requirements, changes or modifications not expressly approved by Thomson Inc. could void the user's authority to operate this product. This device generates and uses radio frequency (RF) energy, and if not installed and used properly, this equipment may cause interference to radio and television reception. If this equipment does cause interference to radio or television reception (which you can determine by turning the equipment off and on), try to correct the interference by one or more of the following measures: • Reorient the receiving antenna (that is, the antenna for the radio or television that is "receiving" the interference). • Move the unit away from the equipment that is receiving interference. • Plug the unit into a different wall outlet so that the unit and the equipment receiving interference are on different branch circuits. If these measures do not eliminate the interference, please consult your dealer or an experienced radio/television technician for additional suggestions. Also, the Federal Communications Commission has prepared a helpful booklet, "How To Identify and Resolve Radio TV Interference Problems." This booklet is available from the U.S. Government Printing Office, Washington, DC 20402. Please specify stock number 004000-00345-4 when ordering copies. This product complies with DHHS Rules 21 CFR Subchapter J. Applicable at the date of manufacture. For Your Safety The AC power plug is polarized (one blade is wider than the other) and only fits into AC power outlets one way. If the plug won't go into the outlet completely, turn the plug over and try to insert it the other way. If it still won't fit, contact a qualified electrician to change the outlet, or use a different one. Do not attempt to bypass this safety feature. CAUTION: TO PREVENT ELECTRIC SHOCK, MATCH WIDE BLADE OF PLUG TO WIDE SLOT, FULLY INSERT. Before You Begin Useful Advice • Do not use your system immediately after transporting it from a cold place to a warm place, as condensation may cause the system to malfunction. If moisture forms inside this system, it may not operate properly. To correct the problem, turn off the power and wait about 30 minutes for moisture to evaporate. • This system is fitted with a laser. To avoid accidents, it is to be opened by qualified technicians only. • Never leave the tray open as dust could cover the laser lens and/or the tray could be bumped into accidentally. • Do not place the system near wet areas such as bathrooms and pool side. Avoid storing the system at humid places or near abnormally heated areas. • Power is continuously supplied to the system. To disconnect power completely, unplug the power cord from the power outlet. • Ensure minimum distance around the apparatus for sufficient ventilation.The ventilation should not be impeded by covering the ventilation openings with items, such as newspaper, etc. • No naked flame source, such as lighted candles, should be placed on the apparatus. • Attention should be paid to enviornment aspects of battery disposal. AC Power Plug the power supply cord into the AC power jack on the back of the unit, and into an AC power supply outlet that accepts the plug supplied with your unit. Battery Power You can insert 6 C-sized alkaline batteries (not supplied) and you can take your stereo just about anywhere. • Open the battery compartment door on the bottom of the unit by pressing down on the tab and pulling out the cover. • Before inserting the batteries, observe the polarities (that is, + and -) of the battery, then relate the polarities to the engraved diagram located on the battery compartment door. Insert batteries in the battery compartment. Note that the AC line cord must be unplugged from the jack on the back of the unit to operate on batteries. Important Battery Information • Remove the batteries to avoid leakage if you do not use your system for more than one month. • Discard leaky batteries immediately as leaking batteries may cause skin burns or other personal injuries. Dispose of batteries in the proper manner, according to provincial and local regulations. • Any battery may leak electrolyte under the following circumstances: - if mixed with a different battery type, - if inserted incorrectly, - if all batteries are not replaced at the same time, - if disposed of in fire, or - if an attempt is made to charge a battery not intended to be recharged • Be sure to remove batteries when storing the set for more than 30 days. Leaky batteries can badly damage the system. Be sure to dispose of leaky, weak or dead batteries properly according to federal, state, and local regulations. To prevent injury or damage, do not reverse batteries and do not mix battery type. CD Playback Creating Programs The unit can program up to 20 normal audio CD tracks. In program mode, RANDOM playback cannot be selected. Displaying and Editing Programs • Press PROGRAM repeatedly to recall and display program. Program position shows first, followed by track number. • While track number is displayed, press or to edit track number. Press PROGRAM to store newly selected track. 1. In CD stop mode, press PROGRAM to enter program mode. The PROGRAM icon flashes on the display. "P01" (first program position) shows briefly on the display followed by "00" flashing. 2. Press or to select the track to be stored. 3. Press PROGRAM to store the selected track. 4. Repeat step 2 and 3 to continue programming. 5. Press in program mode to start program playback. Deleting Programs Press in CD stop mode to delete all the stored tracks. Opening the CD compartment door or switching mode will delete all the stored tracks. The unit remains in program mode once programming track is done. Safety Information Technical Information Product: Portable CD Radio Brand: RCA Model: RCD039 Electrical Consumption Power Supply: 120V ~ 60Hz Power Consumption: 15 Watts IMPORTER Comercializadora Thomson de México, S.A. de C.V. Álvaro Obregón No. 151. Piso 13. Col. Roma. Delegación Cuauhtémoc C.P. 06700. México, D.F. Telefono: 52-55-11-020360 RFC: CTM-980723-KS5 For Your Records In the event that service should be required, you may need the model number. In the space below, record the date and place of purchase: Model No. Date of Purchase Place of Purchase Service Information This product should be serviced only by those specially trained in appropriate servicing techniques. For instructions on how to obtain service, refer to the warranty included in this Guide. General Controls Top View BAND AM/FM - Selects AM or FM band . TUNING - Selects radio frequency. SELECTION ( / CD/ RADIO/ OFF) - Selects operation mode. To switch off the unit, select OFF. PROGRAM - Enters CD program mode. MODE - Selects playback modes. BASS - Turns bass boost on and off. VOL. - Adjusts volume. PUSH TO OPEN - Push to open the mp3 device storage compartment door. Push the door to close it. CAUTION RISK OF ELECTRIC SHOCK DO NOT OPEN T H E L I G H T N I N G CAUTION: TO REDUCE THE THE EXCLAMATION FLASH AND ARROW- RISK OF ELECTRIC SHOCK, POINT WITHIN THE HEAD WITHIN THE DO NOT REMOVE COVER T R I A N G L E I S A T R I A N G L E I S A ( O R B A C K ) . N O U S E R - WARNING SIGN WA R N I N G S I G N SERVICEABLE PARTS IN- ALERTING YOU OF ALERTING YOU OF SIDE. REFER SERVICING I M P O R T A N T " D A N G E R O U S TO QUALIFIED SERVICE I N S T R U C T I O N S VOLTAGE" INSIDE PERSONNEL. A C C O M PA N Y I N G THE PRODUCT. T H E P R O D U C T. SEE MARKING ON BOTTOM / BACK OF PRODUCT WARNING: TO PREVENT FIRE OR ELECTRICAL SHOCK HAZARD, DO NOT EXPOSE THIS PRODUCT TO RAIN OR MOISTURE. Back View AC ~ IN - Insert the power cord here. Antenna - Extend the antenna for better radio reception. Bottom View OPEN - Push and slide to lift up the battery compartment door. Front View - In CD mode - goes back to the previous track or searches backward. - Starts and pauses playback. - In CD modes - goes to the next track or searches forward. - In CD modes - stops playback. PUSH TO OPEN - Opens disc tray. Push the disc tray to close it. GEFAHR EINES ELEKTRISCHEN SCHLAGS Troubleshooting Tips Problem System doesn't turn on No sound Poor radio reception CD doesn't play CD sound skips No sound in mode Solution • Unplug the unit for a moment, and then plug it back in. • Check the outlet by plugging in another device • Adjust volume setting. • Make sure you've selected the correct function • Adjust the antenna for better reception • Try turning off electrical appliances near the unit, such as hair dryers, vacuum cleaners, or fluorescent lights • Make sure you've put a CD in the tray • Make sure the CD's label is facing up • Try another CD • Make sure that Pause mode is not activated • Make sure CD function is selected • Clean the CD (as explained in "Maintenance") • Check CD for warping, scratches, or other damage • Ensure volume of the mp3 player is turned up. ESD Remark: In case of misfunction due to electrostatic discharge just reset the product (disconnect and reconnect of the power source may be required) to resume normal operation. Important Information Safety Precautions • Never open the cabinet under any circumstances. Any repairs or internal adjustments should be made only by a trained technician. • Never operate this product with the cabinet removed. • Do not use your System immediately after transporting it from a cold place to a warm place, as condensation may cause the system to malfunction. • Keep your unit away from humid areas and abnormally hot places. • Do not touch the player with wet hands. If any liquid enters the player cabinet, take the player to a trained technician for inspection. • This compact disc player uses a laser to read the music on the disc. The laser mechanism corresponds to the cartridge and stylus of a record player. Although this product incorporates a laser pick-up lens, it is completely safe when operated according to directions. • Discs rotate at high speed inside the player. Do not use damaged, warped, or cracked discs. • Do not touch the pick-up lens which is located inside the disc compartment. To keep dust from collecting on the pick-up lens, do not leave the compartment door open for an extended period of time. If the lens becomes dirty, clean it with a soft brush, or use an air blower brush designed for camera lenses. • The apparatus shall not be exposed to dripping or splashing and that no objects filled with liquids, such as vases, shall be placed on the apparatus. • No naked flame sources, such as lighted candles, should be placed on the apparatus. • Attention should be drawn to the environmental aspects of battery disposal. • Minimum distances around the apparatus for sufficient ventilation. • The ventilation should not be impeded by covering the ventilation opening with items, such as newspaper, table-cloths, curtains, etc. • The rating plate is located at the bottom cabinet of apparatus. Headset Safety • Do not play your headset at high volume. Hearing experts warn against extended highvolume play. • If you experience ringing in your ears, reduce volume or discontinue use. • You should use with extreme caution or temporarily discontinue use in potentially hazardous situations. • Even if your headset is an open-air designed to let you to hear outside sounds, do not turn up the volume so high that you are unable to hear what is around you. Don't Infringe This product should only be used for the purposes for which it is sold, that is, entertainment, violating no copyright law. Any attempts to use this product for unintended purposes are unlawful and therefore not condoned by Thomson. Display 1. Program mode is activated. 2. Repeat mode is activated. 3. Shuffle mode is activated. 4. Playback in progress. 5. Displays CD track information. 6. AUX mode is selected for connecting with mp3 player. Sound Feature Bass Boost System Press BASS to turn the digital bass boost system on and off. IMPORTADOR Comercializadora Thomson de México, S.A. de C.V. Álvaro Obregón No. 151. Piso 13. Col. Roma. Delegación Cuauhtémoc C.P. 06700. México, D.F. Telefono: 52-55-11-020360 RFC: CTM-980723-KS5 EXPORTER Thomson Inc. P.O. Box 1976 Indianapolis, IN 46206 - 1976 ©2006 Thomson Inc. Trademark(s) ® Registered Marque(s) ® Deposée(s) Marca(s) ® Registrada(s) www.rca.com Printed in China / Impreso en China 5643 1940 (EN/F/E) Radio Selecting Radio Mode Slide the SELECTION switch to RADIO position to turn on the radio. Selecting Radio Band Slide the BAND AM/FM switch to select FM or AM band. Tuning to a station Turn the TUNING knob to select radio frequencies. Extend or reposition the antenna for better FM reception. Rotate the unit for better AM reception. mp3 Input Selecting mp3 Input Slide the SELECTION switch to position. An mp3 player icon shows on the display. Adjust the mp3 player to midrange volume and adjust the master volume by rotating VOL. knob on the unit. Do not turn the volume of the mp3 player too high as this may affect the sound quality. For other playback operatons, control them on your mp3 player. Connecting mp3 Player Open the mp3 storage compartment by pushing PUSH TO OPEN on the top of the player. Insert the audio cable into the mp3 player's headphone jack and start playback of the mp3 player. Close the storage compartment. Maintenance Cleaning the exterior • Disconnect the system from AC power before cleaning the exterior of the unit with a soft dust cloth • Clean the exterior with a soft clean cloth or slightly moistened chamois leather. DO NOT use solvents as it may cause damage to the unit. • If a CD becomes dirty, wet a soft cloth in water, wring it out well, wipe the dirt away gently, and then remove any water drops with a dry cloth. • Do not use record cleaning sprays or antistatic agents on CDs. Also, never clean CDs with benzene, thinner, or other volatile solvents which may cause damage to disc surface. Handling CDs • Do not touch the signal surfaces. Hold CDs by the edges, or by one edge and the hole. • Do not affix labels or adhesive tapes to the label surfaces. Do not scratch or damage the label. • CDs rotate at high speeds inside the player. Do not use damaged (cracked or warped) CDs • Make sure CDs are stored in their original case after use. Keep them away from damp, humid or abnormally heated places. Cleaning CDs • Dirty CDs can cause poor sound quality. Always keep CDs clean by wiping them gently with a soft cloth from the inner edge toward the outer perimeter. CD Lens Care • When your CD lens gets dirty it can also cause the system to output poor sound quality. To clean the lens you will need to purchase a CD lens cleaner which can maintain the output sound quality of your system. For instructions on cleaning the CD lens, refer to the ones accompanying the lens cleaner. Technical Specification Power supply: 120V~60Hz Dimensions ( H x W x D mm): Unit size - 155 x 336 x 222 Weight: 1.87 kg CD player: Response curve (+/- 2dB): 60Hz to 20 kHz Rating Plate: Look for it at the bottom of the set. user manual guide de l'utilisateur manual de usuario RCD039 EN/F/E It is important to read this instruction book prior to using your new product for the first time. Nous vous recommandons de lire ce manuel d'instructions avant d'utiliser votre nouveau produit pour la première fois. Es importante leer este manual antes de usar por vez primera su euipo. CD Playback Selecting CD Mode Slide the SELECTION switch to CD position. Loading Music Press the PUSH TO OPEN button on the unit front to slide disc tray out. Place a disc on the disc tray with the label side facing up and then push the disc tray back in. Playback Mode In CD mode, press MODE repeatedly to select among the following playback modes with icons show on the display : • REPEAT (flashes) - Repeats current track. • REPEAT - Repeats all tracks. • - Random playback. • No icon - Normal playback. Playing and Pausing 1. In stop mode, press playback. to begin The icon is displayed. 2. During playback, press to pause playback. Press again to resume. The icon flashes in pause mode. Skipping and Searching 1. Press or to skip to the previous or next track respectively. 2. Press and hold or to search quickly current track backward or forward respectively. Stoping Playback Press to stop playback. The descriptions and characteristics in this owner's manual are for the purpose of general reference only and not as a guarantee. In order to provide you with the highest quality product, we may make changes or modifications without prior notice. The English version serves as the final reference on all product and operational details should any discrepancies arise in other languages.
-
 1
1
 |
 |