RCA RI503 Ri503 Product Manual - Page 2
Remote controls, Volume adjustment, Listening to your iPod, More information, Specifications, AUX - manual
 |
UPC - 062118450306
View all RCA RI503 manuals
Add to My Manuals
Save this manual to your list of manuals |
Page 2 highlights
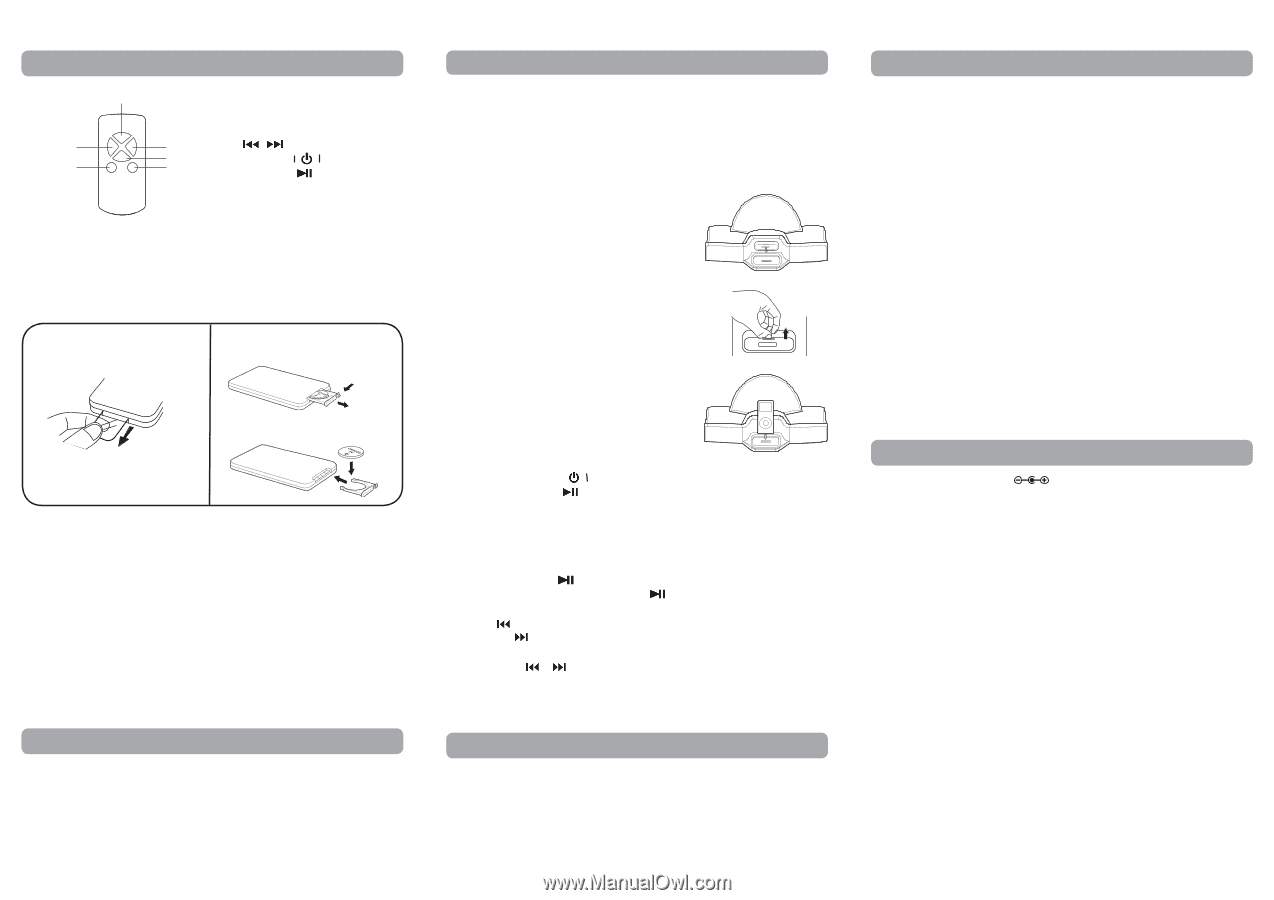
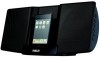
Remote controls 1 2 3 4 5 6 1/5. VOLUME +/- buttons 2/4. / buttons 3. STANDBY/ON / button 6. PLAY/PAUSE button Using the Remote Control Correctly • Point the remote control at the REMOTE SENSOR located on the unit. • When there is a strong ambient light source, the performance of the infrared REMOTE SENSOR may be degraded, causing unreliable operation. • The recommended maximum effective distance for remote operation is about 16 feet (5 meters). ATTENTION Remove the protective plastic tab before operating the remote control. To Change Battery 1. Open the battery door. 2. Insert one CR2025 (3V) size battery. Battery Replacement When the battery becomes weak, the operating distance of the remote control is greatly reduced and you will need to replace it. Note: If the remote control is not going to be used for a long time, remove the battery to avoid damage caused by battery leakage corrosion. WARNINGS: • Do not dispose of battery in fire; battery may explode or leak. • Battery shall not be exposed to excessive heat such as sunshine, fire or the like. • Danger of explosion would be resulted if battery is incorrectly replaced. Replace only with the same or equivalent type of battery. CAUTION: When discarding batteries, environmental problems must be considered and local rules or laws governing the disposal of these batteries must be strictly followed. Volume adjustment TO ADJUST THE VOLUME Adjust the VOLUME control to obtain the desired volume. FOR PERSONAL LISTENING Connect headphones ( Ø3.5mm stereo mini plug) to the PHONES jack. Adjust the VOLUME control to obtain the desired volume. When headphones are connected, the speakers are automatically disconnected. Listening to your iPod Compatible iPod types • iPod nano (1st generation) 1GB, 2GB, 4GB • iPod nano (2nd generation) 2GB, 4GB, 8GB • iPod nano 3rd generation (video) 4GB, 8GB • iPod mini 4GB, 6GB • iPod 5th generation (video) 30GB, 60GB, 80GB • iPod classic 80GB, 160GB • iPod touch 8GB, 16GB,32GB Installing the iPod Dock Adaptor 1. Before connecting your iPod, you need to install the appropriate iPod Dock Adapter(supplied with the iPod or sold separately) in the dock of the unit. 2. Insert your iPod Dock Adapter into the dock until it sits firmly in place. Removing the iPod Dock Adaptor 1. Remove the iPod Dock Adapter as illustrated in the figure to the right. 2. Replace it with another one you need. Inserting Your iPod 1. Ensure the appropriate iPod Docking Adapter is installed. 2. Insert your iPod into the connector in the dock. Start playback 1. Press the STANDBY/ON / button to turn on the unit. 2. Press the PLAY/PAUSE button to start playing. Note: When you are listening to iPod, please disconnect all other audio devices. Notes: • Under AC power supply, the iPod will be charged automatically. • Under battery operation, the iPod will not be charged. Pausing Playback • Press the PLAY/PAUSE button. • To resume playback, press the PLAY/PAUSE button again. Skipping to a Another Track • Press the button to skip to the beginning of the current track or skip to previous track. Press the button to skip to the beginning of the next track. Locating a Particular Point on a Track • Keep either the or button pressed during playback, according to the desired direction, and release at the desired point. Note: Please refer to the user's guide that was included with your iPod for more details. AUX IN connection Connecting to AUX IN for other sound sources You can connect audio devices such as your iPod, CD players or MP3 players to the unit through the AUX IN jack. Use the Line-in cable (not supplied), connect the AUX IN jack on the back panel to the Line Out or Earphone jack of the other audio devices. Listening to the Connected Device Turn on the audio device you have attached to the AUX IN jack. More information Troubleshooting tips System doesn't turn on • Unplug the unit for a moment, and then plug it back in. • Check the outlet by plugging in another device. No sound • Adjust volume setting. • Make sure you've selected the correct function. iPod does not start play • Make sure the iPod is properly connected to the universal dock for iPod. ESD Remark: In case of misfunction due to electrostatic discharge just reset the product (disconnect and reconnect of the power source may be required) to resume normal operation. Cleaning the exterior • Disconnect the system from AC power before cleaning the exterior of the unit with a soft dust cloth. • Clean the exterior with a soft clean cloth or slightly moistened chamois leather. DO NOT use solvents as it may cause damage to the unit. The descriptions and characteristics in this owner's manual are for the purpose of general reference only and not as a guarantee. In order to provide you with the highest quality product, we may make changes or modifications without prior notice. The English version serves as the final reference on all product and operational details should any discrepancies arise in other languages. Specifications DC: 12V EXTERNAL DC SUPPLY BATTERY SUPPLY: 1.5Vx6 "C" SIZE/UM-2/LR14/MN1400 Design and specifications are subject to change without notice. Printed in China 811-R50391W011
-
 1
1 -
 2
2
 |
 |