RCA RS2653 User Manual - RS2653 - Page 7
Radio, Troubleshooting Tips
 |
UPC - 044319503920
View all RCA RS2653 manuals
Add to My Manuals
Save this manual to your list of manuals |
Page 7 highlights
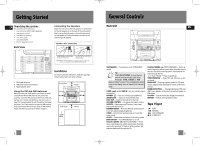
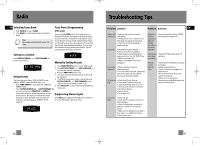
RS2653_55_EN(TCEC) 1/13/06 1:27 PM Page 14 Radio EN Selecting Tuner Band 1. Press SOURCE to select TUNER. 2. Press BAND to select between AM or FM radio band. Tips: Your audio system has 32 preset stations. Auto Preset Programming (FM only) Press and hold BAND button for 2 seconds to scan stations in FM band. The stations will then be stored as preset channels. A maximum of 32 stations can be stored. Beware of your preset channels being erased accidentally because the scanning and storing process is automatic upon pressing the button. You can stop the automatic scan by pressing any button, but the erased stations cannot be recovered. Tuning to a Station Press SKIP BACKWARD to select frequencies. / SKIP FORWARD 87.50 MHz Using Presets The tuner can be in either TUNE or PRESET mode. When in PRESET mode, the PROG light is on. • Press TUNE•PRESET to select between TUNE and PRESET modes. • Press SKIP BACKWARD or SKIP FORWARD on the main system or PRESET UP or DOWN on the remote control to access the previous or next preset station. The display first shows the preset program number and after a few seconds, the frequency will be displayed. (FMPR:01 is FM preset 1) AUTO Manually Setting Presets 1. Press TUNE•PRESET button to enter TUNE mode. 2. Press SKIP BACKWARD / SKIP FORWARD to access the desired frequency. 3. Press the PROG•SET button once. 4. The most recently accessed program location will be displayed. 5. If a different program location is preferred, press SKIP BACKWARD / SKIP FORWARD to move to the desired preset number (1-32). 6. Press PROG•SET to store the selected frequency at that preset. Suppressing Stereo Signal Press FM ST. to toggle between FM mono and stereo for stereo FM stations. (Remote Only) PR:01 Troubleshooting Tips Problem Solution Problem Solution EN System will • Check power cord for a secure not turn on connection. • Unplug the unit for a moment, and then plug into power source again. • Check the outlet by plugging in another device. No sound • Increase the volume setting. • Check connection to speakers. • Check that you have selected the appropriate function: CD, TAPE, Tuner. • Make sure mute is off. • Make sure headphones are not plugged in. Poor radio reception • Check antenna connection. • Move antenna. • Turn off nearby electrical appliances, such as hair dryer, vacuum cleaner, microwave, fluorescent lights. CD does not • Check that CD is in the tray. play • Check that CD label is facing up. • Check that PAUSE mode is not on. • Check that CD function is selected. • Use CD lens cleaner. • Clean the disc. • Try another CD. CD button will not respond, or does not change discs when you press DISC SKIP • Switch to another function (TAPE, Tuner) and then back to CD. Distorted or • Inspect the tape head, clean it if noisy tape necessary. recordings Remote control does not work • Check that the batteries are properly installed. • Replace weak batteries. • Check the system is plugged into power source. • Point the remote directly at the system's front panel. • Move closer to the system. • Remove any obstacles between the remote and the system. CD sound skips • Clean the disc. • Check disc for warping, scratches, or other damage. • Check if something is causing the system to vibrate. If so, move the system. • Make sure the speakers are at least 3 feet away or on a different surface from the main unit. 10 11
-
 1
1 -
 2
2 -
 3
3 -
 4
4 -
 5
5 -
 6
6 -
 7
7 -
 8
8 -
 9
9
 |
 |