RCA Ri171 Ri171 Product Manual - Page 6
Troubleshooting Tips, Auxiliary input, Additional Information
 |
View all RCA Ri171 manuals
Add to My Manuals
Save this manual to your list of manuals |
Page 6 highlights
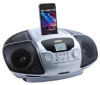
Note: • When the unit is AC-powered, the iPod / iPhone will charge automatically (until fully charged) once it is docked in the cradle. • Note that the use of this accessory with iPod or iPhone may affect wireless performance. • When playing iPod / iPhone, you can use the MENU, , or ENTER button to navigate the iPod / iPhone menu. Pausing Playback • Press the button. • To resume playback, press the button again. Skipping to a Another Track • Press either the or button according to the desired direction. • Press the button to skip to the beginning of the current track or previous track. Press button to skip to the beginning of the next track. Locating a Particular Point on a Track • Keep either the or button pressed during playback, according to the desired direction, and release at the desired point. Note: Please refer to the user's guide that was included with your iPod/iPhone for more details. Auxiliary input iPhone/iPod does not dock properly or does not install properly • Remove your iPhone/iPod from the dock and check for obstruction on the connectors in the dock and on your iPhone/iPod. Make sure you are using the appropriate adapter for your model of iPhone/iPod. iPhone/iPod does not respond to the speaker system. • Make sure that your iPhone/iPod is working properly before docking into the unit. Please refer to your iPhone/iPod manual for details. ESD Remark: In case of misfunction due to electrostatic discharge just reset the product (disconnect and reconnect of the power source may be required) to resume normal operation. Additional Information Cleaning the exterior • Disconnect the system from AC power before clean- ing the exterior of the unit with a soft dust cloth. • Clean the exterior with a soft clean cloth or slightly moistened chamois leather. DO NOT use solvents as it may cause damage to the unit. 1. Connect the auxiliary device to the AUX IN jack with an audio cable (not provided). 2. Press SOURCE until the indicator " " lights on the display. 3. Start playback from the auxiliary device. 4. Adjust the auxiliary device to mid-range volume and adjust the master volume by pressing VOLUME . • Do not turn the volume of the auxiliary device too high as this may affect the sound quality. • For other playback operations, control them on your auxiliary device. Troubleshooting Tips System doesn't turn on • Unplug the unit for a moment, and then plug it back in. • Check the outlet by plugging in another devices. No sound • Adjust volume setting. • Make sure you've selected the correct function. Poor radio reception • Make sure FM antenna wire is fully extended. • Try turning off electrical appliances near the unit, such as hair dryers, vacuum cleaners or fluorescent lights. EN - 5
-
 1
1 -
 2
2 -
 3
3 -
 4
4 -
 5
5 -
 6
6 -
 7
7 -
 8
8 -
 9
9 -
 10
10 -
 11
11 -
 12
12 -
13
-
14
-
15
-
16
-
17
-
18
-
19
-
20
 |
 |
