Reebok Incline Trainer X5 English Manual - Page 7
tabs on the Right Inner Cover 65. Attach the Right Outer
 |
View all Reebok Incline Trainer X5 manuals
Add to My Manuals
Save this manual to your list of manuals |
Page 7 highlights
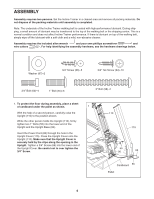
2. Insert a Handrail (67) into the Upper Handrail (68) as 2 shown. The lower end of the Handrail should sit on the Base Hood (105) as shown. (Note: It may be necessary to twist the Handrail as you insert it. It may also be necessary to loosen the two Screws [3] several turns.) Next, 68 tighten two 3/4" Screws (66) into the Handrail. If you 3 loosened the Screws, retighten them. 66 Attach the other Handrail (not shown) to the left side of 67 the Incline Trainer in the same way. 3. Interlock the tabs on the Right Outer Cover (88) with the 3 tabs on the Right Inner Cover (65). Attach the Right Outer Cover with two 3/4" Bolts (60) as shown 65 105 88 60 4. Interlock the tabs on the Left Outer Cover (61) with the tabs on the Left Inner Cover (106). Attach the Left Outer Cover with two 3/4" Bolts (60). Remove the knob from the pin. Make sure that the collar and the spring are on the pin. Insert the threaded end of the pin through the hole in the Left Inner Cover (106) and the hole in the Left Outer Cover (61). Tighten the knob back onto the pin. 4 Knob 60 61 106 Spring Collar Pin 7
-
 1
1 -
 2
2 -
 3
3 -
 4
4 -
 5
5 -
 6
6 -
 7
7 -
 8
8 -
 9
9 -
 10
10 -
 11
11 -
 12
12 -
13
-
14
-
15
-
16
-
17
-
18
-
19
-
20
-
21
-
22
-
23
-
24
-
25
-
26
-
27
-
28
-
29
-
30
-
31
-
32
-
33
-
34
-
35
-
36
-
37
-
38
 |
 |
