Reebok T 9.80 Treadmill English Manual
Reebok T 9.80 Treadmill Manual
 |
View all Reebok T 9.80 Treadmill manuals
Add to My Manuals
Save this manual to your list of manuals |
Reebok T 9.80 Treadmill manual content summary:
- Reebok T 9.80 Treadmill | English Manual - Page 1
above for reference. Serial Number Decal QUESTIONS? If you have questions, or if parts are damaged or missing, DO NOT CONTACT THE STORE; please contact Customer Care. ON THE WEB: www.reebokservice.com CAUTION Read all precautions and instructions in this manual before using this equipment. Save this - Reebok T 9.80 Treadmill | English Manual - Page 2
PRECAUTIONS 3 BEFORE YOU BEGIN 5 ASSEMBLY 6 OPERATION AND ADJUSTMENT 14 HOW TO FOLD AND MOVE THE TREADMILL 23 TROUBLESHOOTING 25 EXERCISE GUIDELINES 28 PART LIST 29 EXPLODED DRAWING 31 ORDERING REPLACEMENT PARTS Back Cover LIMITED WARRANTY Back Cover WARNING DECAL PLACEMENT This drawing - Reebok T 9.80 Treadmill | English Manual - Page 3
your local REEBOK dealer or call the telephone number on the front cover of this manual and order part number 146148, power is turned off. Do not operate the treadmill if the power cord or plug is damaged, or if the treadmill is not working properly. (See TROUBLESHOOTING on page 25 if the treadmill - Reebok T 9.80 Treadmill | English Manual - Page 4
Always unplug the power cord immediately after use, before cleaning the treadmill, and before performing the main- tenance and adjustment procedures de- scribed in this manual. Never remove the motor hood unless instructed to do so by an authorized service representative. Servicing other than - Reebok T 9.80 Treadmill | English Manual - Page 5
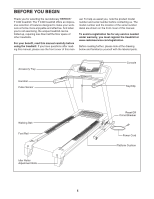
Thank you for selecting the revolutionary REEBOK® T 9.80 treadmill. The T 9.80 treadmill offers an impressive selection of features designed to make your workouts at home more enjoyable and effective. And when youʼre not exercising, the unique treadmill can be folded up, requiring less than half the - Reebok T 9.80 Treadmill | English Manual - Page 6
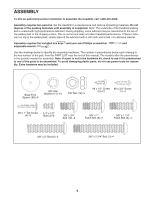
near the end of this manual. The number after the parentheses is the quantity needed for assembly. Note: If a part is not in the hardware kit, check to see if it is preattached to one of the parts to be assembled. To avoid damaging plastic parts, do not use power tools for assembly. Extra hardware - Reebok T 9.80 Treadmill | English Manual - Page 7
1. Make sure that the power cord is unplugged. With the help of a second person, carefully tip the treadmill onto its left side. Partially fold the Frame (51) so the treadmill is more stable. Do not fully fold the Frame until the treadmill is completely assembled. Attach six Base Feet (86) and six - Reebok T 9.80 Treadmill | English Manual - Page 8
100 76 83 11 87 5. With the help of a second person, carefully tip the treadmill onto its right side. Partially fold the Frame (51) so the treadmill is more stable. Do not fully fold the Frame until the treadmill is completely assembled. 5 77 11 83 Orient the left Upright (77) with the bend - Reebok T 9.80 Treadmill | English Manual - Page 9
6. Set the console assembly face down on a soft surface to avoid scratching the console assembly. Identify the Right Handrail (102), which is marked with a sticker. Hold the Right Handrail near the console assembly. Next, insert the console wire into the large hole directly below the indicated hole - Reebok T 9.80 Treadmill | English Manual - Page 10
9. Press the Left Handrail Cover (95) upward against the console assembly. See the inset drawing. Align the lip on the Left Handrail Cover with the lip on the console assembly. Leave a small gap between the Left Handrail Cover and the console assembly. Make sure that no wires are pinched. Then, - Reebok T 9.80 Treadmill | English Manual - Page 11
place. If they do not, turn one connector and try again. IF THE CONNECTORS ARE NOT CONNECTED PROPERLY, THE CONSOLE MAY BE DAMAGED WHEN THE POWER IS TURNED ON. Remove the wire tie from the Upright Wire (76). Insert the excess wire into the Right Upright (100) as you set the - Reebok T 9.80 Treadmill | English Manual - Page 12
second person hold the Frame until 14 this step is completed. Orient the Storage Latch (80) so that the large barrel and the Latch Knob (81) are oriented as shown. Attach the Latch Bracket Frame (51) (see HOW TO LOWER THE TREADMILL FOR USE on page 24). 51 12 81 6 80 Large Barrel 90 83 12 6 12 - Reebok T 9.80 Treadmill | English Manual - Page 13
and the two 3/8" x 1" Patch Bolts (8). Raise the Uprights to the vertical position. 15 100 77 7 8 87 16. Make sure that all parts are properly tightened before you use the treadmill. Keep the included hex keys in a secure place; one of the hex keys is used to adjust the walking belt (see pages - Reebok T 9.80 Treadmill | English Manual - Page 14
grounding plug. Plug the power cord into a surge suppressor treadmill (see drawing 1 at the right). To purchase a surge suppressor, see your local REEBOK dealer or call the telephone number on the front cover of this manual and order part a UL suppressed voltage rating of 400 volts or less - Reebok T 9.80 Treadmill | English Manual - Page 15
make your workouts more effective and enjoyable. When the manual mode of the console is selected, the speed and incline of the treadmill can be changed with the touch of a button. As you exercise, the console will display continuous exercise feedback. You can even measure your heart rate using the - Reebok T 9.80 Treadmill | English Manual - Page 16
POWER at the left. 2. Select the manual mode. Plug in the power cord (see page 14). Next, locate the reset/off circuit breaker on the treadmill frame near the power 22. For simplicity, all instructions in this section refer to miles. To change the incline of the treadmill, press one of the Incline - Reebok T 9.80 Treadmill | English Manual - Page 17
/Pulse display can show the incline of the treadmill. The display will also show your heart rate when you use the handgrip pulse sensor. The treadmill to the lowest setting. The incline must be at the lowest setting when you fold the treadmill to the storage position, or you may damage the treadmill - Reebok T 9.80 Treadmill | English Manual - Page 18
incline setting is too high or too low at any time during the workout, you can manually override the setting by pressing the speed or incline buttons; however, when the next segment of the workout begins, the treadmill will automatically adjust to the speed and incline settings for the next segment - Reebok T 9.80 Treadmill | English Manual - Page 19
first segment, simply adjust the speed and incline of the treadmill as desired by pressing the speed and incline buttons. When the first segment of the workout the workout time will then be saved in memory. 4. Follow your progress with the displays. See step 5 on page 17. 5. Measure your heart rate - Reebok T 9.80 Treadmill | English Manual - Page 20
, one of the speed increase buttons, or one of the numbered speed buttons to start the workout. A moment after you press the Start button, the treadmill will automatically adjust to the first speed and incline settings that you programmed previously. Hold the handrails and begin walking. Each custom - Reebok T 9.80 Treadmill | English Manual - Page 21
console. press the button, the treadmill will automatically adjust to the first speed and incline settings of the workout. Hold the handrails and begin walking. See HOW TO TURN ON THE POWER on page 16. 2. Insert an iFit card and select a workout. To use an iFit workout, insert an iFit card into - Reebok T 9.80 Treadmill | English Manual - Page 22
if desired. The console features a display demo mode, designed to be used if the treadmill is displayed in a store. While the demo mode is turned on, the console will function normally when you plug in the power cord, switch the reset/off circuit breaker to the reset position, and insert the key - Reebok T 9.80 Treadmill | English Manual - Page 23
HOW TO FOLD AND MOVE THE TREADMILL HOW TO FOLD THE TREADMILL FOR STORAGE Before folding the treadmill, adjust the incline to the lowest position. If you do not do this, you may damage the treadmill when you fold it. Remove the key and unplug the power cord. CAUTION: You must be able to safely lift - Reebok T 9.80 Treadmill | English Manual - Page 24
USE 1. Hold the upper end of the treadmill with your right hand. Pull the latch knob to the left and hold it. Pivot the frame downward and release the latch knob. Note: It - Reebok T 9.80 Treadmill | English Manual - Page 25
TROUBLESHOOTING Most treadmill problems can be solved by following the steps below. Find the symptom that applies, and follow the steps listed. If further assistance is needed, please see the front cover of this manual. PROBLEM: The power does not turn on SOLUTION: a. Make sure that the power - Reebok T 9.80 Treadmill | English Manual - Page 26
48 PROBLEM: The incline of the treadmill does . The treadmill will automatically the console. PROBLEM: The walking treadmill performance may decrease and the walking belt may become damaged. Remove the key and UNPLUG THE POWER plug in the power cord, insert the key, and run the treadmill for a few - Reebok T 9.80 Treadmill | English Manual - Page 27
cord, insert the key, and run the treadmill for a few minutes. Repeat until the walking belt is centered. b. If the walking belt slips when walked on, first remove the key and UNPLUG THE POWER CORD. Using b the hex key, turn both idler roller bolts clockwise, 1/4 of a turn. When the walking - Reebok T 9.80 Treadmill | English Manual - Page 28
rate as a guide to find the proper intensity level. The chart below shows recommended heart rates the first few minutes of exercise, your body uses carbohydrate calories for energy. Only after the first your heart rate is near the highest number in your training zone. WORKOUT GUIDELINES Warming Up - Reebok T 9.80 Treadmill | English Manual - Page 29
No. RBTL21908.0 R1208A To locate the parts listed below, see the EXPLODED DRAWING near the end of this manual. Key No. Qty. 1 16 Deal Isolator Belt Guide Walking Platform Frame 69 1 70 1 71 1 72 1 73 1 74 8 75 1 76 1 77 1 78 2 79 1 80 1 81 1 82 1 83 1 84 2 85 6 86 6 87 2 88 2 89 3 90 1 91 Power - Reebok T 9.80 Treadmill | English Manual - Page 30
Ground Wire 3/8" x 1 3/4" Bolt 8" White Wire, M/F 4" Black Wire, M/F 4" Red Wire, M/F 8" Blue Wire, M/F Userʼs Manual Note: Specifications are subject to change without notice. See the back cover of this manual for information about ordering replacement parts. *These parts are not illustrated. 30 - Reebok T 9.80 Treadmill | English Manual - Page 31
EXPLODED DRAWING A-Model No. RBTL21908.0 R1208A 31 19 40 19 41 19 42 17 2 53 15 31 30 33 20 50 55 116 34 13 14 19 18 2 43 78 19 78 2 54 30 15 31 34 56 2 43 44 16 24 18 19 52 18 17 53 33 20 45 51 46 48 47 19 19 23 49 18 24 16 2 43 2 43 44 40 - Reebok T 9.80 Treadmill | English Manual - Page 32
EXPLODED DRAWING B-Model No. RBTL21908.0 R1208A 57 58 59 60 1 36 1 36 1 36 61 62 12 63 64 37 21 16 27 67 37 28 66 23 82 65 23 68 1 46 12 29 22 22 16 5 69 74 23 75 22 1 73 71 72 32 22 1 22 22 70 - Reebok T 9.80 Treadmill | English Manual - Page 33
EXPLODED DRAWING C-Model No. RBTL21908.0 11 9 11 76 9 R1208A 11 11 9 9 77 79 100 80 81 84 1 12 87 83 26 35 25 6 7 39 85 86 88 8 4 12 11 7 85 86 76 4 26 39 90 88 6 124 25 35 84 1 87 11 85 7 11 86 85 8 4 12 85 91 86 4 12 91 7 86 4 85 86 4 33 - Reebok T 9.80 Treadmill | English Manual - Page 34
EXPLODED DRAWING D-Model No. RBTL21908.0 R1208A 92 95 2 2 96 110 93 94 27 2 2 2 11 10 3 2 2 23 97 98 2 99 2 2 110 1 2 92 102 101 27 2 103 2 104 11 2 10 3 2 23 97 1 34 - Reebok T 9.80 Treadmill | English Manual - Page 35
EXPLODED DRAWING E-Model No. RBTL21908.0 105 1 R1208A 113 2 117 118 122 2 2 1 106 108 2 2 115 2 2 2 2 2 1 107 112 2 1 111 2 38 121 2 38 2 38 2 23 123 2 119 120 89 1 89 2 2 2 109 2 2 114 2 1 35 - Reebok T 9.80 Treadmill | English Manual - Page 36
one of its authorized service centers. All repairs for which warranty claims are made must be preauthorized by ICON. If the product is shipped to a service center, freight charges to and from the service center will be the customerʼs responsibility. For replacement parts shipped while the product
-
 1
1 -
 2
2 -
 3
3 -
 4
4 -
 5
5 -
 6
6 -
 7
7 -
8
-
9
-
10
-
11
-
12
-
13
-
14
-
15
-
16
-
17
-
18
-
19
-
20
-
21
-
22
-
23
-
24
-
25
-
26
-
27
-
28
-
29
-
30
-
31
-
32
-
33
-
34
-
35
-
36
 |
 |

CAUTION
Read all precautions and instruc-
tions in this manual before using
this equipment. Save this manual
for future reference.
Serial Number
Decal
Model No. RBTL21908.0
Serial No.
Write the serial number in the space
above for reference.
www.reebokfitness.com
QUESTIONS?
If you have questions, or if parts are
damaged or missing,
DO NOT
CONTACT THE STORE; please
contact Customer Care.
IMPORTANT: You must note the
product model number and
serial number (see the drawing
above) before contacting us:
CALL TOLL-FREE:
1-877-994-4999
Mon.–Fri. 6 a.m.–6 p.m. MT
Sat. 8 a.m.–4 p.m. MT
ON THE WEB:
www.reebokservice.com
USER'S MANUAL