Reebok V1700 Treadmill English Manual - Page 6
Assembly
 |
View all Reebok V1700 Treadmill manuals
Add to My Manuals
Save this manual to your list of manuals |
Page 6 highlights
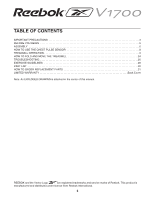
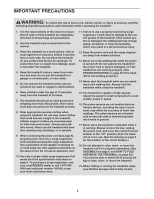
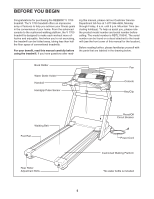
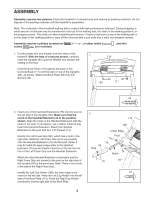
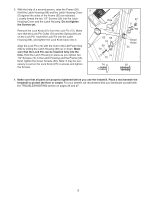
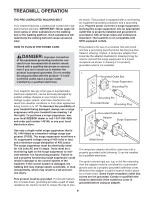
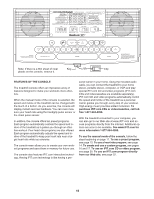
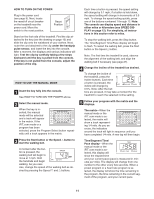
ASSEMBLY Assembly requires two persons. Place the treadmill in a cleared area and remove all packing materials. Do not dispose of the packing materials until the treadmill is assembled. Note: The underside of the treadmill walking belt is coated with high-performance lubricant. During shipping, a small amount of lubricant may be transferred to the top of the walking belt, the sides of the walking platform, or the shipping carton. This does not affect treadmill performance. If there is lubricant on top of the walking belt or on the sides of the walking platform, wipe off the lubricant with a soft cloth and a mild, non-abrasive cleaner. Assembly requires a phillips screwdriver cutters (not included). , a rubber mallet , and wire 1. Cut the plastic ties (not shown) from the sides of the treadmill. With the help of a second person, carefully raise the Uprights (65) until the Wheels (not shown) are resting on the floor. Hold the Book Plate (114) against the back of the Console Base (117) and the tube on top of the Uprights (65), as shown. Attach the Book Plate with four 3/4" Screws (40). 1 114 40 40 65 117 40 2. Insert one of the Handrail Extensions (76) into the post on the left side of the Uprights (65). Make sure that the notch in the Handrail Extension is in the position shown. Align the holes in the Handrail Extension with the holes in the post. If necessary, use a rubber mallet to fully insert the Handrail Extension. Attach the Handrail Extension to the post with four 1/2" Screws (74). Identify the Left Foam Grip (62), which has a hole in the right side. Slide the Left Foam Grip as far as possible onto the Handrail Extension (76) and the post. (Note: It may be helpful to apply soapy water to the Handrail Extension.) Press two Plastic Fasteners (75) into the bottom of the Left Foam Grip and the Handrail Extension. Attach the other Handrail Extension (not shown) and the Right Foam Grip (not shown) to the post on the right side of the Uprights (65) in the same way. Note: There is not a hole in the side of the Right Foam Grip. Identify the Left Cup Holder (128); the lower edge is narrower on the left side. Press the Left Cup Holder into the left side of the Book Plate (114). Press the Right Cup Holder (not shown) into the right side of the Book Plate. 2 114 128 62 Hole Lower Edge Post 74 76 74 Notch 75 65 74 6
-
 1
1 -
 2
2 -
 3
3 -
 4
4 -
 5
5 -
 6
6 -
 7
7 -
 8
8 -
 9
9 -
 10
10 -
 11
11 -
 12
12 -
13
-
14
-
15
-
16
-
17
-
18
-
19
-
20
-
21
-
22
-
23
-
24
-
25
-
26
-
27
-
28
-
29
-
30
-
31
-
32
-
33
-
34
 |
 |