Ricoh 2020D Operating Instructions - Page 61
Select the destination folder., Press, twice.
 |
View all Ricoh 2020D manuals
Add to My Manuals
Save this manual to your list of manuals |
Page 61 highlights
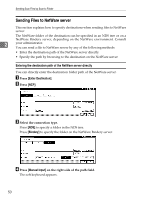
Specifying Scan to Folder Destinations F Select the destination folder. G Press [OK] twice. Note ❒ If you change the protocol after entering the path name, user name, or password, a confirmation message appears. ❒ Only folders that you have the read privileges for are displayed. 2 ❒ If the language used for the NDS tree or by the NetWare Bindery server differs from that used by the machine, file names in the NDS tree or on the NetWare Bindery server might appear garbled. ❒ Up to 100 items can be displayed. ❒ If the selected NDS tree or NetWare Bindery server requires authentication, a login screen appears. Enter a user name and password for logging on to the NDS tree or NetWare Bindery server. If you log on to the NDS tree, enter a user name, and then enter the name of the context containing the user object. If the user name is "user" and the name of the Context is "context", the user name will be "user.context". ❒ The machine may fail to transfer the file if you do not have write privileges for the folder or there is not enough free hard disk space. ❒ You can register the path to the destination in the machine's address book. For details, see "Registering the Path to the Selected Destination in the Address Book". Reference p.54 "Registering the Path to the Selected Destination in the Address Book" 53
-
 1
1 -
2
-
3
-
4
-
5
-
6
-
7
-
8
-
9
-
10
-
11
-
12
-
13
-
14
-
15
-
16
-
17
-
18
-
19
-
20
-
21
-
22
-
23
-
24
-
25
-
26
-
27
-
28
-
29
-
30
-
31
-
32
-
33
-
34
-
35
-
36
-
37
-
38
-
39
-
40
-
41
-
42
-
43
-
44
-
45
-
46
-
47
-
48
-
49
-
50
-
51
-
52
-
53
-
54
-
55
-
 56
56 -
 57
57 -
 58
58 -
 59
59 -
 60
60 -
 61
61 -
 62
62 -
 63
63 -
 64
64 -
 65
65 -
 66
66 -
67
-
68
-
69
-
70
-
71
-
72
-
73
-
74
-
75
-
76
-
77
-
78
-
79
-
80
-
81
-
82
-
83
-
84
-
85
-
86
-
87
-
88
-
89
-
90
-
91
-
92
-
93
-
94
-
95
-
96
-
97
-
98
-
99
-
100
-
101
-
102
-
103
-
104
-
105
-
106
-
107
-
108
-
109
-
110
-
111
-
112
-
113
-
114
-
115
-
116
-
117
-
118
-
119
-
120
-
121
-
122
-
123
-
124
-
125
-
126
-
127
-
128
-
129
-
130
-
131
-
132
-
133
-
134
-
135
-
136
-
137
-
138
-
139
-
140
-
141
-
142
-
143
-
144
-
145
-
146
-
147
-
148
-
149
-
150
-
151
-
152
-
153
-
154
-
155
-
156
-
157
-
158
 |
 |
