Ricoh 3045 Scanner Reference - Page 115
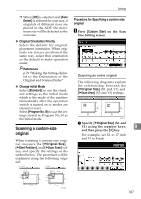
Scanning a custom-size original, Procedure for Specifying a custom-size original
 |
View all Ricoh 3045 manuals
Add to My Manuals
Save this manual to your list of manuals |
Page 115 highlights
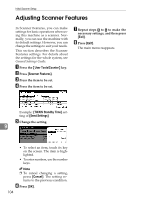
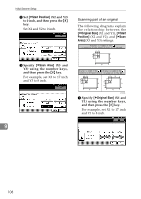
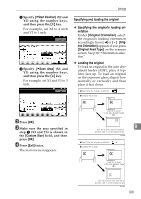
Settings ❒ When [Off] is selected and [Auto Detect] is selected for scan size, if originals of different sizes are placed in the ADF, the maximum size will be detected as the scan size. Procedure for Specifying a custom-size original A Press [Custom Size] on the Scan Size Setting screen. ❖ Original Orientation Priority Select the default for original placement orientation. When originals are always positioned the same way, select that orientation as the default to make operation easier. Reference p.79 "Making the Settings Related to the Orientation of the Original and Scanned Sides" ❖ Change Initial Mode Select [Standard] to use the standard settings as the initial mode which is the mode of the machine immediately after the operation switch is turned on or modes are cleared or reset. Select [Program No.10] to use the settings stored in Program No.10 as the initial mode. Scanning a custom-size original When scanning a custom-size original, measure the [VOriginal Size], [VStart Position], and [VScan Area] values, and specify the settings as described below. The procedure will be explained using the following original: Scanning an entire original The following diagrams explain the relationship between the [VOriginal Size] (X1 and Y1) and [VScan Area] (X3 and Y3) settings. AHU007S A Specify [VOriginal Size] (X1 and Y1) using the number keys, 9 and then press the {#} key. For example, set X1 to 17 inch and Y1 to 8 inch. AHY009S 107
-
 1
1 -
2
-
3
-
4
-
5
-
6
-
7
-
8
-
9
-
10
-
11
-
12
-
13
-
14
-
15
-
16
-
17
-
18
-
19
-
20
-
21
-
22
-
23
-
24
-
25
-
26
-
27
-
28
-
29
-
30
-
31
-
32
-
33
-
34
-
35
-
36
-
37
-
38
-
39
-
40
-
41
-
42
-
43
-
44
-
45
-
46
-
47
-
48
-
49
-
50
-
51
-
52
-
53
-
54
-
55
-
56
-
57
-
58
-
59
-
60
-
61
-
62
-
63
-
64
-
65
-
66
-
67
-
68
-
69
-
70
-
71
-
72
-
73
-
74
-
75
-
76
-
77
-
78
-
79
-
80
-
81
-
82
-
83
-
84
-
85
-
86
-
87
-
88
-
89
-
90
-
91
-
92
-
93
-
94
-
95
-
96
-
97
-
98
-
99
-
100
-
101
-
102
-
103
-
104
-
105
-
106
-
107
-
108
-
109
-
 110
110 -
 111
111 -
 112
112 -
 113
113 -
 114
114 -
 115
115 -
 116
116 -
 117
117 -
 118
118 -
 119
119 -
 120
120 -
121
-
122
-
123
-
124
-
125
-
126
-
127
-
128
-
129
-
130
-
131
-
132
-
133
-
134
-
135
-
136
-
137
-
138
 |
 |
