Ricoh IM 4000 Guide to Set Up OAuth 2.0 Authentication for Receiving Microsoft - Page 4
Click the [Start Authentication] button on [Exchange Online] OAuth 2.0 Fax Email Account.
 |
View all Ricoh IM 4000 manuals
Add to My Manuals
Save this manual to your list of manuals |
Page 4 highlights
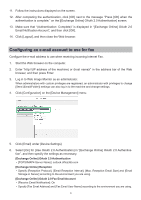
7. Click the [Start Authentication] button on "[Exchange Online] OAuth 2.0 Fax Email Account". 8. Make a note of the displayed code on the [OAuth 2.0 Authentication] screen. 9. Click [Microsoft] displayed on the [[Exchange Online] OAuth 2.0 Authentication] screen. The Microsoft authentication screen is displayed. 10. Enter the code in the Microsoft authentication screen to complete the authentication. 11. Follow the instructions displayed on the screen. 12. After completing the authentication, click [OK] next to the message "Press [OK] when the authentication is complete." on the [[Exchange Online] OAuth 2.0 Authentication] screen. 13. Make sure that "(Authentication: Complete)" is displayed in "[Exchange Online] OAuth 2.0 Fax Email Account ", and then click [OK]. 14. Click [Logout], and then close the Web browser. EN GB © 2022 EN US EN AU D0BK-7069 4
-
 1
1 -
 2
2 -
 3
3 -
 4
4
 |
 |
