Ryobi ES5500 Operation Manual - Page 4
Operation - stud finder
 |
View all Ryobi ES5500 manuals
Add to My Manuals
Save this manual to your list of manuals |
Page 4 highlights
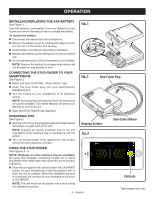
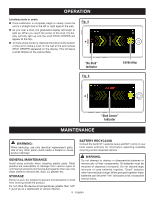
OPERATION INSTALLING/REPLACING THE AAA BATTERY See Figure 1. One AAA battery is preinstalled in the unit. Before first use, locate and remove the red pull tab to activate the battery. To replace the battery: Disconnect the device from the smartphone. Remove the battery cover by inserting the edge of a coin into the slot on the bottom and twisting. Install battery according to the polarity indicators. Replace the battery cover, making sure it is secure before use. Do not use the product without the battery cover installed. NOTE: Remove the battery for storage when device will not be used for long periods of time. Fig. 1 CONNECTING THE STUD FINDER TO YOUR SMARTPHONE See Figure 2. Select and open the RYOBI™ Phone Works™ app. Insert the stud finder plug into your smartphone's headphone jack. Turn the volume on your smartphone to its maximum setting. NOTE: Some phones have features that limit the amount of volume available. Turn these features off before you attempt to use the device. Open the STUD FINDER App Segment. Fig. 2 Stud Finder Plug StuSdensor OPERATING TIPS See Figure 2. Grip the unit only by the gripping surfaces located toward the bottom on each side of the unit. NOTE: Gripping the device anywhere else on the unit may lead to faulty readings due to interference with the sensor. The unit should remain firmly against the wall surface during the entire detection process. Gripping Surface Fig. 3 Stud Center Marker USING THE STUD FINDER See Figures 3 - 5. NOTE: Readings on some surfaces may be unreliable. Be aware that wallpaper containing metallic foil or fibers and plaster with metal mesh may cause the unit to function improperly. Place the unit against the wall and select the CALIBRATE button on your smartphone. Hold the product still to allow the unit to calibrate. When the calibration process is completed, the interface on your smartphone will return to CALIBRATE. NOTE: The unit must not be placed over a stud during the calibration process. 4 - English Calibrate *App images may vary
-
 1
1 -
 2
2 -
 3
3 -
 4
4 -
 5
5 -
 6
6
 |
 |
