Ryobi P20016BTLVNM Operation Manual 1
Ryobi P20016BTLVNM Manual
 |
View all Ryobi P20016BTLVNM manuals
Add to My Manuals
Save this manual to your list of manuals |
Ryobi P20016BTLVNM manual content summary:
- Ryobi P20016BTLVNM | Operation Manual 1 - Page 1
Instructions........... 2-3 Symbols 4 Features 5 Assembly 5-6 Operation 6-8 Maintenance 9 Troubleshooting 10 Parts Ordering/Service......... Back Page TABLE DES MATIÈRES Instructions must read and understand the operator's manual before using this product. AVERTISSEMENT : - Ryobi P20016BTLVNM | Operation Manual 1 - Page 2
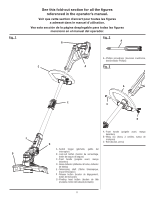
le manuel d'utilisation. Vea esta sección de la página desplegable para todas las figuras mencionó en el manual del operador. Fig. 2 A B A - Phillips screwdriver (tournevis cruciforme, destornillador Phillips) C A Fig. 3 F D A E C B A - Front handle (poignée avant, mango delantero) B - Wing - Ryobi P20016BTLVNM | Operation Manual 1 - Page 3
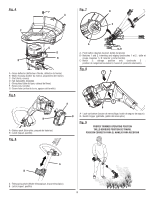
Fig. 4 C F Fig. 7 B A C G E D B D A - Grass deflector (déflecteur d'herbe, deflector de hierba) B - Motor housing (boîtier du moteur, alojamiento del motor) C - Slot (fente, ranura) D - Tab (languette, lengüeta) E - String head (tête de ligne, cabezal del línea) F - Screw (vis, tornillo) G - Ryobi P20016BTLVNM | Operation Manual 1 - Page 4
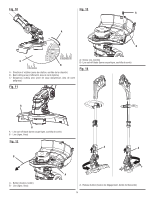
Fig. 10 Fig. 13 A A B C B A - Direction of rotation (sens de rotation, sentido de la rotación) B - Best cutting area (d'efficacité, área de corte óptima) C - Dangerous cutting area (zone de coup dangereuse, área de corte peligrosa) Fig. 11 A - Screw (vis, tornillo) B - Line cut-off blade (lame - Ryobi P20016BTLVNM | Operation Manual 1 - Page 5
Fig. 15 Fig. 16 A C F B E D A - Spool retainer (retenue de bobine, retén del carrete) B - Spool (bobine, carrete) C - Tabs (languettes, pestañas) D - Slot (fente, ranura) E - Eyelet (trou, agujero) F - Slot (fente, ranura) Fig. 17 A A - Slot (fente, ranura) v - Ryobi P20016BTLVNM | Operation Manual 1 - Page 6
INSTRUCTIONS For safe operation, read and understand all instructions before using this product. Follow all safety instructions. Failure to follow all safety instructions damaged should be properly repaired or replaced by an authorized service dealer. Make sure all guards, straps, deflectors and - Ryobi P20016BTLVNM | Operation Manual 1 - Page 7
pack or appliance outside of the temperature range specified in the instructions. Charging improperly or at temperatures outside of the specified range may damage the battery and increase the risk of fire. Have servicing performed by a qualified repair person using only identical replacement parts - Ryobi P20016BTLVNM | Operation Manual 1 - Page 8
Symbol Direct Current No Load Speed Per Minute Volts Hertz Minutes To reduce the risk of injury, user must read and understand operator's manual before using this product. Always wear eye protection with side shields marked to comply with ANSI Z87.1. Do not expose battery, battery compartment - Ryobi P20016BTLVNM | Operation Manual 1 - Page 9
or missing, please call 1-800-525-2579 for assistance. PACKING LIST String Trimmer/Edger Front Handle Grass Deflector 0.080 in. diameter Twisted Line Operator's Manual WARNING: If any parts are damaged or missing do not operate this product until the parts are replaced. Use of this product with - Ryobi P20016BTLVNM | Operation Manual 1 - Page 10
all fasteners and caps and do not operate this product until all missing or damaged parts are replaced. Please contact customer service or a qualified service center for assistance. INSTALLING/REMOVING BATTERY PACK See Figure 5. WARNING: Always remove battery pack from your tool when you are - Ryobi P20016BTLVNM | Operation Manual 1 - Page 11
OPERATION For complete charging instructions, refer to the Operator's Manuals for your battery pack and charger. WARNING: To avoid serious personal injury, always remove the battery pack and keep hands clear of the lock-out - Ryobi P20016BTLVNM | Operation Manual 1 - Page 12
Figure 12. Remove the battery pack. Push the button located on the string head while pulling on the line to manually advance the line. NOTE: Pull only enough line to reach the cut-off blade plus or minus an inch. After releasing the button, tug slightly - Ryobi P20016BTLVNM | Operation Manual 1 - Page 13
fasteners and caps and do not operate this product until all missing or damaged parts are replaced. Please contact customer service or a qualified service center for assistance. GENERAL MAINTENANCE Avoid using solvents when cleaning plastic parts. Most plastics are susceptible to damage from various - Ryobi P20016BTLVNM | Operation Manual 1 - Page 14
TROUBLESHOOTING PROBLEM Line will not advance when using the auto-feed head POSSIBLE manual. Cut tall grass from the top down to prevent wrapping. To secure the battery pack, make sure the latches on the battery pack are snapped into place. Charge the battery pack according to the instructions - Ryobi P20016BTLVNM | Operation Manual 1 - Page 15
NOTES - Ryobi P20016BTLVNM | Operation Manual 1 - Page 16
Pour travailler en toute sécurité, lire et veiller à bien comprendre toutes les instructions avant d'utiliser ce produit. Respecter toutes les instructions de sécurité. Le non respect des instructions de sécurité ci-dessous peut entraîner des blessures graves. Ne pas laisser des enfants - Ryobi P20016BTLVNM | Operation Manual 1 - Page 17
l'entretien, le nettoyage de l'produit de jardin, d'en retirer des matériaux, ou pendant de le ranger. codes locaux pour connaître toute instruction spéciale relative à l'élimination des piles. Ne pas altérer le bloc-piles. L'électrolyte est un produit corrosif pouvant causer des lésions cutan - Ryobi P20016BTLVNM | Operation Manual 1 - Page 18
SYMBOLES Les termes de mise en garde suivants et leur signification ont pour but d'expliquer le degré de risques associé à l'utilisation de ce produit. SYMBOLE SIGNAL SIGNIFICATION DANGER : Indique une situation dangereuse qui, si elle n'est pas évitée, aura pour conséquences des blessures - Ryobi P20016BTLVNM | Operation Manual 1 - Page 19
CARACTÉRISTIQUES FICHE TECHNIQUE Moteur 18 V C.C Largeur de coupe 254 mm/304,8 mm (10 po/12 po) Diamètre de ligne rond ou torsadé de 1,6 mm (0,065 po) de diamètre ou un fil monofilament torsadé de 2,0 mm (0,080 po) de diamètre VEILLER À BIEN CONNAÎTRE LA TAILLEBORDURE/TONDEUSE À FOUET Voir la - Ryobi P20016BTLVNM | Operation Manual 1 - Page 20
utiliser le produit tant que toutes les pièces manquantes ou endommagées n'ont pas été remplacées. Pour obtenir de l'aide, veuillez communiquer avec le service à la clientèle ou un centre de réparations qualifié. 6 - Français - Ryobi P20016BTLVNM | Operation Manual 1 - Page 21
UTILISATION RETRAIT/INSTALLATION DU BLOC-PILES Voir la figure 5. AVERTISSEMENT : Toujours retirer la pile de l'outil au moment d'assembler des pièces, d'effectuer des réglages et de procéder au nettoyage, ou lorsque l'outil n'est pas utilisé. Le fait de retirer la pile permet d'empêcher un dé - Ryobi P20016BTLVNM | Operation Manual 1 - Page 22
UTILISATION Contourner les arbres et buissons. L'écorce des arbres, les moulures en bois, le lambrissage et les piquets de palissades peuvent être endommagés par la ligne. AVANCE DE LIGNE DE COUPE Voir la figure 11. NOTE : Le taille-bordures est équipé avec une tête d'autonourrit. Frapper la tête - Ryobi P20016BTLVNM | Operation Manual 1 - Page 23
le produit tant que toutes les pièces manquantes ou endommagées n'ont pas été remplacées. Pour obtenir de l'aide, veuillez communiquer avec le Service à la clientèle ou un centre de réparations qualifié. ENTRETIEN GÉNÉRAL Éviter d'utiliser des solvants pour le nettoyage des pièces en plastique. La - Ryobi P20016BTLVNM | Operation Manual 1 - Page 24
. Le bloc-piles n'est pas chargée. Charger la pile conformément aux instructions fournis avec ce modèle. Raccordement de l'arbre incomplet S'assurer que l'extr concernant l'utilisation ou l'entretien utiliser ce produit, appeler le service d'assistance téléphonique Ryobi ! Le taille-bordures à été - Ryobi P20016BTLVNM | Operation Manual 1 - Page 25
NOTES - Ryobi P20016BTLVNM | Operation Manual 1 - Page 26
INSTRUCCIONES DE SEGURIDAD IMPORTANTES ¡ADVERTENCIA! Al utilizar herramientas eléctricas para el cuidado del jardín, con el fin de reducir el riesgo de incendio, descargas eléctricas y lesiones corporales, siempre deben seguirse ciertas medidas básicas de precaución. LEA TODAS LAS INSTRUCCIONES - Ryobi P20016BTLVNM | Operation Manual 1 - Page 27
INSTRUCCIONES DE SEGURIDAD IMPORTANTES Al usar la recortadora, sujétela firmemente por ambos mangos. Mantenga el cabezal del hilo por debajo del nivel de la cintura. Nunca corte con el cabezal del hilo a más de 762 mm (30 pulg.) del suelo. Guarde en el interior los artefactos que no esté usando - Ryobi P20016BTLVNM | Operation Manual 1 - Page 28
NOMBRE DENOMINACIÓN/EXPLICACIÓN Alerta de seguridad Indica un peligro posible de lesiones personales. Lea manual del operador Para reducir el riesgo de lesiones, el usuario debe leer y comprender el manual del operador antes de usar este producto. Protección ocular Alerta de condiciones húmedas - Ryobi P20016BTLVNM | Operation Manual 1 - Page 29
RECORTADORA DE BORDES Vea la figura 1. El uso seguro que este producto requiere la comprensión de la información impresa en la producto y en el manual del operador así como ciertos conocimientos sobre el proyecto a realizar. Antes de usar este producto, familiarícese con todas las características de - Ryobi P20016BTLVNM | Operation Manual 1 - Page 30
ARMADO ADVERTENCIA: Si hay piezas dañadas o faltantes, no utilice esta producto sin haber reemplazado las piezas dañadas o faltantes. La inobservancia de esta advertencia puede causar lesiones graves. ADVERTENCIA: No intente modificar esta producto ni hacer accesorios no recomendados para la - Ryobi P20016BTLVNM | Operation Manual 1 - Page 31
de aseguramiento. Para el desmontaje: Oprima los pestillos y extraer el paquete de baterías. Para obtener instrucciones específicas de carga, lea los manuales del operador que se incluye con el cargador y la batería. MANEJO DE LA RECORTADORA DE HILO/ RECORTADORA DE BORDES Vea la figura 9. Siga - Ryobi P20016BTLVNM | Operation Manual 1 - Page 32
de baterías. Deslice la botón de liberación que se encuentran ubicado cerca del cabezal de la recortadora de hilo. Reanude el recorte. AVANCE MANUAL DEL HILO Vea la figura 12. Retire el paquete de baterías. Gire la cabezal de la recortadora sentido horario hasta la posición de recortadora - Ryobi P20016BTLVNM | Operation Manual 1 - Page 33
MANTENIMIENTO ADVERTENCIA: Para evitar lesiones serias, siempre retire el paquete de baterías de la herramienta cuando la limpie o durante cualquier mantenimiento. ADVERTENCIA: Siempre póngase protección ocular con protección lateral con la marca de cumplimiento de la norma ANSI Z87.1. La - Ryobi P20016BTLVNM | Operation Manual 1 - Page 34
cabezal con alimentación automática No hay suficiente hilo en el carrete Vuelva a colocar el carrete. Vea la sección Reemplazo del carrete arriba en este manual. El hilo se desgastó hasta quedar Tire de hilo secuencias mientras que presiona el muy corto. botón. Vea las seccións Avance del hilo - Ryobi P20016BTLVNM | Operation Manual 1 - Page 35
NOTAS - Ryobi P20016BTLVNM | Operation Manual 1 - Page 36
OBTAIN CUSTOMER OR TECHNICAL SUPPORT: To obtain customer or technical support please contact us at 1-800-525-2579. RYOBI is a registered trademark of Ryobi Limited and is used pursuant to a license granted by Ryobi Limited. • PIÈCES ET SERVICE : Avant de faire la demande de service ou l'achat de pi
-
 1
1 -
 2
2 -
 3
3 -
 4
4 -
 5
5 -
 6
6 -
 7
7 -
8
-
9
-
10
-
11
-
12
-
13
-
14
-
15
-
16
-
17
-
18
-
19
-
20
-
21
-
22
-
23
-
24
-
25
-
26
-
27
-
28
-
29
-
30
-
31
-
32
-
33
-
34
-
35
-
36
 |
 |
OPERATOR’S MANUAL
MANUEL D’UTILISATION
MANUAL DEL OPERADOR
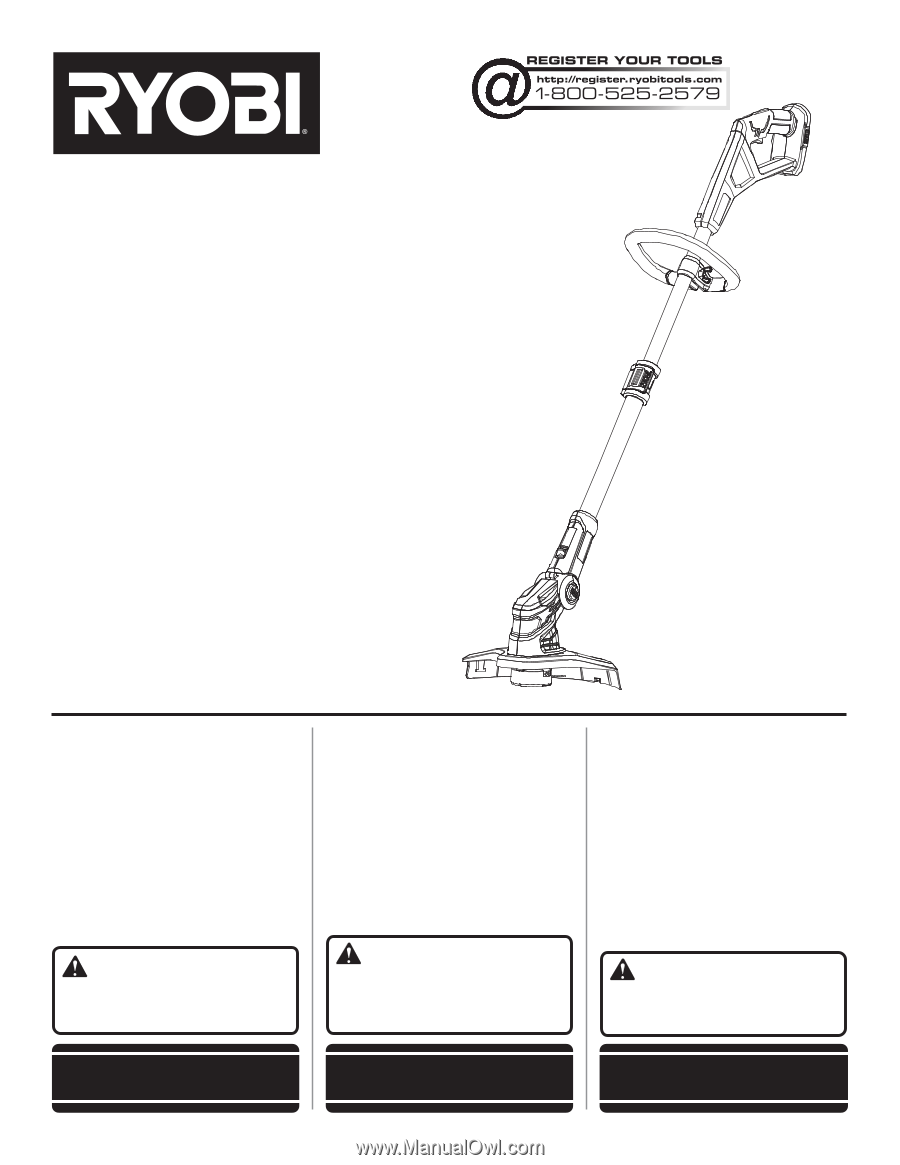
18 VOLT STRING TRIMMER/EDGER
18 V TAILLE-BORDURE/TONDEUSE À FOUET
18 V RECORTADORA DE HILO/
RECORTADORA DE BORDES
P20023
WARNING:
To reduce the
risk of injury, the user must read and
understand the operator’s manual
before using this product.
TABLE OF CONTENTS
Important Safety Instructions
..........
2-3
Symbols
..............................................
4
Features
..............................................
5
Assembly
........................................
5-6
Operation
........................................
6-8
Maintenance
.......................................
9
Troubleshooting
................................
10
Parts Ordering/Service
........
Back Page
AVERTISSEMENT :
Pour
réduire les risques de blessures,
l’utilisateur doit lire et veiller à bien
comprendre le manuel d’utilisation avant
d’employer ce produit.
TABLE DES MATIÈRES
Instructions importantes concernant la
sécurité
...........................................
2-3
Symboles
............................................
4
Caractéristiques
..................................
5
Assemblage
....................................
5-6
Utilisation
........................................
6-8
Entretien
..............................................
9
Dépannage
........................................
10
Commande de pièces /
réparation
..........................
Páge arrière
ADVERTENCIA:
Para reducir
el riesgo de lesiones, el usuario debe leer
y comprender el manual del operador
antes de usar este producto.
ÍNDICE DE CONTENIDO
Instrucciones de seguridad
importantes
.....................................
2-3
Símbolos
.............................................
4
Características
....................................
5
Armado
...........................................
5-6
Funcionamiento
..............................
6-8
Mantenimiento
....................................
9
Corrección de problemas
.................
10
Pedidos de piezas/
servicio
...........................
Pág. posterior
SAVE THIS MANUAL FOR
FUTURE REFERENCE
CONSERVER CE MANUEL
POUR FUTURE RÉFÉRENCE
GUARDE ESTE MANUAL
PARA FUTURAS CONSULTAS